はじめに
今回、Teams へ Azure Bot Service を使用して ProActive メッセージを送る手順をまとめてみました。
一応、公式の GitHub の sample にもあります。
ちょっと違うのが、Http Request を postにしていることです。
今回は(も)Node.js を使用していきます。
また、コードは Github にあげるほどはないので、記事内にペタペタしときます。
また、Azure Bot Service の sample の試し方やDeploy方法は過去の以下の記事を参考にしていただけると嬉しいです!
- local test 方法まで
- Azure へのDeployなど
ProActive メッセージを post で送信する際に必要な情報
基本的には body にconversation reference という情報が必要になります。
conversation reference には多くの情報があるのですが、以下の4つを最低限含めてあげたら大丈夫です。なので、ここから内容では基本的に以下の4つのみに注目して書きます。
{"ref":{"conversation":{"id":""},"bot":{"id":"","name":""},"serviceUrl":""}}基本的に、この形式を入れてあげたら、他にどんな情報でも自由に足してあげたら大丈夫です!
この辺の情報は chat ごとに作られます。ので、Teamsのこれらの情報がは特に大事にしてください。
もとにした
今回は硬式sample の EchoBot の一部を編集します。
こちらから手元に落としてください
編集したのは
- index.js
- bot.js
の2つです。
まずは、サーバを起動する index.js の方を編集します。
下の折り畳みにコードが書いてるので、コピペでおkです。
index.js の全体
// Copyright (c) Microsoft Corporation. All rights reserved.// Licensed under the MIT License.constdotenv=require('dotenv');constpath=require('path');constrestify=require('restify');// Import required bot services.// See https://aka.ms/bot-services to learn more about the different parts of a bot.const{BotFrameworkAdapter}=require('botbuilder');// This bot's main dialog.const{EchoBot}=require('./bot');// Import required bot configuration.constENV_FILE=path.join(__dirname,'.env');dotenv.config({path:ENV_FILE});// Create HTTP serverconstserver=restify.createServer();server.listen(process.env.port||process.env.PORT||3978,()=>{// Importantserver.use(restify.plugins.bodyParser({mapParams:true}));console.log(`\n${server.name} listening to ${server.url}`);console.log('\nGet Bot Framework Emulator: https://aka.ms/botframework-emulator');console.log('\nTo talk to your bot, open the emulator select "Open Bot"');});// Create adapter.// See https://aka.ms/about-bot-adapter to learn more about how bots work.constadapter=newBotFrameworkAdapter({appId:process.env.MicrosoftAppId,appPassword:process.env.MicrosoftAppPassword});// Catch-all for errors.constonTurnErrorHandler=async(context,error)=>{// This check writes out errors to console log .vs. app insights.// NOTE: In production environment, you should consider logging this to Azure// application insights.console.error(`\n [onTurnError] unhandled error: ${error}`);// Send a trace activity, which will be displayed in Bot Framework Emulatorawaitcontext.sendTraceActivity('OnTurnError Trace',`${error}`,'https://www.botframework.com/schemas/error','TurnError');// Send a message to the userawaitcontext.sendActivity('The bot encountered an error or bug.');awaitcontext.sendActivity('To continue to run this bot, please fix the bot source code.');};// Set the onTurnError for the singleton BotFrameworkAdapter.adapter.onTurnError=onTurnErrorHandler;// Create the main dialog.constmyBot=newEchoBot();// Listen for incoming requests.server.post('/api/messages',(req,res)=>{adapter.processActivity(req,res,async(context)=>{// Route to main dialog.awaitmyBot.run(context);});});// Listen for Upgrade requests for Streaming.server.on('upgrade',(req,socket,head)=>{// Create an adapter scoped to this WebSocket connection to allow storing session data.conststreamingAdapter=newBotFrameworkAdapter({appId:process.env.MicrosoftAppId,appPassword:process.env.MicrosoftAppPassword});// Set onTurnError for the BotFrameworkAdapter created for each connection.streamingAdapter.onTurnError=onTurnErrorHandler;streamingAdapter.useWebSocket(req,socket,head,async(context)=>{// After connecting via WebSocket, run this logic for every request sent over// the WebSocket connection.awaitmyBot.run(context);});});// add to echo sample// Listen for incoming notifications and send proactive messages to users.server.post('/api/notify',async(req,res)=>{awaitMicrosoftAppCredentials.trustServiceUrl(req.body.ref.serviceUrl);awaitadapter.continueConversation(req.body.ref,asyncturnContext=>{// console.dir(req.body.ref.serviceUrl);awaitturnContext.sendActivity('ProActive Hello!');});res.setHeader('Content-Type','text/html');res.writeHead(200);res.write('<html><body><h1>Proactive messages have been sent.</h1></body></html>');// res = JSON.stringify(req);res.end();});
注意すべきは server.listen の部分で restify のプラグインを追加しているところ、server.post のエンドポイントを実装しているところです。 また、Loacalでテストする際にはawait MicrosoftAppCredentials.trustServiceUrl(req.body.ref.serviceUrl);の部分をコメントアウトしてないとエラーが出るかもです(確かここはTeams上で実行するのに必要な部分)
----抜粋----// Create HTTP serverconstserver=restify.createServer();server.listen(process.env.port||process.env.PORT||3978,()=>{// Importantserver.use(restify.plugins.bodyParser({mapParams:true}));console.log(`\n${server.name} listening to ${server.url}`);console.log('\nGet Bot Framework Emulator: https://aka.ms/botframework-emulator');console.log('\nTo talk to your bot, open the emulator select "Open Bot"');});----post処理部分----// Listen for incoming notifications and send proactive messages to users.server.post('/api/notify',async(req,res)=>{awaitMicrosoftAppCredentials.trustServiceUrl(req.body.ref.serviceUrl);awaitadapter.continueConversation(req.body.ref,asyncturnContext=>{// console.dir(req.body.ref.serviceUrl);awaitturnContext.sendActivity('ProActive Hello!');});res.setHeader('Content-Type','text/html');res.writeHead(200);res.write('<html><body><h1>Proactive messages have been sent.</h1></body></html>');// res = JSON.stringify(req);res.end();});次に、Bot.js を編集します。
こちらは、Bot との会話のやり取りをするときに使用しています。
今回は、ProActive メッセージを送ることのフォーカスしているので、
あんまり実装はしてませんが、ConverstaionReference を取得するのに少し編集してます。
bot.js の全体
// Copyright (c) Microsoft Corporation. All rights reserved.// Licensed under the MIT License.const{ActivityHandler,MessageFactory}=require('botbuilder');// add to echo sampleconst{TurnContext}=require('botbuilder');classEchoBotextendsActivityHandler{constructor(){super();// See https://aka.ms/about-bot-activity-message to learn more about the message and other activity types.this.onMessage(async(context,next)=>{// add echo sample fromconstcvid=this.getConversationReference(context.activity);console.dir(cvid)varmsg=`Your Info`;awaitcontext.sendActivity(msg);msg="- conversation reference:"+cvid.conversation.id+"\n\n";msg+="- Bot id:"+cvid.bot.id+"\n\n";msg+="- Bot name:"+cvid.bot.name+"\n\n";msg+="- Service URL:"+cvid.serviceUrl+"\n\n";console.log(msg);awaitcontext.sendActivity(msg);// to hereawaitnext();});this.onMembersAdded(async(context,next)=>{constmembersAdded=context.activity.membersAdded;constwelcomeText='Hello and welcome!';for(letcnt=0;cnt<membersAdded.length;++cnt){if(membersAdded[cnt].id!==context.activity.recipient.id){awaitcontext.sendActivity(MessageFactory.text(welcomeText,welcomeText));}}// By calling next() you ensure that the next BotHandler is run.awaitnext();});}// add echo sample fromgetConversationReference(activity){// ConversationReference の取得constconversationReference=TurnContext.getConversationReference(activity);returnconversationReference;}// to here}module.exports.EchoBot=EchoBot;
大した長さがないですが、
// add to echo sampleconst{TurnContext}=require('botbuilder');というのを忘れがちなので一応抜粋しておきます。
(もしかしたら、このmoduleを足さなくても別の方法でも実装できるかもです。)
(もしあれば教えてください(笑))
とりあえず、一度 Local でテストしてみましょう。
やり方は最初にも言いましたが、これを参考にしてください。
Emulator で実行して何かしら話しかけたらこんな感じで返してくれます。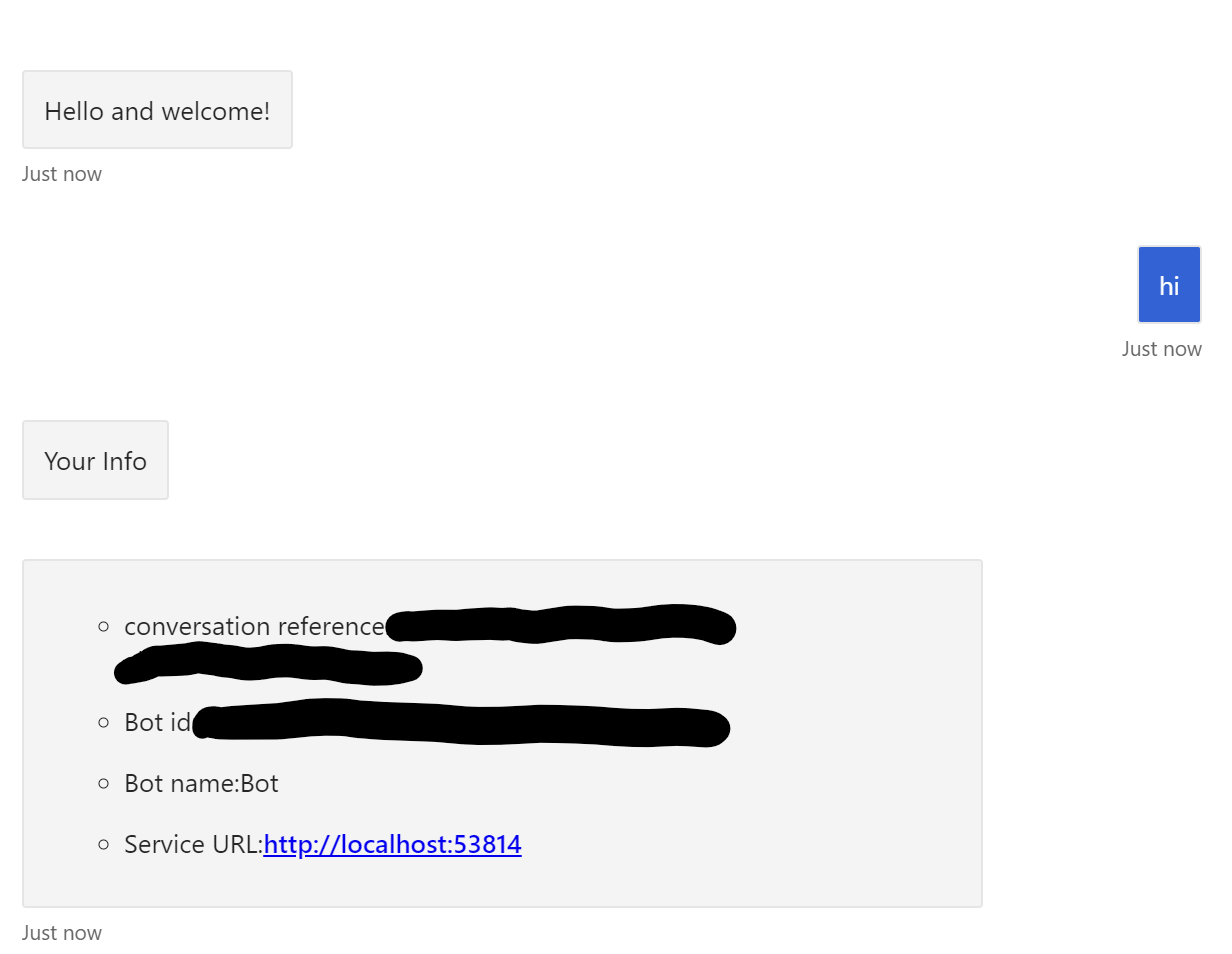
ちなみに、Emulator だと ServiceURL や id がEmulatorを更新するたびに変更されるので注意してくださいね。そして、上記の body.json にBotから変えてきた情報を入れて post してあげると
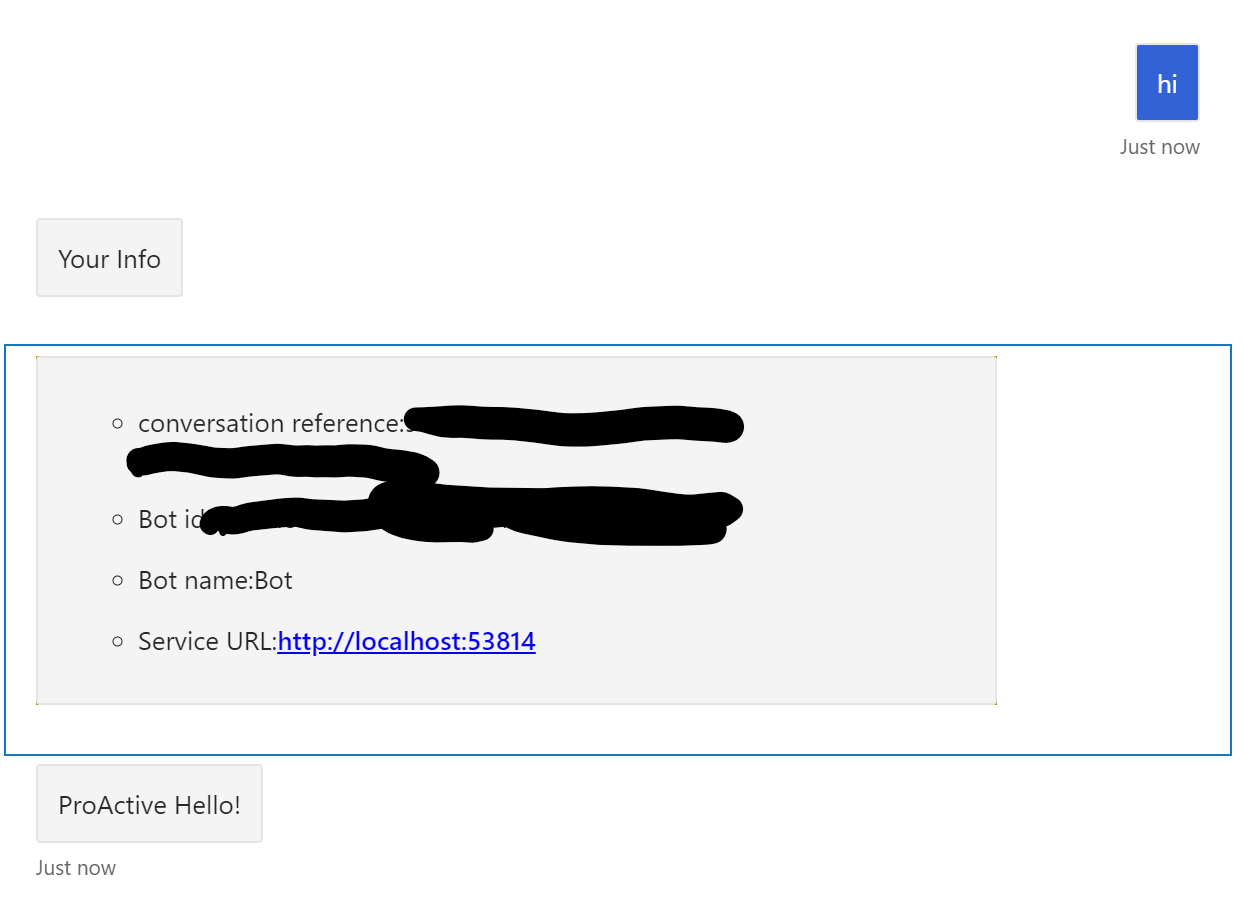
こうなります!ちゃんと PoroActive にメッセージが送られてきてますね!
後は、AzureにBotをDeployして、Teamsとの接続を確認しましょう。
例によって、Azure へのDeployなどはこちらから確認してください(笑)
さて、Deploy が済んだら、BotServiceのリソースに移動して、チャンネルから、Teamsを選んでください。(私のはすでにchannelが出来ているので、少し表示されている場所は違うかと思いますが)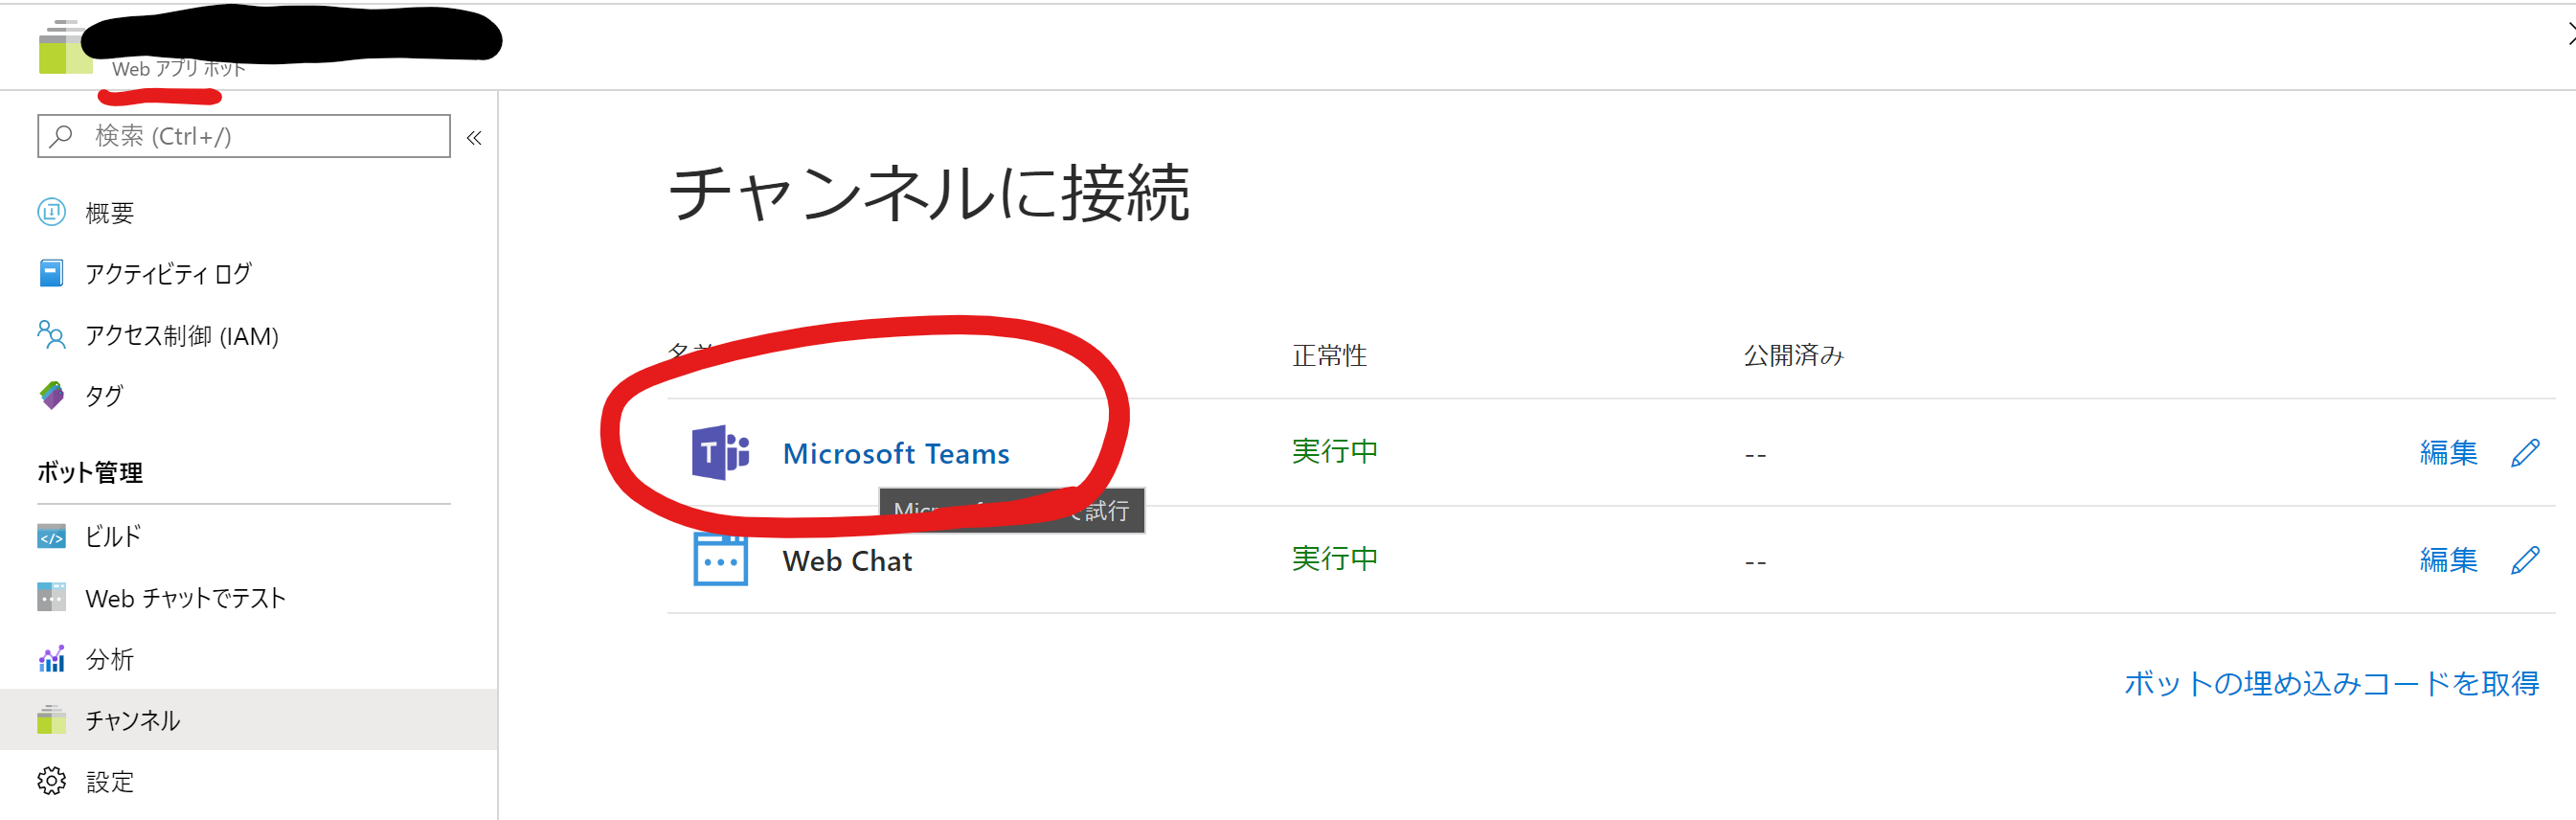
ここをクリックして、画面の指示通りに何回かクリックしたら、Teams を Web かデスクトップアプリで開くように指示されますので、開いてください。そしたら、先ほどまで作成していた Bot とのChat が出来ているはずです。
ここまで来たらもう少しです。Teams に Proactive メッセージを送る際のpost Request の URL は App Service のEndpointを指定してあげてください。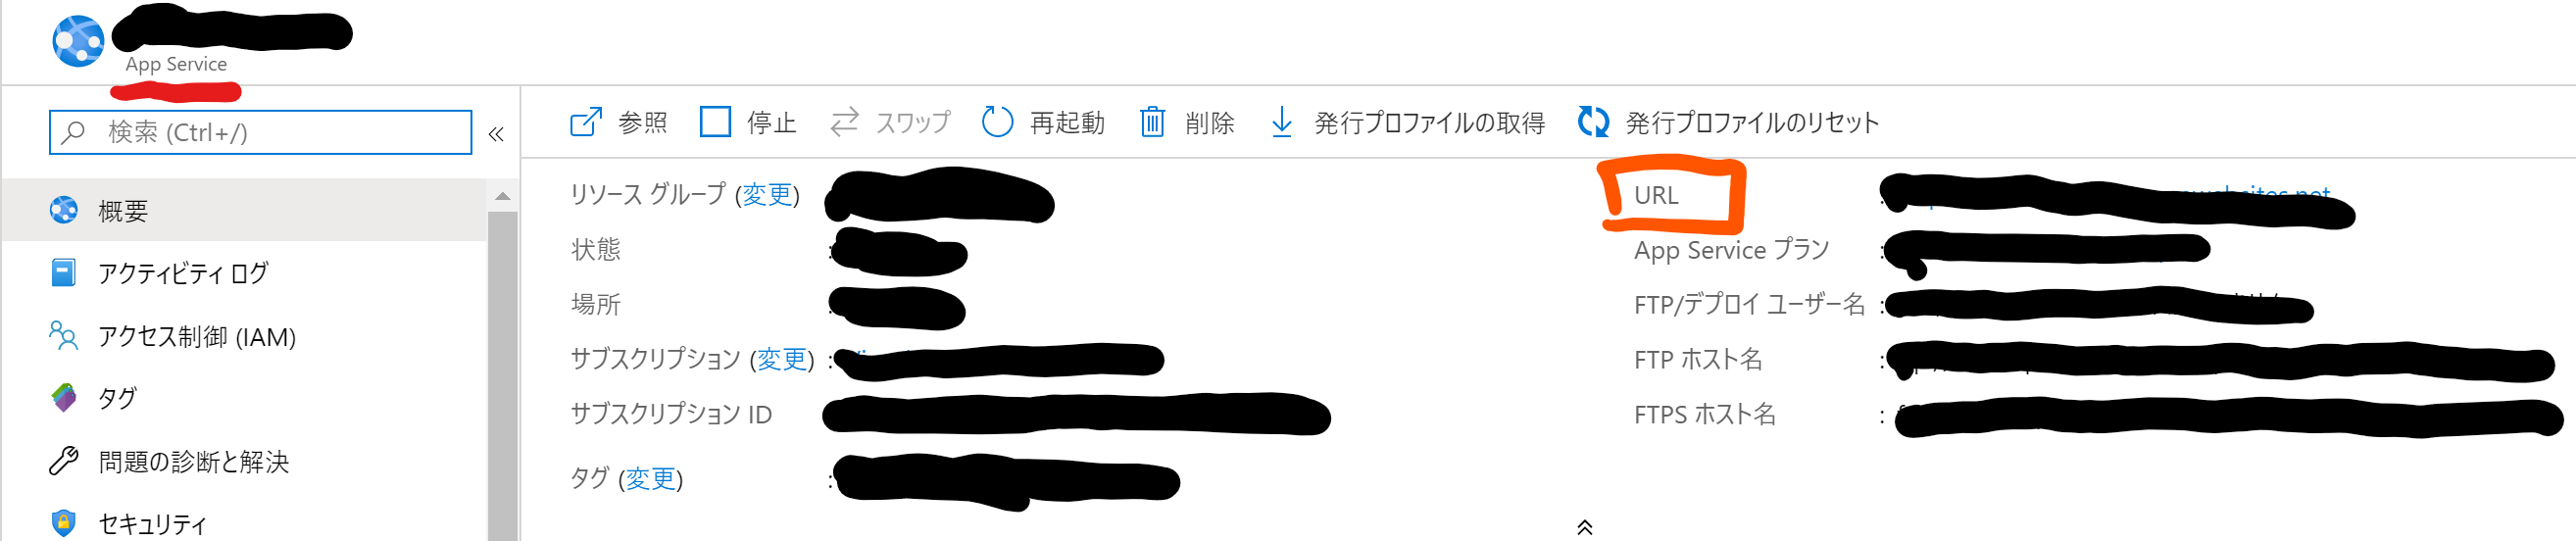
この画像の右上にある URL ですね。
以上です!いろいろとつたない文章でしたが、ご興味があります方はぜひお試しくださいな!