始めに
この記事は、 WebAuthn を使用したユーザの登録フローに関する学習メモです。
作成したソースコード一式はこちらに格納しておきます。
FIDO2 について
TL; DR
FIDOという非営利団体が推進する認証技術、規格のこと
生体認証などで用いられるような専用の機器が不要
FIDO2 = WebAuthn + CTAP
W3C WebAuthn
FIDO認証のサポートを可能にするためにブラウザおよびプラットフォームに組み込まれている標準Web APIのこと。登録と認証の機能を持つ。
navigator.credentials.create():publicKeyオプションと併用すると、新規に認証情報を作成します。navigator.credentials.get():publicKeyオプションと併用すると、既存の認証情報を取得します。
CTAP(Client to Authentication Protocol)
名前の通り、クライアントと認証器の通信プロトコルです。
認証サーバを実装する上では、CTAPの仕様に関する理解は不要ですが、覗いてみると結構楽しいです。
仕組みの概要
FIDOのプロトコルでは、標準的な公開鍵暗号方式を用いて、認証を実現しています。
以下、基本的な処理シーケンス。

- クライアントとサーバ間でパスワード等の認証情報をやり取りしないため、従来のID/Password方式の認証方式よりも安全だと言われている。
- クライアント側に認証に必要な秘密鍵を保持することで、ユーザがパスワードを記憶する必要がない。
- 認証に使用する端末を紛失した場合は、パスワードの紛失と同じようにセキュリティリスクが存在する。
サービスの認証にFIDO2を導入するためには
- 認証サーバを自作する
- 有料のサービスを使用する
と、2通りの方法がありますが今回は学習目的のため、自分で実装します。
認証サーバ(Relying Party)を自作してみる
実装言語・FW
- 認証サーバ;Nest.js v6.13.3
- クライアント;Angular v9.0.4
- Database;MongoDB
のMANスタックで実装してみました。お好きな言語、FWで作ってみてください。
登録の処理シーケンス
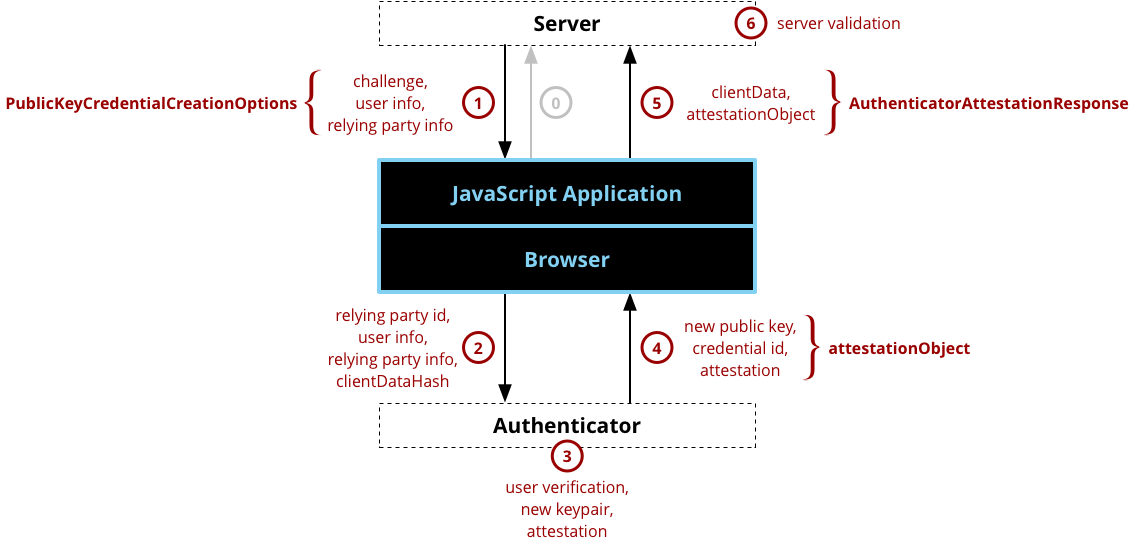
※MDMより引用
処理概要
認証サーバに対して、challengeの生成をリクエストする。
認証サーバで生成したchallenge, ユーザ情報、サーバの情報をクライアントにレスポンスする。
取得したデータを元にパラメータを組み立て、
navigator.credentials.create()を呼び出す。非対称鍵ペア(公開鍵と秘密鍵)とAttestationを生成する。(Attestation; 公開鍵がユーザが所持する認証器から生成されたものであることを保証するための仕組み)
生成したデータをクライアントに返却する。
認証器から取得した認証情報をサーバに送信する。
認証情報の検証を行う。
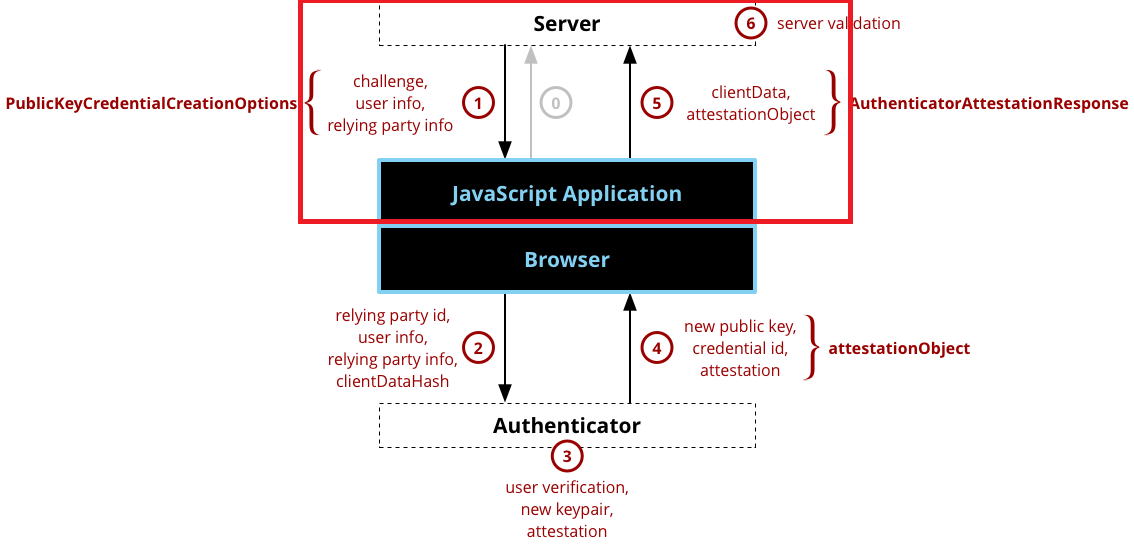
WebAuthnで規定されていない箇所(上図の0, 1, 5, 6)に関しては自分で仕様を考えて実装する必要があります。
従って、今回作成するのは以下の赤枠部分となります。(認証サーバとJavaScript Application)
実装のポイント
全部を載せると、とんでもな量になってしまうのでかいつまんでポイントを説明します。実装の細かい点は、リポジトリを参照してください。
0. challengeの生成リクエスト ~ 1. challenge、ユーザ情報、サーバ情報のレスポンス
WebAuthnによって仕様が定義されているわけではないため、自分で設計をする必要があります。
今回は、クライアントから以下のようなリクエストを発行してみました。
POSThttp://localhost:3000/webauthn/registerHTTP/1.1Content-Type:application/json{"email":"test-user-001@example.com"}それを受ける認証サーバは以下のように実装しています。
@Controller('webauthn')exportclassWebauthnController{constructor(privatereadonlywebauthnSercice:WebauthnService){}/**
   * challenge生成のエンドポイントです。
   * @param createUserDto リクエストボディー
*/@Post('/register')asyncregister(@Body()createUserDto:CreateUserDto):Promise<ResponseData>{constuserCreationOptions=awaitthis.webauthnSercice.createUserCreationOptions(createUserDto);if(!userCreationOptions){thrownewHttpException({status:HttpStatus.INTERNAL_SERVER_ERROR,error:'database error.',},HttpStatus.INTERNAL_SERVER_ERROR);}constresponseData=newResponseData();responseData.status=HttpStatus.CREATED;responseData.data=userCreationOptions;returnresponseData;}// ... 省略}@Injectable()exportclassWebauthnService{privatereadonlyORIGIN='http://localhost:4200';constructor(@InjectModel('User')privateuserModel:Model<User>){}/**
* 認証器が鍵の生成に必要なパラメータを生成します。
* @param createUserDto リクエストボディー
*/asynccreateUserCreationOptions(createUserDto:CreateUserDto):Promise<UserCreationOptions>{// 少なくとも16バイト以上のランダムに生成されたバッファーを生成するconstchallenge=Buffer.from(Uint8Array.from(uuid(),c=>c.charCodeAt(0)));constuserId=Buffer.from(Uint8Array.from(uuid(),c=>c.charCodeAt(0)));constuserCreationOptions:UserCreationOptions={email:createUserDto.email,challenge:base64url.encode(challenge),rp:{name:'webauthn-server-nestjs-sample',},user:{id:base64url.encode(userId),name:createUserDto.email,displayName:createUserDto.email,},attestation:'direct',};// DBに保存するconstsaveResult=awaitthis.saveUser(userCreationOptions);if(!saveResult){returnnull;}returnuserCreationOptions;}/**
* ユーザをDBに保存します。
* @param userCreationOptions ユーザの認証情報
*/privateasyncsaveUser(userCreationOptions:UserCreationOptions):Promise<User>{// ユーザが保存済みがどうか確認するconstuser=awaitthis.userModel.findOne({email:userCreationOptions.email}).exec();if(user){thrownewHttpException({status:HttpStatus.CONFLICT,error:'user already exists.',},HttpStatus.CONFLICT);}constnewUser=newthis.userModel(userCreationOptions);returnnewUser.save();}}ポイントは2つあります。
- challengeは、認証サーバで生成する。また、生成するchallengeは、少なくとも16バイト以上でランダムに生成されたバッファであること。
これを満たすために、今回はuuid(v4)を元にバッファを生成しています。
constchallenge=Buffer.from(Uint8Array.from(uuid(),c=>c.charCodeAt(0)));- 特に定められていないが、レスポンスはWebAuthn APIで扱いやすい形式で返却するほうが望ましい。
これを踏まえて、今回は以下のようなレスポンスをクライアントに返却しています。
HTTP/1.1201CreatedX-Powered-By:ExpressContent-Type:application/json; charset=utf-8Content-Length:333ETag:W/"14d-LWc+sLb+7AIGIewNEbfdcmI1pHw"Date:Mon, 01 Jun 2020 14:28:49 GMTConnection:close{"status":201,"data":{"email":"test-user-001@example.com","challenge":"MTJjMGUzMmEtMzM3My00ODAzLThiMTMtZGU3YmFhMzdhZWY5","rp":{"name":"webauthn-server-nestjs-sample"},"user":{"id":"MjA4YTI3NWQtYmFhYi00ZDQyLTliODEtMWNmMzQ1NjMxYTY1","name":"test-user-001@example.com","displayName":"test-user-001@example.com"},"attestation":"direct"}}| パラメータ | 概要説明 |
|---|---|
| challenge | 署名の正当性を検証するためのランダムな文字列。サーバで生成したランダムバッファをbase64urlエンコードしたもの。 |
| rp | 認証サーバの情報 |
| user | ユーザの登録情報 |
| attestation | 認証からCredentialをどのように受け取るかを記したもの。directの他にもnoneやindirectといったパラメータが存在する。詳細は、Attestation Conveyance Preference Enumerationを参照してください。 |
2. navigator.credentials.create()呼び出し ~ 5. サーバに送信
認証サーバから取得したデータを元にnavigator.credentials.create()呼び出しに必要なパラメータを作成します。
// challengeの生成要求constregisterResponse=awaitthis.createChallenge(email);// navigator.credentials.create()呼び出しのために必要なパラメータの組み立てconstpublicKeyCredentialCreationOptions:PublicKeyCredentialCreationOptions={challenge:Buffer.from(base64url.decode(registerResponse.data.challenge)),rp:registerResponse.data.rp,user:{id:Buffer.from(base64url.decode(registerResponse.data.user.id)),name:registerResponse.data.user.name,displayName:registerResponse.data.user.displayName,},attestation:registerResponse.data.attestation,pubKeyCredParams:[{type:'public-key'as'public-key',alg:-7,}],authenticatorSelection:{authenticatorAttachment:'cross-platform',requireResidentKey:false,userVerification:'discouraged'}};// ... 省略| パラメータ | 概要説明 |
|---|---|
| pubKetCredParams | 認証器の鍵作成に用いるアルゴリズムを指定する。今回は、-7 (ECDSA-SHA256)を指定しています。 |
| authenticatorSelection | 認証器の種類を限定できる。今回は、Yubikeyのようなクロスプラットフォームの認証器を使用したかったため、cross-platformを指定しています。 |
navigator.credentials.create()を呼び出し、そのレスポンスを認証サーバに送信する。という一連の流れが以下になります。
@Injectable({providedIn:'root'})exportclassSignUpService{constructor(privatereadonlyhttpClient:HttpClient){}/**
   * ユーザの登録処理を実行します。
   * @param email メールアドレス
   */asyncsignUp(email:string):Promise<boolean>{// challengeの生成要求constregisterResponse=awaitthis.createChallenge(email);// `navigator.credentials.create()呼び出しのために必要なパラメータの組み立てconstpublicKeyCredentialCreationOptions:PublicKeyCredentialCreationOptions={challenge:Buffer.from(base64url.decode(registerResponse.data.challenge)),rp:registerResponse.data.rp,user:{id:Buffer.from(base64url.decode(registerResponse.data.user.id)),name:registerResponse.data.user.name,displayName:registerResponse.data.user.displayName,},attestation:registerResponse.data.attestation,pubKeyCredParams:[{type:'public-key'as'public-key',alg:-7,}],authenticatorSelection:{authenticatorAttachment:'cross-platform',requireResidentKey:false,userVerification:'discouraged'}};// 明示的にPublicKeyCredentialにキャストするconstattestationObject=awaitthis.createAttestationObject(publicKeyCredentialCreationOptions)asPublicKeyCredential;console.log(attestationObject);// 公開鍵をサーバに送信するreturnthis.registerPublicKey(attestationObject);}/**
   * WebAuthn認証サーバに対して、チャレンジの生成要求を行います。
   * @param email メールアドレス
   */privateasynccreateChallenge(email:string):Promise<User>{constregisterResponse=awaitthis.httpClient.post<User>(Uri.USER_REGISTER,{email},{headers:{'Content-Type':'application/json'},observe:'response',}).toPromise();console.log(registerResponse.body);returnregisterResponse.body;}/**
   * 認証器に対して公開鍵の生成要求を行います。
   * @param publicKeyCreationOptions 認証情報生成オプション
   */privateasynccreateAttestationObject(publicKeyCreationOptions:PublicKeyCredentialCreationOptions):Promise<Credential>{returnnavigator.credentials.create({publicKey:publicKeyCreationOptions});}/**
   * 認証情報をBase64Urlエンコードして認証サーバにPOSTします。
   * @param credential 認証器で生成した認証情報
   */privateasyncregisterPublicKey(publicKeyCredential:PublicKeyCredential):Promise<boolean>{constattestationResponse=awaitthis.httpClient.post(Uri.ATTESTATION_RESPONSE,{rawId:base64url.encode(Buffer.from(publicKeyCredential.rawId)),response:{attestationObject:base64url.encode(Buffer.from(publicKeyCredential.response.attestationObject)),clientDataJSON:base64url.encode(Buffer.from(publicKeyCredential.response.clientDataJSON)),},id:publicKeyCredential.id,type:publicKeyCredential.type},{headers:{'Content-Type':'application/json'},observe:'response'}).toPromise();returnattestationResponse.body?true:false;}}
6. 認証情報のチェック
クライアントから以下のようなリクエストが送信されてきます。
POSThttp://localhost:3000/webauthn/responseHTTP/1.1Content-Type:application/json{"rawId":"MLzRnn5P7mRPTK5sATEmKiJfhvV1TJgGXHCbWu3mKrcSZW-oZQ4LwZ3kqeN6KRfESWDbJfv8EXdXHr53XhOQiAvV1Gti4XR9gJaQY45HQK_xw98VxP7e9EnOLjdi6_5a3nLs4lAkQjJ1TqY4IJBnFNSbue7nUAotIQ6kD3ubYR5S","response":{"attestationObject":"o2NmbXRoZmlkby11MmZnYXR0U3RtdKJjc2lnWEcwRQIgO3T6_LkyjbSDnIyWX29oe7dUflpm6nt2BB9U1sdVcTwCIQDacpQ3-TAMhaTsFPM039VvjHqSQDUFzC_YaYHkk88v72N4NWOBWQKpMIICpTCCAkqgAwIBAgIJANhaddxx4y8sMAoGCCqGSM49BAMCMIGlMQswCQYDVQQGEwJDTjESMBAGA1UECAwJR3Vhbmdkb25nMREwDwYDVQQHDAhTaGVuemhlbjEzMDEGA1UECgwqU2hlbnpoZW4gRXhjZWxzZWN1IERhdGEgVGVjaG5vbG9neSBDby4gTHRkMR4wHAYDVQQLDBVFeGNlbHNlY3UgRmlkbyBTZXJ2ZXIxGjAYBgNVBAMMEUV4Y2Vsc2VjdSBGaWRvIENBMB4XDTE4MDExOTAzNDY1OVoXDTI4MDExNzAzNDY1OVowgawxCzAJBgNVBAYTAkNOMRIwEAYDVQQIDAlHdWFuZ2RvbmcxETAPBgNVBAcMCFNoZW56aGVuMTMwMQYDVQQKDCpTaGVuemhlbiBFeGNlbHNlY3UgRGF0YSBUZWNobm9sb2d5IENvLiBMdGQxHjAcBgNVBAsMFUV4Y2Vsc2VjdSBGaWRvIFNlcnZlcjEhMB8GA1UEAwwYRXhjZWxzZWN1IEZpZG8gVTJGIDAwMDAyMFkwEwYHKoZIzj0CAQYIKoZIzj0DAQcDQgAEtwOC4SZp2EpDMVxiZS-P_2wp_ZBNMEFKTruWGdg38qM4r_jT5r_a1vxW0UN89LFY1m1BpXuUAeeCn36DriitcaNaMFgwCQYDVR0TBAIwADALBgNVHQ8EBAMCB4AwHQYDVR0OBBYEFERWGpXZomZNMqJn2_6GzguxnlkmMB8GA1UdIwQYMBaAFKyJLw-sy4g7nHYTZwKpZqyJzZ-bMAoGCCqGSM49BAMCA0kAMEYCIQCpPai4VwA59-PiHq8SYjS9qcffQD-3oFnfR9njRpY5UwIhAMlMszhSeaf0xaAPC48ZYSB_ZeZ8vgnkQOFjfctD_EFmaGF1dGhEYXRhWQEFSZYN5YgOjGh0NBcPZHZgW4_krrmihjLHmVzzuoMdl2NBAAAAAAAAAAAAAAAAAAAAAAAAAAAAgTC80Z5-T-5kT0yubAExJioiX4b1dUyYBlxwm1rt5iq3EmVvqGUOC8Gd5KnjeikXxElg2yX7_BF3Vx6-d14TkIgL1dRrYuF0fYCWkGOOR0Cv8cPfFcT-3vRJzi43Yuv-Wt5y7OJQJEIydU6mOCCQZxTUm7nu51AKLSEOpA97m2EeUqUBAgMmIAEhWCBwt4oPucNcbc8PIR7gFdM9tWAr0NCKc9HjzPvB4h0wvSJYIK09jRBM_VY8ms4y5pnsfURZjwTcvmu6noWK7GXpCNxy","clientDataJSON":"eyJ0eXBlIjoid2ViYXV0aG4uY3JlYXRlIiwiY2hhbGxlbmdlIjoiWlRjNE4yUTNZbUV0TUROaU15MDBaVGxtTFdFek1EWXROamhtTTJRek1UQXdPV1JpIiwib3JpZ2luIjoiaHR0cDovL2xvY2FsaG9zdDo0MjAwIiwiY3Jvc3NPcmlnaW4iOmZhbHNlfQ"},"id":"MLzRnn5P7mRPTK5sATEmKiJfhvV1TJgGXHCbWu3mKrcSZW-oZQ4LwZ3kqeN6KRfESWDbJfv8EXdXHr53XhOQiAvV1Gti4XR9gJaQY45HQK_xw98VxP7e9EnOLjdi6_5a3nLs4lAkQjJ1TqY4IJBnFNSbue7nUAotIQ6kD3ubYR5S","type":"public-key"}| パラメータ | 概要説明 |
|---|---|
| rawId | 公開鍵のID。 |
| response | 認証器が生成した情報。attestationObject, clientDataJSONというパラメータを持ち、認証器が生成した情報を検証する際に使用する。 |
| id | rawIdをbase64urlエンコードしたもの。 |
| type | 'public-key'固定 |
それを受ける認証サーバは以下のように実装しています。
@Controller('webauthn')exportclassWebauthnController{constructor(privatereadonlywebauthnSercice:WebauthnService){}// ... 省略/**
   * 認証器で生成した認証情報を受け取るエンドポイントです。
   * @param createCredentialDto リクエストボディー
*/@Post('/response')asyncresponse(@Body()createCredentialDto:CreateCredentialDto):Promise<ResponseData>{constverifyResult=awaitthis.webauthnSercice.isValidCredential(createCredentialDto);constresponseData=newResponseData();verifyResult?responseData.status=HttpStatus.OK:responseData.status=HttpStatus.INTERNAL_SERVER_ERROR;returnresponseData;}// 省略}@Injectable()exportclassWebauthnService{privatereadonlyORIGIN='http://localhost:4200';constructor(@InjectModel('User')privateuserModel:Model<User>){}// ... 省略/**
* 認証器が生成した認証情報の検証を行います。
* @param createCredentialDto 認証器が生成した認証情報
*/asyncisValidCredential(createCredentialDto:CreateCredentialDto):Promise<boolean>{// clientDataJSONをデコードし、JSON形式にパースするconstclientData:DecodedClientDataJson=JSON.parse(base64url.decode(createCredentialDto.response.clientDataJSON));Logger.debug(clientData,'WebAuthnService',true);// originの検証を行うif(clientData.origin!==this.ORIGIN){thrownewHttpException('Origin is not correct.',HttpStatus.BAD_REQUEST);}// challengeの検証を行うconstcount=awaitthis.userModel.findOne({challenge:Buffer.from(clientData.challenge)}).count();Logger.debug(count,'webauthnService#isvalidCredential',true);if(count===0){thrownewHttpException('Challenge is not collect.',HttpStatus.BAD_REQUEST);}// attestationObjectの検証を行うconstvalidateResult=awaitthis.verifyAuthenticatorAttestationResponse(createCredentialDto);// 公開鍵をDBに登録するthis.userModel.findOneAndUpdate({challenge:Buffer.from(clientData.challenge)},{$set:{id:createCredentialDto.id}},error=>{if(error){Logger.error(error);thrownewError('Update failed.');}});returnvalidateResult.verified;}/**
* AttestationObjectの検証を行います。
* @param createCredentialDto 認証器が生成した認証データ
*/privateasyncverifyAuthenticatorAttestationResponse(createCredentialDto:CreateCredentialDto):Promise<VerifiedAuthenticatorAttestationResponse>{// 認証器でbase64urlエンコードされているので、認証サーバでデコードするconstattestationBuffer=base64url.toBuffer(createCredentialDto.response.attestationObject);// attestationObjectをCBORデコードするconstctapMakeCredentialResponse:CborParseAttestationObject=Decoder.decodeAllSync(attestationBuffer)[0];Logger.debug(ctapMakeCredentialResponse,'WebAuthnService',true);constresponse:VerifiedAuthenticatorAttestationResponse={verified:false,};if(ctapMakeCredentialResponse.fmt==='fido-u2f'){constauthDataStruct=this.parseMakeCredAuthData(ctapMakeCredentialResponse.authData);if(!authDataStruct.flags){thrownewError('User was NOT presented durring authentication!');}constclientDataHash=crypto.createHash('SHA256').update(base64url.toBuffer(createCredentialDto.response.clientDataJSON)).digest();constreservedByte=Buffer.from([0x00]);constpublicKey=this.convertToRawPkcsKey(authDataStruct.cosePublicKey);constsignatureBase=Buffer.concat([reservedByte,authDataStruct.rpIdHash,clientDataHash,authDataStruct.credID,publicKey]);constpemCertificate=this.convertPemTextFormat(ctapMakeCredentialResponse.attStmt.x5c[0]);constsignature=ctapMakeCredentialResponse.attStmt.sig;response.verified=this.verifySignature(signature,signatureBase,pemCertificate);constvalidateResult=this.verifySignature(signature,signatureBase,pemCertificate);// Attestation Signatureの有効性を検証するreturnvalidateResult?{verified:validateResult,authInfo:{fmt:'fido-u2f',publicKey:base64url.encode(publicKey),counter:authDataStruct.counter,credId:base64url.encode(authDataStruct.credID),},}:response;}}/**
* AuthDataをCBORパースします。
* @param authData 認証器の信頼性、セキュリティ等のバイナリデータ
*/privateparseMakeCredAuthData(authData:Buffer):CborParseAuthData{constrpIdHash=authData.slice(0,32);authData=authData.slice(32);constflagsBuf=authData.slice(0,1);authData=authData.slice(1);constflags=flagsBuf[0];constcounterBuf=authData.slice(0,4);authData=authData.slice(4);constcounter=counterBuf.readUInt32BE(0);constaaguid=authData.slice(0,16);authData=authData.slice(16);constcredIDLenBuf=authData.slice(0,2);authData=authData.slice(2);constcredIDLen=credIDLenBuf.readUInt16BE(0);constcredID=authData.slice(0,credIDLen);authData=authData.slice(credIDLen);constcosePublicKey=authData;return{rpIdHash,flagsBuf,flags,counter,counterBuf,aaguid,credID,cosePublicKey,}asCborParseAuthData;}/**
* COSEエンコードされた公開鍵をPKCS ECDHA Keyに変換します。
* @param cosePublicKey COSEエンコードされた公開鍵
*/privateconvertToRawPkcsKey(cosePublicKey:Buffer):Buffer{/*
+------+-------+-------+---------+----------------------------------+
| name | key | label | type | description |
| | type | | | |
+------+-------+-------+---------+----------------------------------+
| crv | 2 | -1 | int / | EC Curve identifier - Taken from |
| | | | tstr | the COSE Curves registry |
| | | | | |
| x | 2 | -2 | bstr | X Coordinate |
| | | | | |
| y | 2 | -3 | bstr / | Y Coordinate |
| | | | bool | |
| | | | | |
| d | 2 | -4 | bstr | Private key |
+------+-------+-------+---------+----------------------------------+
*/constcoseStruct=Decoder.decodeAllSync(cosePublicKey)[0];consttag=Buffer.from([0x00]);constx=coseStruct.get(-2);consty=coseStruct.get(-3);returnBuffer.concat([tag,x,y]);}/**
* バイナリ形式の公開鍵をOpenSSL PEM text形式に変換します。
* @param publicKeyBuffer バイナリの公開鍵
*/privateconvertPemTextFormat(publicKeyBuffer:Buffer):string{if(!Buffer.isBuffer(publicKeyBuffer)){thrownewError('publicKeyBuffer must be Buffer.');}lettype;if(publicKeyBuffer.length===65&&publicKeyBuffer[0]===0x04){publicKeyBuffer=Buffer.concat([Buffer.from('3059301306072a8648ce3d020106082a8648ce3d030107034200','hex'),publicKeyBuffer,]);type='PUBLIC KEY';}else{type='CERTIFICATE';}constb64cert=publicKeyBuffer.toString('base64');letpemKey='';for(leti=0;i<Math.ceil(b64cert.length/64);i++){conststart=64*i;pemKey+=b64cert.substr(start,64)+'\n';}pemKey=`-----BEGIN ${type}-----\n`+pemKey+`-----END ${type}-----\n`;returnpemKey;}/**
* 署名の妥当性を検証します。
* @param signature 署名
* @param data データ
* @param publicKey 公開鍵
*/privateverifySignature(signature:Buffer,data:Buffer,publicKey:string):boolean{returncrypto.createVerify('SHA256').update(data).verify(publicKey,signature);}}いくつかポイントを絞って説明します。認証サーバでは、認証器が生成した情報を以下のように検証します。
- リクエストで受け取ったchallengeがサーバで生成されたchallengeと一致するか?
- リクエストで受け取ったoriginが期待するoriginと一致するか?
- attestationObjectが妥当かどうか?
challenge, originの検証
// clientDataJSONをデコードし、JSON形式にパースするconstclientData:DecodedClientDataJson=JSON.parse(base64url.decode(createCredentialDto.response.clientDataJSON));リクエストボディに含まれるclientDataJSONをbase64Urlデコードし、JSONにパースすると以下のようなJSONを取得できます。
{"challenge":"upYb6sib9exL7fvSfQhIEazOkBh8_YJXVPzSx0T16B0","origin":"http://localhost:4200","type":"webauthn.create"}従って、origin, challengeは以下のように実施しています。
// originの検証を行うif(clientData.origin!==this.ORIGIN){// do something}// challengeの検証を行うconstcount=awaitthis.userModel.findOne({challenge:Buffer.from(clientData.challenge)}).count();Logger.debug(count,'webauthnService#isvalidCredential',true);if(count===0){// do something}origin:予め期待しているoriginと一致するかどうか検証
challenge:検索条件として、リクエストに含まれるchallengeを指定し、検索結果の数で検証
※challengeがぶつかることは想定していないです。一応、uuidから生成しているので、、
AttestationObjectの検証
AttestationObjectは、base64urlエンコードされているCBORとなっています。実際の構成は以下の通りとなっています。

※W3Cより引用
検証では、AttestationObjectをパースして得られるパラメータを使用して、Attestation Signatureの有効性を検証します。
実際の検証ロジックは、fido-seminar-webauthn-tutorialを参考にしました。
/**
   * AttestationObjectの検証を行います。
   * @param createCredentialDto 認証器が生成した認証データ
   */privateasyncverifyAuthenticatorAttestationResponse(createCredentialDto:CreateCredentialDto):Promise<VerifiedAuthenticatorAttestationResponse>{// 認証器でbase64urlエンコードされているので、認証サーバでデコードするconstattestationBuffer=base64url.toBuffer(createCredentialDto.response.attestationObject);// attestationObjectをCBORデコードするconstctapMakeCredentialResponse:CborParseAttestationObject=Decoder.decodeAllSync(attestationBuffer)[0];Logger.debug(ctapMakeCredentialResponse,'WebAuthnService',true);constresponse:VerifiedAuthenticatorAttestationResponse={verified:false,};if(ctapMakeCredentialResponse.fmt==='fido-u2f'){constauthDataStruct=this.parseMakeCredAuthData(ctapMakeCredentialResponse.authData);if(!authDataStruct.flags){thrownewError('User was NOT presented durring authentication!');}constclientDataHash=crypto.createHash('SHA256').update(base64url.toBuffer(createCredentialDto.response.clientDataJSON)).digest();constreservedByte=Buffer.from([0x00]);constpublicKey=this.convertToRawPkcsKey(authDataStruct.cosePublicKey);constsignatureBase=Buffer.concat([reservedByte,authDataStruct.rpIdHash,clientDataHash,authDataStruct.credID,publicKey]);constpemCertificate=this.convertPemTextFormat(ctapMakeCredentialResponse.attStmt.x5c[0]);constsignature=ctapMakeCredentialResponse.attStmt.sig;response.verified=this.verifySignature(signature,signatureBase,pemCertificate);constvalidateResult=this.verifySignature(signature,signatureBase,pemCertificate);// Attestation Signatureの有効性を検証するreturnvalidateResult?{verified:validateResult,authInfo:{fmt:'fido-u2f',publicKey:base64url.encode(publicKey),counter:authDataStruct.counter,credId:base64url.encode(authDataStruct.credID),},}:response;}}
完成イメージ

終わりに
自分で実装してみることで、「完全に理解した!」から「なんも分からん」くらいにはなれたと思います。
次は、認証のフローについて書きます。