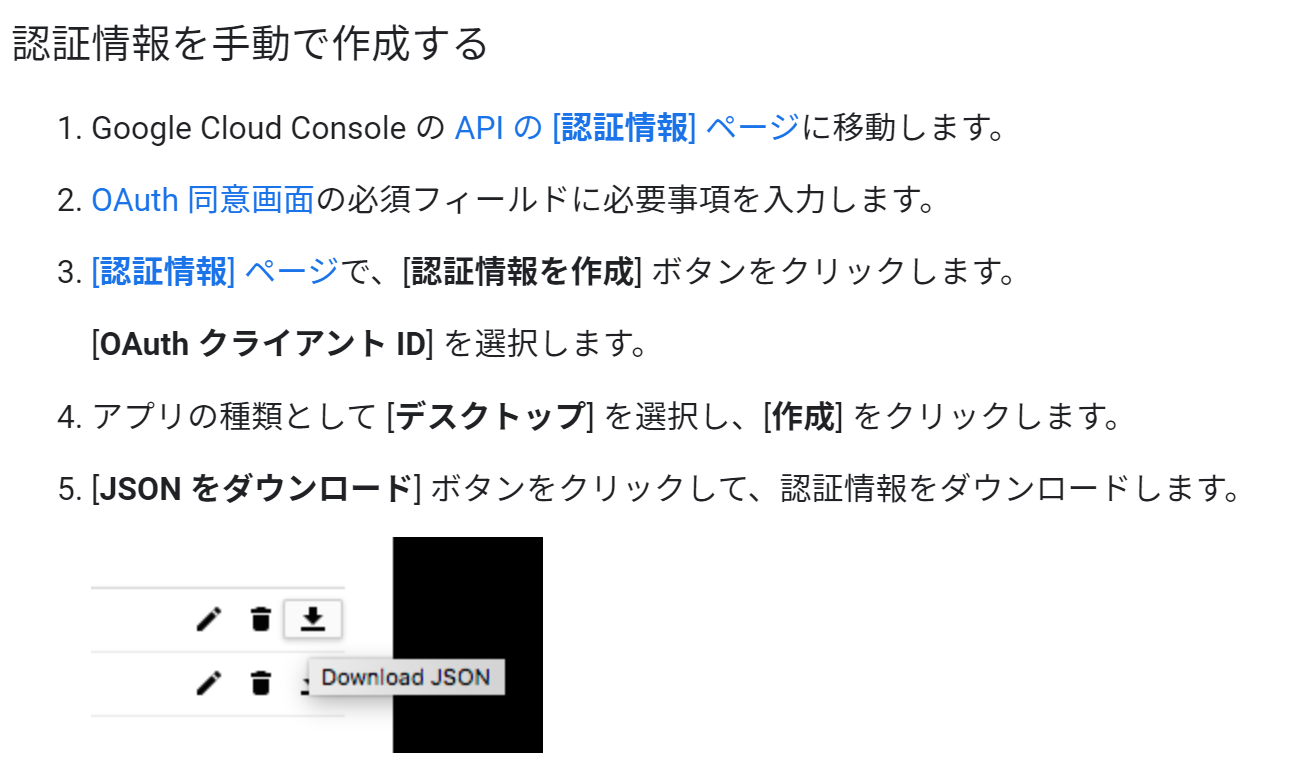
はじめに
Node.js を使用して GoogleAPI にアクセスする場合、SheetAPI であろうと DriveAPI であろうと認可の部分までは実は大体一緒です。
https://developers.google.com/docs/api/quickstart/nodejs
https://developers.google.com/sheets/api/quickstart/nodejs
https://developers.google.com/drive/api/v3/quickstart/nodejs
あまりプロジェクト内で各サービスを行き来する事は無いのですが、どうせ共通なら一つのファイルにまとめて使いまわしたい、と思ってクラスを作りました。サンプルの内容をts化、クラス化して、Promise対応しています。
誰でも思いつく事だと思いますが、今後の自分のため + 同じような結論に行きついた方のためにまとめておきます。
認可までを行うクラス
GoogleAuthorizerという名称のクラスにしました。
適当な名前で、以下のファイルを保存します。ここでは authorize.tsにしました。
importfsfrom"fs";importreadlinefrom"readline";import{google}from"googleapis";import{OAuth2Client}from"googleapis-common";exportclassGoogleAuthorizer{privatecredentialsBuffer:string|null=null;privatetokenBuffer:string|null=null;constructor(privatescopes:string[],privatetokenPath:string,privatecredentialsPath:string){}publicasyncgetOAuth2Client():Promise<OAuth2Client>{if(this.credentialsBuffer){returnawaitthis.authorize(JSON.parse(this.credentialsBuffer));}else{returnnewPromise<OAuth2Client>((res,rej)=>{fs.readFile(this.credentialsPath,async(err,content)=>{if(err){rej('Error loading client secret file:'+err);return;}// Authorize a client with credentials, then call the Google Drive API.this.credentialsBuffer=content.toString();try{consto=awaitthis.authorize(JSON.parse(content.toString()));res(o);}catch(e){rej(e);}});});}}privateasyncauthorize(credentials:any):Promise<OAuth2Client>{returnnewPromise<OAuth2Client>((res,rej)=>{const{client_secret,client_id,redirect_uris}=credentials.installed;constoAuth2Client=newgoogle.auth.OAuth2(client_id,client_secret,redirect_uris[0]);if(this.tokenBuffer){oAuth2Client.setCredentials(JSON.parse(this.tokenBuffer));res(oAuth2Client);return;}// Check if we have previously stored a token.fs.readFile(this.tokenPath,async(err,token)=>{if(err){try{awaitthis.getAccessToken(oAuth2Client);res(oAuth2Client);}catch(e){rej(e)}return;}this.tokenBuffer=token.toString();oAuth2Client.setCredentials(JSON.parse(token.toString()));res(oAuth2Client);});});}privategetAccessToken(oAuth2Client:OAuth2Client):Promise<OAuth2Client>{returnnewPromise<OAuth2Client>((res,rej)=>{constauthUrl=oAuth2Client.generateAuthUrl({access_type:'offline',scope:this.scopes,});console.log('Authorize this app by visiting this url:',authUrl);constrl=readline.createInterface({input:process.stdin,output:process.stdout,});rl.question('Enter the code from that page here: ',(code)=>{rl.close();oAuth2Client.getToken(code,(err,token)=>{if(err||!token){rej('Error retrieving access token'+err);return;}oAuth2Client.setCredentials(token);// Store the token to disk for later program executionsfs.writeFile(this.tokenPath,JSON.stringify(token),(err)=>{if(err){rej(err);return;}console.log('Token stored to',this.tokenPath);});res(oAuth2Client);});});});}}あまり気にしなくても良いかもしれませんが、ファイルIOがあまり発生するのもアレかなと思って、一度ファイルから読んだ情報はバッファに入れて再利用しています。
使用方法
先程保存した authorize.tsを読み込み、コンストラクタに以下の引数を指定して、まずはインスタンスを作成します。
その後、getOAuth2Clientを await付きで呼び出せば、必要な OAuth2Clientが取得できます。
| 引数 | 内容 |
|---|---|
| 1 | 使用するスコープ(配列) |
| 2 | トークンファイルのパス |
| 2 | 認証ファイルのパス |
import{GoogleAuthorizer}from"./authorize";classMain{constructor(){this.init();}asyncinit(){constSCOPES=['https://www.googleapis.com/auth/drive.metadata.readonly'];constTOKEN_PATH="token.json";constCREDENTIALS_PATH="credentials.json";consta=newGoogleAuthorizer(SCOPES,TOKEN_PATH,CREDENTIALS_PATH);try{constauth=awaita.getOAuth2Client();console.log(auth);}catch(e){console.error(e);}}}newMain();おまけ
冒頭で紹介した Google の Node.js サンプルページでは、とりあえず認証情報作るボタンがありますが、これをクリックすると QuickStart というプロジェクトが作成され、その中に適切な権限が与えられた認証情報が作成されて、認証ファイルがDLされます。
既存のプロジェクトに手動で追加する場合に困ったのですが、以下に方法が書いてありました。
BigQueryのページですが、ここはサービス間で共通です。