始めに
この記事は、WebAuthnを使用したユーザ認証フローに関する記事です。
登録処理は、FIDO2(WebAuthn)に入門してみた - ユーザ登録処理から参照してください。
また、作成したソースコード一式はこちらに格納しておきます。
認証サーバ(Relying Party)を自作してみた
実装言語・FW
FIDO2(WebAuthn)に入門してみた - ユーザ登録処理の続きとなるので、当然MANスタックで実装します。
- 認証サーバ;Nest.js v6.13.3 (https://gitlab.com/s.kawamura/webauthn-nestjs-sample)
- JavaScript Application;Angular v9.0.4 (https://gitlab.com/s.kawamura/webauthn-angular-sample)
- Database;MongoDB
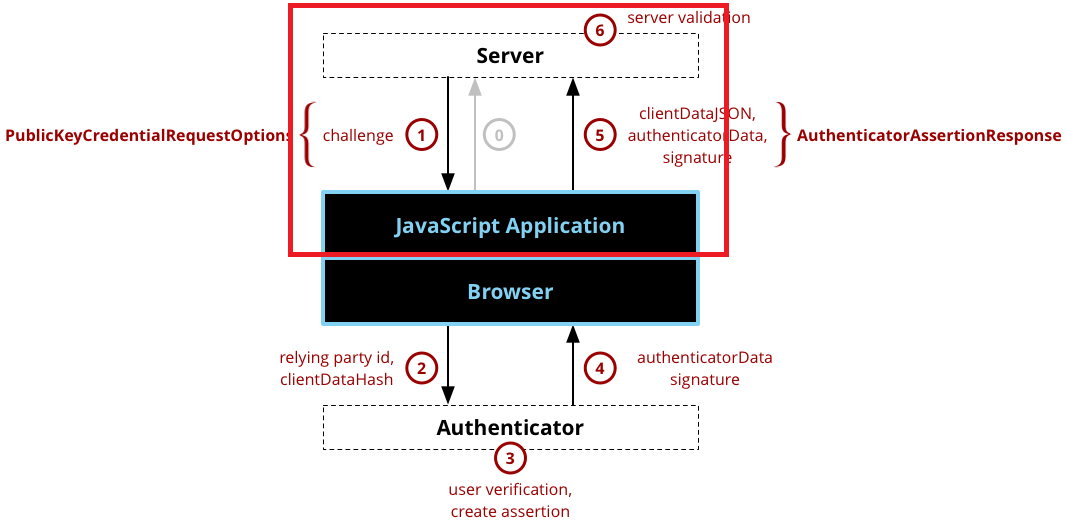
認証の処理シーケンス
基本的な処理の流れは、登録処理と同様です。
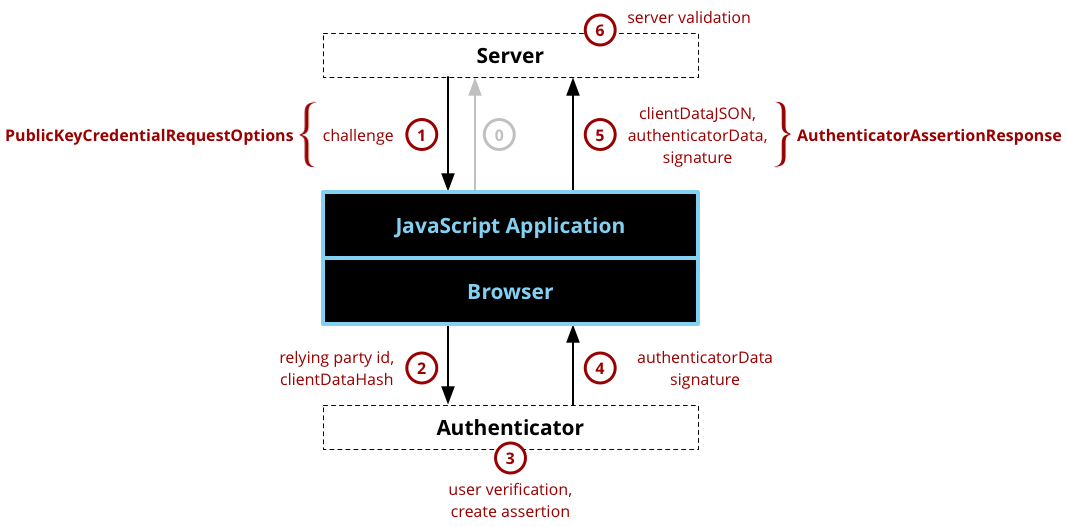
※MDMより引用
処理概要
- 認証サーバに対して、challenge生成の要求を行う。
- サーバで生成されたchallengeと公開鍵の情報をクライアントにレスポンスする。
- 取得したデータを元にパラメータを組み立て、
navigator.credentials.get()を呼び出す。 - 認証器がユーザの認証処理を行い、Assertionを生成する。(Assertion; 認証器が署名したchallengeやrelying partyの情報のこと)
- 認証器が生成したデータをクライアントに返却する。
- 認証器が生成したデータを認証サーバに対して送信する。
- 認証器が生成したデータの検証を行い、結果に応じたレスポンスをする。
登録処理と同様に、WebAuthnで規定されていない箇所(上図の0, 1, 5, 6)に関しては自分で仕様を考えて実装する必要があります。
従って、今回作成するのは以下の赤枠部分となります。(認証サーバとJavaScript Application)
実装のポイント
今回も全部を載せると、とんでもな量になってしまうのでかいつまんでポイントを説明します。実装の細かい点は、リポジトリを参照してください。
0. challengeの生成リクエスト ~ challenge、公開鍵のレスポンス
WebAuthnによって、仕様が定義されているわけではないため、自分で設計をする必要があります。
今回は、クライアントから以下のようなリクエストを発行してみました。
POSThttp://localhost:3000/webauthn/loginHTTP/1.1Content-Type:application/json;charset=UTF-8{"email":"tester-001@example.com"}それを受ける認証サーバは以下のように実装しています。
@Controller('webauthn')exportclassWebauthnController{constructor(privatereadonlywebauthnSercice:WebauthnService){}// ... 省略/**
   * 認証処理開始のエンドポイント
   * @param loginUserDto リクエストボディー
*/@Post('/login')asynclogin(@Body()loginUserDto:LoginUserDto):Promise<ResponseData>{constresponseData=newResponseData();constuserAuthenticationOption=awaitthis.webauthnSercice.createUserAuthenticationOption(loginUserDto);if(!userAuthenticationOption){responseData.status=HttpStatus.BAD_REQUEST;}else{responseData.status=HttpStatus.CREATED;responseData.data=userAuthenticationOption;}returnresponseData;}}@Injectable()exportclassWebauthnService{constructor(@InjectModel('User')privateuserModel:Model<User>){}// ... 省略/**
* ユーザの認証処理のためにchallengeを新規に生成します。
* @param loginUserDto リクエストボディー
*/asynccreateUserAuthenticationOption(loginUserDto:LoginUserDto):Promise<UserAuthenticationOption>{// ユーザが登録済みかどうかチェックするconstcount=awaitthis.userModel.findOne({email:loginUserDto.email}).count();if(count===0){thrownewHttpException('User is NOT found.',HttpStatus.BAD_REQUEST);}// 新規でchallengeを生成するconstchallenge=Buffer.from(Uint8Array.from(uuid(),c=>c.charCodeAt(0)));Logger.log(base64url.encode(challenge));// 新規に生成したchallengeをDBに保存するawaitthis.userModel.updateOne({email:loginUserDto.email},{$set:{challenge}}).exec();constuser=awaitthis.userModel.findOne({email:loginUserDto.email}).exec();if(!user){returnnull;}// DBに保存されている公開鍵、challngeを使用して、レスポンス用のパラメータを組み立てるconstuserAuthenticationOption:UserAuthenticationOption={challenge:base64url.encode(user.challenge),allowCredentials:[{type:'public-key',id:user.id,transports:['usb','nfc','ble','internal',],},],};returnuserAuthenticationOption;}// ... 省略}登録処理の時と同様で、ポイントが2つあります。
- challengeは、認証サーバで生成する。また、生成するchallengeは、少なくとも16バイト以上でランダムに生成されたバッファであること
これを満たすために、今回はuuid(v4)を元にバッファを生成しています。
constchallenge=Buffer.from(Uint8Array.from(uuid(),c=>c.charCodeAt(0)));- 特に差が目られているわけではないが、レスポンスはWebAuthn APIで扱いやすい形式で返却するほうが望ましい。
これを踏まえて、今回は以下のようなレスポンスをクライアントに返却しています。
HTTP/1.1201CreatedX-Powered-By:ExpressContent-Type:application/json; charset=utf-8Content-Length:353ETag:W/"161-eCu9t9Vc9dDX+riEye19uCF+4lA"Date:Fri, 05 Jun 2020 00:43:22 GMTConnection:close{"status":201,"data":{"challenge":"OTRkODY2NDAtMDkxYy00YzdmLTg0MzAtNzUwZjNmNzZlOWM0","allowCredentials":[{"type":"public-key","id":"w5MUMH595ry66BtZPxwDU3l8w2V9kqRwjT6qB4bWJsdDw2rdL9IZVBAp-0rs5e2SbSgr6Plw6zln9emdAfHhC7MbjUqx8A-m5nwyEFJdgpIywueQEKZ6P7n7N-nzcsGkz2KATJvblx8DqlbMRmFjZobR4QC7QD_Ljq8a__T78wF9","transports":["usb","nfc","ble","internal"]}]}}allowCredentialsには以下のパラメータが含まれています。
| パラメータ | 概要説明 |
|---|---|
| type | public-key固定 |
| id | 公開鍵を特定するID(base64urlエンコード済み) |
| transports | 認証器からAssertionを受け取るために許可する通信手段 |
2. navigator.credentials.get()呼び出し ~ 5. サーバに送信
認証サーバから取得したデータを元にnavigator.credentials.get()呼び出しに必要なパラメータを作成します。
// challengeの生成要求constloginResponse=awaitthis.httpClient.post<AuthUser>(Uri.USER_LOGIN,{email},{headers:{'Content-Type':'application/json'},observe:'response',}).toPromise();// navigator.credentials.get()呼び出しに必要なパラメータを組み立てconstpublicKey:PublicKeyCredentialRequestOptions={challenge:base64url.toBuffer(loginResponse.body.data.challenge),allowCredentials:[{id:base64url.toBuffer(loginResponse.body.data.allowCredentials[0].id),type:loginResponse.body.data.allowCredentials[0].type,transports:loginResponse.body.data.allowCredentials[0].transports}],};navigator.credentials.get()を呼び出し、そのレスポンスを認証サーバに送信する。という一連の流れが以下になります。
@Injectable({providedIn:'root'})exportclassSignInService{constructor(privatereadonlyhttpClient:HttpClient){}/**
   * ユーザの認証処理を実行します。
   * @param email メールアドレス
   */asyncsignIn(email:string){// challengeの生成要求constloginResponse=awaitthis.httpClient.post<AuthUser>(Uri.USER_LOGIN,{email},{headers:{'Content-Type':'application/json'},observe:'response',}).toPromise();// WebAuthn API呼び出しに必要なパラメータを組み立てconstpublicKey:PublicKeyCredentialRequestOptions={challenge:base64url.toBuffer(loginResponse.body.data.challenge),allowCredentials:[{id:base64url.toBuffer(loginResponse.body.data.allowCredentials[0].id),type:loginResponse.body.data.allowCredentials[0].type,transports:loginResponse.body.data.allowCredentials[0].transports}],};// 明示的にPublicKeyCredentialAuthenticationにキャストするconstassertionResponse=awaitthis.getCredential(publicKey)asPublicKeyCredentialAuthentication;console.log(assertionResponse);}/**
   * 認証器に対してユーザ認証の要求を行います。
   * @param publicKey 認証情報取得オプション
   */privateasyncgetCredential(publicKeyCredentialRequestOptions:PublicKeyCredentialRequestOptions):Promise<Credential>{returnnavigator.credentials.get({publicKey:publicKeyCredentialRequestOptions,});}/**
   * 認証情報をBase64Urlエンコードして認証サーバにPOSTします。
   * @param publicKeyCredential 認証器から取得した認証情報
   */privateasyncvalidateAssertionResponse(publicKeyCredential:PublicKeyCredentialAuthentication):Promise<boolean>{constassertionResponse=awaitthis.httpClient.post(Uri.ASSERTION_RESPONSE,{rawId:base64url.encode(Buffer.from(publicKeyCredential.id)),response:{authenticatorData:base64url.encode(Buffer.from(publicKeyCredential.response.authenticatorData)),signature:base64url.encode(Buffer.from(publicKeyCredential.response.signature)),clientDataJSON:base64url.encode(Buffer.from(publicKeyCredential.response.clientDataJSON)),},id:publicKeyCredential.id,type:publicKeyCredential.type,},{headers:{'Content-Type':'application/json'},observe:'response'}).toPromise();returnassertionResponse.body?true:false;}}
6. 認証情報のチェック
クライアントから以下のようなリクエストが送信されてきます。
POSThttp://localhost:3000/webauthn/assertion-responseHTTP/1.1Content-Type:application/json;charset=UTF-8{"rawId":"eWljXzgyWk12Z25reEE1RDZVa01WZjJHUXM4dkFKTWJTQ2lUaFFNTDR6Mm56blVMcmwwSWk2OGltUERPRU5WOU5ZaklRS01wU1hFRVB3cVhTOE5VMXVMQjN5RTBHQzFWZEFTSEJESHpVLVUwZ0RtU1RJQ29IRDR4UlVmUG9SMjVHaFFSU0NPWEx6ZHF1d29iMUJEbUttWFU4X29YM0IxcGpSMnhBT044TmF3Mw","response":{"authenticatorData":"SZYN5YgOjGh0NBcPZHZgW4_krrmihjLHmVzzuoMdl2MBAAAAEg","signature":"MEUCIQDAGI4DQgNbRF4fHaMJvW0_p1vVZvZ4U100nfkZRc1GPAIgBDtjdIjhl--1Gec9x9bGS68hnJ2nKYbSZY8s2Lqx8m0","clientDataJSON":"eyJ0eXBlIjoid2ViYXV0aG4uZ2V0IiwiY2hhbGxlbmdlIjoiTXpReU1HWTJNMlF0Tm1Jd05DMDBaRE5pTFRoaVpqTXRaRE5sTnpnNE0yUmpNakJtIiwib3JpZ2luIjoiaHR0cDovL2xvY2FsaG9zdDo0MjAwIiwiY3Jvc3NPcmlnaW4iOmZhbHNlfQ"},"id":"yic_82ZMvgnkxA5D6UkMVf2GQs8vAJMbSCiThQML4z2nznULrl0Ii68imPDOENV9NYjIQKMpSXEEPwqXS8NU1uLB3yE0GC1VdASHBDHzU-U0gDmSTICoHD4xRUfPoR25GhQRSCOXLzdquwob1BDmKmXU8_oX3B1pjR2xAON8Naw3","type":"public-key"}| パラメータ | 概要説明 |
|---|---|
| rawId | 公開鍵のID |
| response | 認証器から取得した情報。authenticatorData, signature, clientDataJSONというパラメータを持ち、認証器から取得した情報を検証する際に使用する。 |
| id | rawIdをbase64urlエンコードしたもの |
| type | 'public-key'固定 |
それを受ける認証サーバは以下のように実装しています。
@Controller('webauthn')exportclassWebauthnController{constructor(privatereadonlywebauthnSercice:WebauthnService){}// ... 省略/**
   * 認証器から取得した認証情報を受け取るエンドポイントです。
   * @param authenticationCredentialDto リクエストボディー
*/@Post('/assertion-response')asyncassertionResponse(@Body()authenticationCredentialDto:AuthenticationCredentialDto):Promise<ResponseData>{constresponseData=newResponseData();constverifyResult=awaitthis.webauthnSercice.isValidCredentialForAuthentication(authenticationCredentialDto);verifyResult?responseData.status=HttpStatus.OK:responseData.status=HttpStatus.INTERNAL_SERVER_ERROR;returnresponseData;}}@Injectable()exportclassWebauthnService{privatereadonlyORIGIN='http://localhost:4200';constructor(@InjectModel('User')privateuserModel:Model<User>){}// ... 省略/**
* 認証器から取得した情報の検証を行います。
* @param authenticationCredewntialDto リクエストボディー
*/asyncisValidCredentialForAuthentication(authenticationCredentialDto:AuthenticationCredentialDto):Promise<boolean>{// clientDataJSONをデコードし、JSON形式にパースするconstclientData:DecodedClientDataJson=JSON.parse(base64url.decode(authenticationCredentialDto.response.clientDataJSON));Logger.debug(clientData,'WebAuthnService',true);// originの検証if(clientData.origin!==this.ORIGIN){thrownewHttpException('Origin is not correct.',HttpStatus.BAD_REQUEST);}// challengeの検証constcount=awaitthis.userModel.findOne({challenge:base64url.toBuffer(clientData.challenge)}).count();Logger.debug(count,'webauthnService#isvalidCredential',true);if(count===0){thrownewHttpException('Challenge is not collect.',HttpStatus.BAD_REQUEST);}// assertionResponseの検証を行うconstvalidResult=awaitthis.verifyAuthenticatorAssertionResponse(authenticationCredentialDto);returnvalidResult.verified;}/**
* Assertionの検証を実施します。
* @param authenticationCredewntialDto 認証器から取得した認証データ
*/privateasyncverifyAuthenticatorAssertionResponse(authenticationCredewntialDto:AuthenticationCredentialDto){// クライアントから送信されてきた公開鍵のIDがDBに存在しているかチェックconstauthr=awaitthis.userModel.findOne({id:authenticationCredewntialDto.id});// 認証器でbase64urlエンコードされているので、認証サーバでデコードするconstauthenticatorData=base64url.toBuffer(authenticationCredewntialDto.response.authenticatorData);constresponse={verified:false,};if(authr.authInfo.fmt==='fido-u2f'){constauthDataStruct=this.parseGetAssertionAuthData(authenticatorData);if(!authDataStruct.flags){thrownewError('User was NOT presented durring authentication!');}constclientDataHash=crypto.createHash('SHA256').update(authenticationCredewntialDto.response.clientDataJSON).digest();constsignatureBase=Buffer.concat([authDataStruct.rpIdHash,authDataStruct.flagsBuf,authDataStruct.counterBuf,clientDataHash]);constpublicKey=this.convertPemTextFormat(base64url.toBuffer(authr.authInfo.publicKey));constsignature=base64url.toBuffer(authenticationCredewntialDto.response.signature);response.verified=this.verifySignature(signature,signatureBase,publicKey);}returnresponse;}/**
* バイナリ形式の公開鍵をOpenSSL PEM text形式に変換します。
* @param publicKeyBuffer バイナリの公開鍵
*/privateconvertPemTextFormat(publicKeyBuffer:Buffer):string{if(!Buffer.isBuffer(publicKeyBuffer)){thrownewError('publicKeyBuffer must be Buffer.');}lettype;if(publicKeyBuffer.length===65&&publicKeyBuffer[0]===0x04){publicKeyBuffer=Buffer.concat([Buffer.from('3059301306072a8648ce3d020106082a8648ce3d030107034200','hex'),publicKeyBuffer,]);type='PUBLIC KEY';}else{type='CERTIFICATE';}constb64cert=publicKeyBuffer.toString('base64');letpemKey='';for(leti=0;i<Math.ceil(b64cert.length/64);i++){conststart=64*i;pemKey+=b64cert.substr(start,64)+'\n';}pemKey=`-----BEGIN ${type}-----\n`+pemKey+`-----END ${type}-----\n`;returnpemKey;}/**
* 署名の妥当性を検証します。
* @param signature 署名
* @param data データ
* @param publicKey 公開鍵
*/privateverifySignature(signature:Buffer,data:Buffer,publicKey:string):boolean{returncrypto.createVerify('SHA256').update(data).verify(publicKey,signature);}/**
* 認証器から取得したAssertionをCBORパースします。
* @param assertionData Assertion
*/privateparseGetAssertionAuthData(assertionData:Buffer):CborParseAssertionObject{constrpIdHash=assertionData.slice(0,32);assertionData=assertionData.slice(32);constflagsBuf=assertionData.slice(0,1);assertionData=assertionData.slice(1);constflags=flagsBuf[0];constcounterBuf=assertionData.slice(0,4);assertionData=assertionData.slice(4);constcounter=counterBuf.readUInt32BE(0);return{rpIdHash,flagsBuf,flags,counter,counterBuf};}}いくつかポイントを絞って説明します。認証サーバでは、認証器から取得した情報を以下のように検証します。
- リクエストで受け取ったchallengeがサーバで生成されたchallengeと一致するか?
- リクエストで受け取ったoriginが期待するoriginと一致するか?
- Assertionが妥当かどうか?
challenge, originの検証
// clientDataJSONをデコードし、JSON形式にパースするconstclientData:DecodedClientDataJson=JSON.parse(base64url.decode(authenticationCredentialDto.response.clientDataJSON));// originの検証if(clientData.origin!==this.ORIGIN){// do something}// challengeの検証constcount=awaitthis.userModel.findOne({challenge:base64url.toBuffer(clientData.challenge)}).count();if(count===0){// do something}- origin:予め期待しているoriginと一致するかどうか検証
- challenge:検索条件として、リクエストに含まれるchallengeを指定し、検索結果の数で検証
※challengeがぶつかることは想定していないです。一応、uuidから生成しているので、、
Assertionの検証
検証では、AssertionObjectをパースして得られるパラメータを使用して、Assertion Signatureの有効性を検証します。
実装は、fido-seminar-webauthn-tutorialを参考にしました。
/**
   * AttestationObjectの検証を行います。
   * @param createCredentialDto 認証器が生成した認証データ
   */privateasyncverifyAuthenticatorAttestationResponse(createCredentialDto:CreateCredentialDto):Promise<VerifiedAuthenticatorAttestationResponse>{// 認証器でbase64urlエンコードされているので、認証サーバでデコードするconstattestationBuffer=base64url.toBuffer(createCredentialDto.response.attestationObject);// attestationObjectをCBORデコードするconstctapMakeCredentialResponse:CborParseAttestationObject=Decoder.decodeAllSync(attestationBuffer)[0];Logger.debug(ctapMakeCredentialResponse,'WebAuthnService',true);constresponse:VerifiedAuthenticatorAttestationResponse={verified:false,};if(ctapMakeCredentialResponse.fmt==='fido-u2f'){constauthDataStruct=this.parseMakeCredAuthData(ctapMakeCredentialResponse.authData);if(!authDataStruct.flags){thrownewError('User was NOT presented durring authentication!');}// TODO util化したいconstclientDataHash=crypto.createHash('SHA256').update(base64url.toBuffer(createCredentialDto.response.clientDataJSON)).digest();constreservedByte=Buffer.from([0x00]);constpublicKey=this.convertToRawPkcsKey(authDataStruct.cosePublicKey);constsignatureBase=Buffer.concat([reservedByte,authDataStruct.rpIdHash,clientDataHash,authDataStruct.credID,publicKey]);constpemCertificate=this.convertPemTextFormat(ctapMakeCredentialResponse.attStmt.x5c[0]);constsignature=ctapMakeCredentialResponse.attStmt.sig;response.verified=this.verifySignature(signature,signatureBase,pemCertificate);constvalidateResult=this.verifySignature(signature,signatureBase,pemCertificate);// Attestation Signatureの有効性を検証するreturnvalidateResult?{verified:validateResult,authInfo:{fmt:'fido-u2f',publicKey:base64url.encode(publicKey),counter:authDataStruct.counter,credId:base64url.encode(authDataStruct.credID),},}:response;}}
完成イメージ
終わりに
今回、認証サーバについてある程度学習したので、CTAPの仕様まで踏み込んで学習したいところです。