はじめに
昨日、筋萎縮性側索硬化症(ALS)と呼ばれる病気についての記事を見かけ、以前より知っている病気ではあったもののなぜ、この病気になってしまうのかについては、知らなかった。
ネットで調べてみたところ、様々なサイトで解説されているものの、言葉が難しかったり、文字数が多く読むのが大変であった。
そこで、そのような知識を分かりやすく、まとめ尚且つ大人から子供まで使えるような学習アプリケーションを自作してみました。
実装
まず、環境構築については、下記の記事を見ていただければと思います。
参考: React Nativeをはじめる(環境構築)
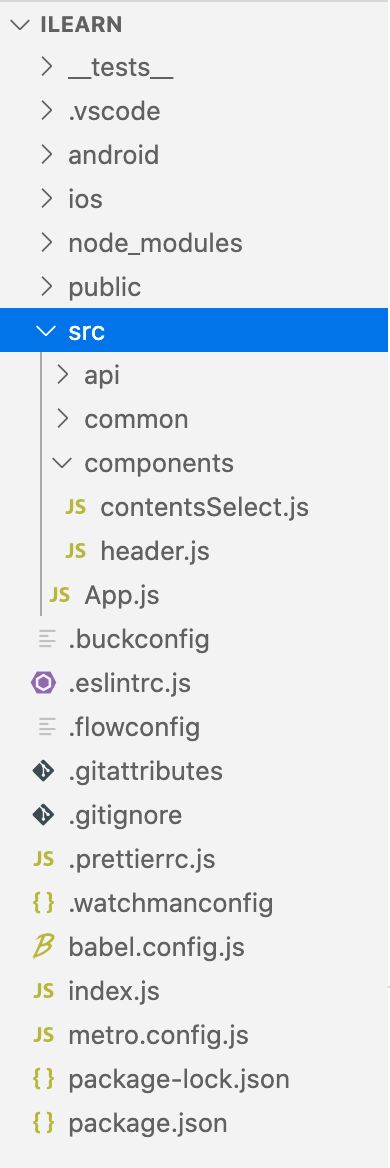
ディレクトリ構成
使用したUI component, ライブラリ, フリーイラスト
UI component
1.React-native-elements
React-Native-Elementsは、フリーのクロスプラットフォームのUIcomponentです。
色々な開発者が作成したcomponentが集められ、クオリティもかなり高いです。
2.React-native-paper
React-native-paperは、使いやすく設計されているUIcomponentです。
componentは、Googleのマテリアル基準に準拠しているのでデザイン性がかなり高いという感想です。
ライブラリ
1.React Navigation
React Navigationは、画面遷移のライブラリです。
なぜ、このライブラリが必要かというと、Reactでは画面遷移のための機能が用意されていないからです。
React Navigationでは3つの方法で画面遷移ができます。
1.stack:スライドしながら画面遷移する方法
2.tabs:タブを選択することで画面遷移する方法
3.drawer:画面端から現れるメニューで画面遷移する方法
今回は、1の方法で実装を行いました。
フリーイラスト
1.manypixels
manypixelsは、フラットなイラストをフリーでdlできます。
App.js
このファイルではメインとなるページの処理を記載しています。
import'react-native-gesture-handler';import*asReactfrom'react';import{Image,SafeAreaView,ScrollView,StyleSheet}from'react-native';import{Text,Card,Button}from'react-native-elements';import{NavigationContainer}from'@react-navigation/native';import{createStackNavigator}from'@react-navigation/stack';importAppHeaderfrom'./components/header';importcontentsSelectfrom'./components/contentsSelect';constHomeScreen=({navigation})=>{return(<SafeAreaViewstyle={styles.container}><ScrollView><AppHeader/><Texth2style={styles.hearderMessage}>Forexplorerwhowanttoknowtheunknown</Text>
<Textstyle={styles.hearderMessageBody}>ilearnはさまざまなトピックスをまとめ{'\n'}発信する場所だよ。</Text>
<Card><Card.Title>探検をはじめよう!</Card.Title>
<Card.Divider/><Imagesource={require('../public/img/teach.png')}style={styles.cardImage}/>
<Textstyle={styles.cardText}>医学,科学,数学,コンピュータ・サイエンス,宇宙,{'\n'}歴史をまなぼう。</Text>
<Buttonstyle={styles.cardButtonText}title="出発する🚀"onPress={()=>navigation.navigate('Contents')}/>
</Card>
</ScrollView>
</SafeAreaView>
);};constStack=createStackNavigator();constApp=()=>{return(<NavigationContainer><Stack.Navigator><Stack.Screenname="Home"component={HomeScreen}/>
<Stack.Screenname="Contents"component={contentsSelect}/>
</Stack.Navigator>
</NavigationContainer>
);};conststyles=StyleSheet.create({container:{flex:1,},headerImg:{width:90,height:30,top:60,},hearderMessage:{marginTop:100,textAlign:'center',},hearderMessageBody:{flex:1,top:20,marginBottom:60,textAlign:'center',fontWeight:'bold',color:'#93a5b1',},cardImage:{width:350,height:350,},cardText:{marginBottom:10,},cardButtonText:{marginTop:20,marginBottom:20,},});exportdefaultApp;
header component
名前から察するようにヘッダーについてまとめたファイルになります。
importReactfrom'react';import{View,StyleSheet,Image}from'react-native';constAppHeader=()=>{return(<View><Imagesource={require('../../public/img/Header.png')}style={styles.headerImg}/>
</View>
);};conststyles=StyleSheet.create({headerImg:{width:90,height:30,marginLeft:20,top:30,},});exportdefaultAppHeader;
contents component
こちらのcontents componentは、ユーザが実際に何のコンテンツについて学びたいかを選ばせるページの処理をまとめています。
importReactfrom'react';import{SafeAreaView,ScrollView,StyleSheet}from'react-native';import{Card,Title}from'react-native-paper';importAppHeaderfrom'./header';constcontentsSelect=()=>{return(<SafeAreaViewstyle={styles.container}><ScrollView><AppHeader/><Cardstyle={styles.cardPadding}><Card.Content><Titlestyle={styles.cardTitle}>宇宙って?</Title>
<Card.Coversource={require('../../public/img/alien.png')}style={styles.cardImg}/>
</Card.Content>
</Card>
<Cardstyle={styles.cardPadding}><Card.Content><Titlestyle={styles.cardTitle}>ALSって知ってる?</Title>
<Card.Coversource={require('../../public/img/health.png')}style={styles.cardImg}/>
</Card.Content>
</Card>
<Cardstyle={styles.cardPadding}><Card.Content><Titlestyle={styles.cardTitle}>Falcon9がすごい</Title>
<Card.Coversource={require('../../public/img/startup_isometric.png')}style={styles.cardImg}/>
</Card.Content>
</Card>
</ScrollView>
</SafeAreaView>
);};conststyles=StyleSheet.create({container:{flex:1,},cardImg:{height:300,},cardPadding:{marginBottom:20,},cardTitle:{fontWeight:'bold',},});exportdefaultcontentsSelect;
動作
次回
次回は、コンテンツ選択した後の詳細画面を作り込んでいこうと思います。
おわり
かなり気合を入れて作成を始めたので、随時記事も更新していこうと思います。
また、React-vativeをさわってみたい方に対し、開発コードがお役に立てば幸いです。
参考
React-native
React-native-elements
React Navigation
React-native-paper
manypixels
難病情報センター: ALS