todoistにやることリストを追加したり、今日のやることリストを取得してくれるLINEボットを作成します。
前回の投稿「 AlexaとTodoistでやることリスト・お買い物リスト」の応用です。

今回作成するのは、Node.jsで作成するLINEボットサーバです。
図の点線矢印は、最初の設定のときのみで、それが終わってしまえば、あとは、何回でもLINEアプリからtodoistの操作ができるようになります。
とりあえず、LINEアプリからは以下ができるようにします。これ以外は、直接todoistアプリから操作してください。
・タスクの新規登録、および担当者のアサイン、期限の設定
・今日、明日、明後日以降、期限切れのタスクの一覧を取得
・タスクの詳細を表示
・タスクの完了を設定
毎度の通り、ソースコード一式をGitHubに上げておきました。
poruruba/line-todoist
https://github.com/poruruba/line_todoist
LINEボットの設定
LINEデベロッパーコンソールから登録します。
LINEデベロッパーコンソール
https://developers.line.biz/console/
プロバイダを選択または新規作成したのち、チャネル設定の新規チャネルを選択します。

チャネルの種類は、Messaging APIです。

適当に入力し、利用規約に同意して、「作成」ボタンを押下します。

作成後に表示されるチャネル基本設定にあるチャネルシークレットとMessaging API設定にあるチャネルアクセストークン(長期)の発行ボタンで生成されるチャネルアクセストークン(長期)を覚えておきます。
また、Messaging API設定の応答メッセージは無効に変更しておきます。グループ・複数人チャットへの参加を許可するも有効にしておきます。
Node.jsの立ち上げ
GitHubからZIPダウンロードしてください。
https://github.com/poruruba/line_todoist
> unzip line_todoist-master.zip
> cd line_todoist
> mkdir data
> mkdir data\line-todoist
> mkdir cert
> npm install
> node app.js
HTTPSである必要があるため、certにSSL証明書を格納します。ファイル名は、app.jpを参照してください。
まずは、LINEボットとして応答できるようにするためには、最低限以下の記載があればよいです。
'use strict';constconfig={channelAccessToken:process.env.LINE_CHANNEL_ACCESS_TOKEN||'【LINEチャネルアクセストークン(長期)】',channelSecret:process.env.LINE_CHANNEL_SECRET||'【LINEチャネルシークレット】',};constline=require('@line/bot-sdk');constLineUtils=require(HELPER_BASE+'line-utils');constapp=newLineUtils(line,config);app.message(async(event,client)=>{console.log(event);vartext=event.message.textconstecho={type:'text',text:text+'だよ'};returnclient.replyMessage(event.replyToken,echo);});exports.fulfillment=app.lambda();Swaggerファイルには以下を最低限記載します。
swagger:'2.0'info:version:'firstversion'title:Lambda Laboratory Serverpaths:/line-todoist:post:x-handler:fulfillmentparameters:-in:bodyname:bodyschema:$ref:"#/definitions/CommonRequest"responses:200:description:Successschema:$ref:"#/definitions/CommonResponse"【LINEチャネルアクセストークン(長期)】と【LINEチャネルシークレット】のところに、先ほど覚えておいた値を付記しておきます。
細かな処理は、api/helpers/line-utils.js で処理させています。以下のnpmモジュールを使っています。
line/line-bot-sdk-nodejs
https://github.com/line/line-bot-sdk-nodejs
LINEボットのWebhook設定
LINEデベロッパーの、Messagin API設定に、Webhook設定があります。
ここに、立ち上げたNode.jsサーバのURLを指定します。以下のような感じです。
https://【Node.jsサーバのホスト名】/line-todoist
これで、Webhookの利用をOKにして、検証ボタンを押下すると、「成功」と表示されるかと思います。
ついでに、同じページに表示されているQRコードから、LINEアプリでこのLINEボットを友達として登録しておきましょう。
LINEとtodoistの連携
LINEとtodoistの連携は、このLINEボットが担います。
連携のための設定情報は、Node.jsサーバの data/line-todoist/フォルダにJSONファイルとして保存します。
目標とするConfigファイル名と中身は以下の通りです。
ファイル名:user-【LINEのユーザID】 またはgroup-【LINEのグループID】
ファイルの中身:
{
  "token": {
    "access_token": "【todoistのAPIトークン】",
    "token_type": "Bearer"
  },
  "apikey": "【本ファイルをアクセスするためのAPIキー】",
  "project_id": 【todoistの対象プロジェクトID】
}
まず、ファイル名がLINEのユーザIDまたはグループIDとなっています。
LINEボットをお友達にしたのち直接LINEボットと会話する場合と、LINEのグループにLINEボットを招待して会話する場合の両方があるためです。対象となるLINEのIDは、前者がユーザID、後者がグループIDとなります。
それらのLINEのIDとtodoistをどうやって結びつけるかというと、いったんLINEボットからLINEのIDとともに、これから立ち上げるWebページに飛ばし、そこでユーザによりtodoistと認証した結果をLINEボットに戻すことで、行っています。
todoistのアプリ登録
todoistで認証できるようにアプリ登録します。
Todoist App Management
https://developer.todoist.com/appconsole.html
「Create a new app」ボタンを押下します。

大事なのは、OAuth redirect URLの部分です。
さきほど立ち上げたNode.jsサーバのURLを指定します。
https://【Node.jsサーバのホスト名】/admin/index.html
public/admin/フォルダに、静的ページを用意しておきました。
todoist認証完了後、todoistの認可コード付きでこのページに戻るようになります。
Client IDとClient secretも使うので覚えておきます。
流れはこんな感じです。
①LINEアプリからtodoist認証ページへ切り替える
以下の部分です。
todoistのAPIトークンがすでにある場合は、直接静的ページ/admin/index.htmlに飛びますが、ない場合は、todoistの認証URLを返しています。
varmessage;if(!conf.token){// 新規登録message={type:"template",altText:"設定",template:{type:"buttons",text:"まだTodoistが設定されていません。",actions:[{type:"uri",label:"設定ページ",uri:"https://todoist.com/oauth/authorize?client_id="+TODOIST_CLIENT_ID+"&scope=data:delete,data:read_write&state="+sourceId+"&openExternalBrowser=1"}]}}}else{// 登録済みmessage={type:"template",altText:"設定",template:{type:"buttons",text:"すでにTodoistが設定されています。",actions:[{type:"uri",label:"設定ページ",uri:ADMIN_PAGE_URL+"?openExternalBrowser=1"}]}}}returnclient.replyMessage(event.replyToken,message);上記処理は、LINEチャットから以下を入力することで起動します。
/todoist config
ちなみに、「/(スラッシュ)」で続くチャットのみ、今回作成するLINEボットで扱うようにしています。
②認可コードをNode.jsサーバにわたす。
todoistのユーザ認証が完了すると、認可コードとともに、静的ページに戻ってきます。
静的ページでは、LINEのID、todoistの認可コード、パスワードとして使うapikeyをNode.jsに渡します。以下の部分です。
if(searchs.code){// todoist認証後の認可コードvarsourceId=searchs.state;varcode=searchs.code;history.replaceState(null,null,'.');varapikey=prompt("API Keyを指定してください。");if(!apikey)return;// todoistのトークン設定varparam={code:code,sourceId:sourceId};do_post_apikey(base_url+'/line-todoist-callback',param,apikey).then(json=>{this.apikey=apikey;this.sourceId=sourceId;Cookies.set("line_apikey",this.apikey,{expires:EXPIRES});Cookies.set("line_sourceId",this.sourceId,{expires:EXPIRES});this.get_config();});}else{③認可コードからAPIトークンを取得する
まずは、ブラウザから、POST呼び出しを受け付けるために、HTTP POSTエンドポイントを作成します。
以下の部分です。
exports.handler=async(event,context,callback)=>{varbody=JSON.parse(event.body);if(event.path=='/line-todoist-callback'){・・・}};また、swagger.xmlにエンドポイントを定義します。
paths:・・・/line-todoist-callback:post:security:-apikeyAuth:[]parameters:-in:bodyname:bodyschema:$ref:"#/definitions/CommonRequest"responses:200:description:Successschema:$ref:"#/definitions/CommonResponse"で、認可コードを受け取って、todoistのWebAPIを使ってAPIトークンの取得する処理は以下の部分です。
constTODOIST_CLIENT_ID=process.env.TODOIST_CLIENT_ID||"【todoistのClient ID】";constTODOIST_CLIENT_SECRET=process.env.TODOIST_CLIENT_SECRET||"【todoistのClient secret】";・・・if(event.path=='/line-todoist-callback'){// トークン取得処理varapikey=event.requestContext.apikeyAuth.apikey;varsourceId=body.sourceId;// トークン取得呼び出しvarparam={client_id:TODOIST_CLIENT_ID,client_secret:TODOIST_CLIENT_SECRET,code:body.code};varjson=awaitdo_post("https://todoist.com/oauth/access_token",param);// sourceIdのConfigファイル更新varconf=awaitreadConfigFile(sourceId);if(!conf){conf={apikey:apikey};}elseif(conf.apikey!=apikey){throw'invalid apikey';}conf.token=json;awaitwriteConfigFile(sourceId,conf);returnnewResponse({});④LINEボットがタスク登録するtodoistプロジェクトの選択
静的ページには、todoistに作成してあるプロジェクト一覧が表示されているかと思います。
そのうちから、LINEボットが登録する先のプロジェクトをセレクトボックスから選択して、「Select Project」ボタンを押下します。

以下の部分が呼ばれて、project_idがConfigファイルに設定されます。
if(event.path=='/line-todoist-set-config'){// project_id設定要求varapikey=event.requestContext.apikeyAuth.apikey;varsourceId=body.sourceId;// sourceIdのConfigファイル更新varconf=awaitreadConfigFile(sourceId);if(conf.apikey!=apikey)throw'apikey mismatch';conf.project_id=body.project_id;awaitwriteConfigFile(sourceId,conf);returnnewResponse({});これで、Configファイルに必要な値が埋まりました。
タスク(やることリスト)の登録
LINEチャットで以下のように入力します。
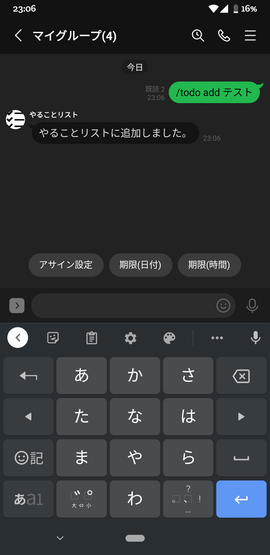
/todo add タスク名
以下の部分が呼ばれます。
constTodoist=require('todoist').v8;・・・if(command.cmd=='todo'&&command.ope=='add'){// タスクの追加// sourceIdからConfigファイル取得varconf=awaitreadConfigFile(sourceId);if(!conf||!conf.token)returnclient.replyMessage(event.replyToken,{type:'text',text:'todoistが設定されていません。'});// 指定プロジェクトにタスクの追加consttodoist=Todoist(conf.token.access_token);constnewItem=awaittodoist.items.add({content:command.param,project_id:conf.project_id});varitem_id=newItem.id;returnclient.replyMessage(event.replyToken,make_item_suggestion(item_id,"やることリストに追加しました。"));Configファイルに保存しておいたtodoistのAPIトークンを使ってタスクを登録しています。
npm node-todoistを利用していますが、使い方は以下を参照してください。
romgrk/node-todoist
https://github.com/romgrk/node-todoist
「やることリストに追加しました」と返答がかえってきました。
合わせて、続けて設定できるように「アサイン設定」「期限(日付)」がサジェスチョンされてます。
「アサイン設定」は後述の処理を動かすためのポストバック、「期限(日付)」はユーザに日付を選択してもらうための日時選択アクションをサジェスチョンに設定しています。
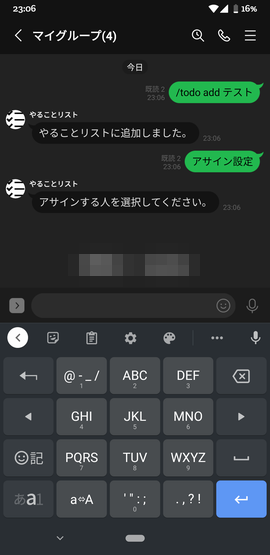
アサイン設定のサジェスチョンを選択すると以下の処理が走ります。
if(data[0]=='todo_asign_select'){// アサイン選択要求(todo_asign_select,item_id)varitem_id=parseInt(data[1]);// todoist.sync()呼び出しconsttodoist=Todoist(conf.token.access_token);// タスクの検索awaittodoist.sync();vartask=todoist.items.get().find(item=>item.id==item_id);constcollaborators=todoist.sharing.collaborators();constcollaboratorStates=todoist.state.collaborator_states;// 指定プロジェクトの共有ユーザリストの抽出varmembers=collaboratorStates.filter(item=>item.project_id==conf.project_id);if(members.length>0){varmessage={type:'text',text:"アサインする人を選択してください。",quickReply:{items:[]}};members.forEach(member=>{constuser=collaborators.find(item=>member.user_id==item.id);constparam={type:"action",action:{type:"postback",label:user.full_name,data:"todo_asign,"+item_id+','+user.id,displayText:user.full_name}}message.quickReply.items.push(param);});returnclient.replyMessage(event.replyToken,message);}else{returnclient.replyMessage(event.replyToken,make_item_suggestion(item_id,"アサインできる人がいません。",(task.due)?task.due.date:undefined));}対象プロジェクトの共有者をリストアップし、アサイン候補者としてサジェスチョンを表示してます。
期限(日付)のサジェスチョンを選択した場合、以下の処理が動きます。ユーザが日付を選択した後に呼ばれます。
if(data[0]=='todo_duedate'){// 期限(日付)設定要求(todo_duedate,item_id)varitem_id=parseInt(data[1]);consttodoist=Todoist(conf.token.access_token);todoist.items.update({id:item_id,due:{date:event.postback.params.date,lang:'ja'}});returnclient.replyMessage(event.replyToken,make_item_suggestion(item_id,"変更しました。",event.postback.params.date));
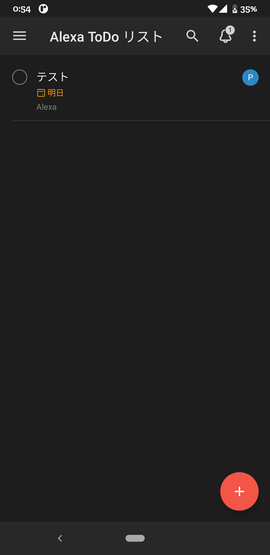
さっそく、todoistアプリから覗いてみましょう。
上記のタスクが登録されているのではないでしょうか。
今日のタスクの一覧取得
タスク一覧を取得します。
操作しやすいように、LINEアプリにチャットとして「/」を入力することで、「今日」「明日」「明後日以降」「期限切れ」「いつか」を選択できるサジェスチョンを表示し、それを選択してもらうと使いやすいかと思いました。
「/」がチャットされたときには以下が動きます。
if(command.cmd=='default'){returnclient.replyMessage(event.replyToken,make_tasksearch_suggestion());そして、ユーザによりサジェスチョンを選択されると、以下が動きます。
if(data[0]=='todo_today'||data[0]=='todo_tommorow'||data[0]=='todo_other'||data[0]=='todo_someday'||data[0]=='todo_expire'){// タスクリスト取得要求(todo_xxx)// todoist.sync()呼び出しconsttodoist=Todoist(conf.token.access_token);awaittodoist.sync();constcollaborators=todoist.sharing.collaborators();varitems=todoist.items.get();if(conf.project_id)items=items.filter(item=>item.project_id==conf.project_id);// 対象プロジェクトにフィルタリング// 境界時間の算出vartoday=newDate();today.setHours(0,0,0,0);vartodayTime=today.getTime();// 今日の開始vartomorrow=newDate();tomorrow.setHours(0,0,0,0);tomorrow.setDate(tomorrow.getDate()+1);vartomorrowTime=tomorrow.getTime();varaftertomorrow=newDate();// 明日の開始aftertomorrow.setHours(0,0,0,0);aftertomorrow.setDate(aftertomorrow.getDate()+2);varaftertomorrowTime=aftertomorrow.getTime();// 明後日の開始vartarget_list;vartitle;if(data[0]=='todo_today'){// 期限が今日の始めから明日の始めtitle="今日";target_list=items.filter(item=>item.due&&Date.parse(item.due.date)>=todayTime&&Date.parse(item.due.date)<tomorrowTime);}elseif(data[0]=='todo_tommorow'){// 期限が明日の初めから明後日の始めtitle="明日";target_list=items.filter(item=>item.due&&Date.parse(item.due.date)>=tomorrowTime&&Date.parse(item.due.date)<aftertomorrowTime);}elseif(data[0]=='todo_other'){// 期限が明後日の始め以降title="明後日以降";target_list=items.filter(item=>item.due&&Date.parse(item.due.date)>=aftertomorrowTime);}elseif(data[0]=='todo_expire'){// 期限が今日の始め以前title="期限切れ";target_list=items.filter(item=>item.due&&Date.parse(item.due.date)<todayTime);}else{// 期限が未設定title='いつか';target_list=items.filter(item=>!item.due);}console.log(target_list);varmessage=make_todolist_message(title+"のやることリスト",target_list,collaborators);returnclient.replyMessage(event.replyToken,message);例えば、期限を明日に設定していると、明日を選択すると以下のように、リストの中の1つとして表示されています。

サジェスチョンに、項目番号をいれておきました。それを選択すると、そのタスクの詳細が表示されるようにしました。

以下の部分です。
if(data[0]=='todo_detail'){// タスクの詳細表示要求(todo_detail,item_id)varitem_id=parseInt(data[1]);// todoist.sync()呼び出しconsttodoist=Todoist(conf.token.access_token);awaittodoist.sync();varitems=todoist.items.get();constcollaborators=todoist.sharing.collaborators();varnotes=todoist.notes.get();// タスクの検索vartask=items.find(item=>item.id==item_id);varmessage=make_tododetail_message(task,collaborators,notes);returnclient.replyMessage(event.replyToken,message);もし、コメントを残しているようであれば、それも表示するようにしています。
「完了する」というサジェスチョンも用意しておきました。言葉どおり、タスクを完了状態にします。
以下の処理が動きます。
if(data[0]=='todo_complete'){// タスク完了要求(todo_complete,item_id)varitem_id=parseInt(data[1]);consttodoist=Todoist(conf.token.access_token);todoist.items.complete({id:item_id});returnclient.replyMessage(event.replyToken,{type:'text',text:"完了にしました"});終わりに
ちょっと説明が少なく、わかりにくかったかもしれません。
機能拡張の機会があれば、その時にもう少し補足しようかな。。。
以下も参考にしてください。
AlexaとTodoistでやることリスト・お買い物リスト
Dialogflowと連携してLINE Botを作る
LINE Beaconを自宅に住まわせる
以上