概要
近年、スクラムを導入した開発チームが増えつつあります。
スクラムチームの質を向上させるため、プロジェクト管理者だけではなくて、チームメンバーにも開発状況を把握しやすくすることが重要だと思います。
今回は、JIRA REST APIを使って、最新のスプリント情報を取得すると、バーンダウンチャートを生成して、日常的にSlackのChannelに送信するBotを紹介します。
要求仕様
node 12.16.1
npm 6.13.4
JIRA REST API テスト
まずはChrome API Tester Toolを使って、JIRA REST APIのテストを行う。(スクラムボードのみ支持)
METHOD: GET
SCHEMA: https://{your-domain}.atlassian.net/rest/agile/1.0/board/{boardId}/sprint/{sprintId}/issue
こんな感じのレスポンスで問題ないかと思います。
Image may be NSFW.
Clik here to view.
SlackBot を作成する
Botの作り方はワークスペースで利用するボットの作成を参照してください。
現在、元宵節を迎えることになりますので、MagicalYuanxiao(中国語:神奇小元宵)と名付けました。
Image may be NSFW.
Clik here to view.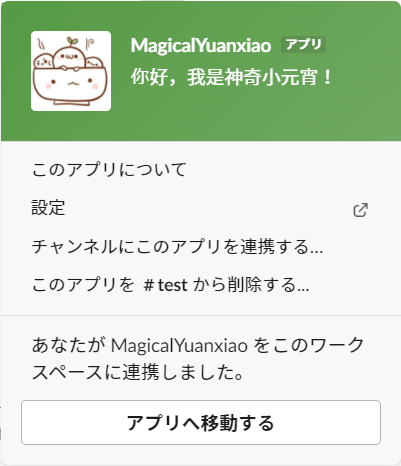
次は、作成済みのAppを送信したいChannelに追加しました。
Image may be NSFW.
Clik here to view.
SlackBot 送信テスト
HTTPクライアントのインストール
$ npm install axios
メッセージを送信する
// test file// Run "node sendMsg.js" to test access slack token// If send message to channel is successfully, the token is OKconstaxios=require("axios");constMSG_URL="https://slack.com/api/chat.postMessage";constslackToken="Your slack token";// *Slack Bot User OAuth Access Token*asyncfunctionrun(){constres=awaitaxios.post(MSG_URL,{channel:"#test",// *send to target channel*text:"Hello, I am magical yuanxiao!",// message content},{headers:{authorization:`Bearer ${slackToken}`,},});console.log("Done",res.data);}run().catch((err)=>console.log(err));実行コマンド
$ node sendMsg.js
テスト結果
Image may be NSFW.
Clik here to view.
SlackBot 機能要件
ここからバーンダウンチャートを送信するSlackBotMagicalYuanxiaoのワークフローや実装部分を簡単に説明します。
ワークフロー
Image may be NSFW.
Clik here to view.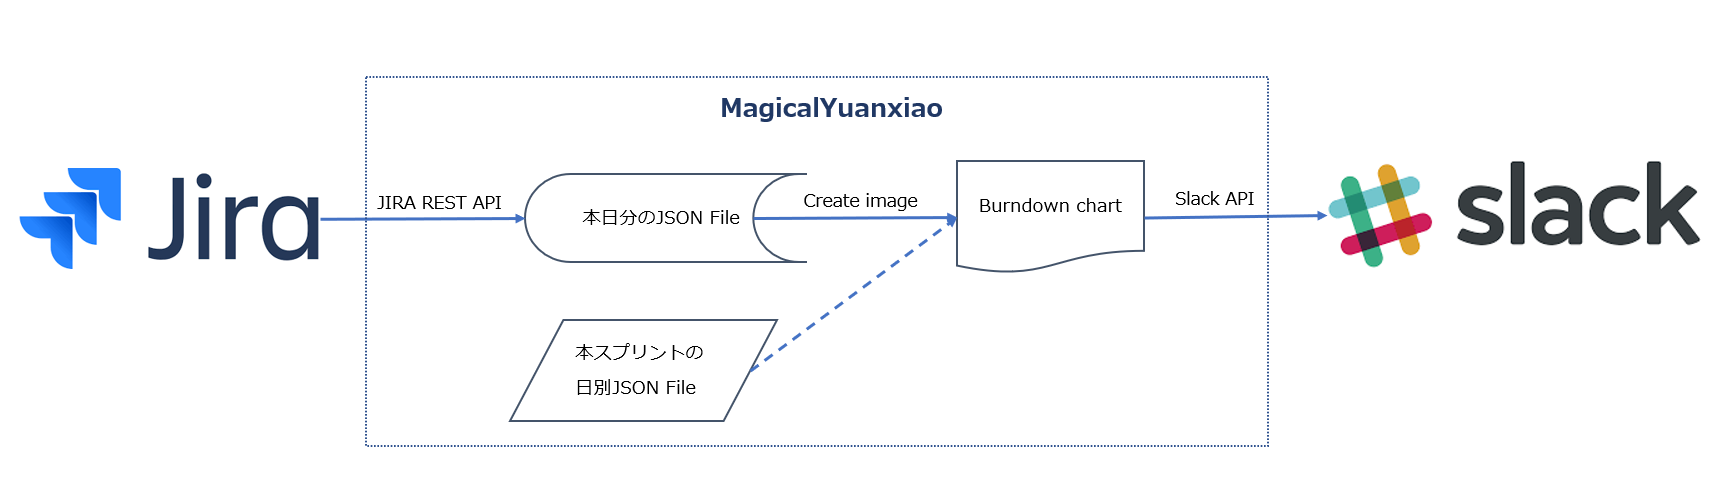
ライブラリの導入
・JIRAアクセス(https://www.npmjs.com/package/jira-client)
・ファイルとディレクトリの読み取りと書き込み(https://www.npmjs.com/package/fs)
・HTTPリクエスト(https://www.npmjs.com/package/request)
・時間データの操作(https://www.npmjs.com/package/moment)
・グラフ描画(https://github.com/SeanSobey/ChartjsNodeCanvas)
・環境変数の設定(https://www.npmjs.com/package/dotenv)
スプリントデータを保存する
// jira API optionsconstjira=newJiraApi({protocol:"https",host:jiraHost,username:jiraUsername,password:jiraPassword,apiVersion:"3",strictSSL:true,});// today's dateconstYYYYMMDD=moment().format("YYYYMMDD");// step1: get sprint info to generate json from jiraletsprint={};awaitjira.getSprintIssues(rapidViewId,sprintId).then(function(issues){sprint["id"]=issues.sprint.id;// スプリントIDsprint["name"]=issues.sprint.name;// スプリント名sprint["goal"]=issues.sprint.goal?issues.sprint.goal:0;// 目標点数sprint["startDate"]=moment(issues.sprint.isoStartDate).format("YYYYMMDD");// 開始日sprint["endDate"]=moment(issues.sprint.isoEndDate).format("YYYYMMDD");// 終了日sprint["issuesPointSum"]=issues.contents.completedIssuesEstimateSum.value?issues.contents.completedIssuesEstimateSum.value:0+issues.contents.issuesNotCompletedEstimateSum.value?issues.contents.issuesNotCompletedEstimateSum.value:0;// ストーリー点数合計sprint["notCompletedIssuesPointSum"]=issues.contents.issuesNotCompletedEstimateSum.value?issues.contents.issuesNotCompletedEstimateSum.value:0;// 未完了ストーリー点数合計(include: todo, doing, review...)}).catch(function(err){console.error(err);});// json data to be writtenletjsonData={code:0,data:sprint,updateDate:moment().format("YYYY/MM/DD HH:mm:ss"),msg:"success",};// format jsonlettext=JSON.stringify(jsonData);// param: directory and file nameletfile=path.join("./output/",YYYYMMDD+"_sprint_data.json");// write into jsonawaitfs.writeFile(file,text,function(err){if(err){console.log(err);}else{console.log("File was successfully created: "+file);}});チャートデータを用意する
// step2: get data for line chartvarstartAndEndDateDiff=moment(sprint.endDate).diff(moment(sprint.startDate),"days");// X axis labels for line chartvarxLables=[];for(leti=0;i<=startAndEndDateDiff;i++){xLables[i]=moment(sprint.startDate).add(i,"days").format("MM/DD");}// Y axis values for line chartvaryValues=[];// from 0 to date difference(from today to startDate)vardateDifferenceArray=[];for(leti=0;i<=moment().diff(moment(sprint.startDate),"days");i++){dateDifferenceArray.push(i);}varjsonArray=dateDifferenceArray.reverse().map(getJsonAsync);awaitPromise.all(jsonArray).then(function(jsonData){// 本スプリントの日別残ポイントデータを埋め込むyValues=jsonData.map((s)=>s.data.notCompletedIssuesPointSum);}).catch(function(err){console.error(err);});// guideline Y axis valuesvarguidelineValues=[];for(leti=0;i<=startAndEndDateDiff;i++){guidelineValues.push(sprint.goal-Math.floor((sprint.goal*i)/startAndEndDateDiff));}バーンダウンチャートを作成する
// step3: create burn down chart imageconstheight=400;constwidth=700;constchartJSNodeCanvas=newChartJSNodeCanvas({width,height});(async()=>{constconfiguration={type:"line",data:{labels:xLables,datasets:[{label:"Story Points remaining",borderColor:"rgba(255, 100, 100, 1)",data:yValues,fill:false,},{label:"Guideline",borderColor:"rgba(122, 122, 122, 1)",borderDash:[10,3],// dotted linedata:guidelineValues,fill:false,borderWidth:1,},],},options:{scales:{yAxes:[{ticks:{beginAtZero:true,// set Y min value to 0},},],},elements:{point:{radius:0,// do not show points},},title:{display:true,fontSize:16,text:sprint.name+"("+moment(sprint.startDate).format("MM/DD")+"~"+moment(sprint.endDate).format("MM/DD")+")",// chart title},},};constdataUrl=awaitchartJSNodeCanvas.renderToDataURL(configuration);constbase64Data=dataUrl.replace(/^data:image\/png;base64,/,"");awaitfs.writeFile("./output/"+YYYYMMDD+"_burn_down_chart.png",base64Data,"base64",function(err){if(err){console.log(err);}});})();Slackにバーンダウンチャートを送信する
// step4: upload created chart to slackrequest.post({url:UPLOAD_URL,formData:{file:fs.createReadStream("./output/"+YYYYMMDD+"_burn_down_chart.png"),token:slackToken,filetype:"png",filename:YYYYMMDD+"_burn_down_chart.png",channels:slackChannel,// send to XXX channeltitle:YYYYMMDD+"_burn_down_chart.png",// show this name in slack},},function(error,response,body){if(error){console.log(error);}else{console.log("Send burn down chart to slack.");// console.log(body);}});実行コマンド
$ node app.js
Slackスクリーンショット
Image may be NSFW.
Clik here to view.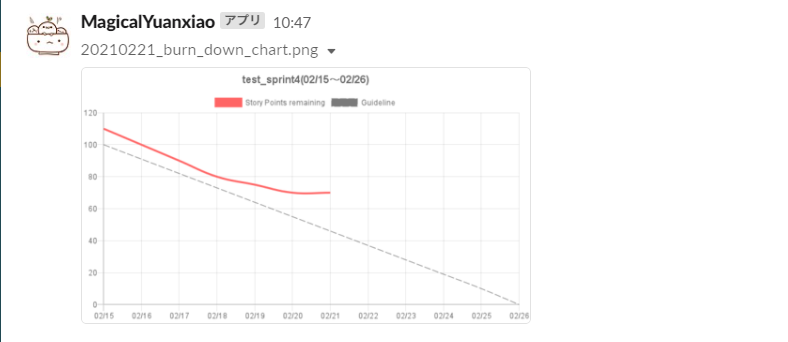
以上でnodejsの実装部分は完成です。
あとは定時バッチ、GASなどで行えば定時的にSlackにpostする予定です。
Source Code (GitHub)
そのうちリポジトリのコード載せる(予定)