Alexaスキル開発チュートリアル(AWS Lamda, node.js)
個人で開発した、Alexaスキル開発チュートリアルを記載します。
今回は自分の目標設定をAlexaに記憶させて、次回起動時に目標期限を自動で算出して教えてくれるAlexaスキルを開発してみようと思います。
完成イメージ
◼︎ 初回起動時
(自分)アレクサ、目標リマインダーを開いて
(Alexa)こんにちは、目標リマインダーへようこそ。目標達成希望日時を教えてください。
(自分)2020年10月9日
(Alexa)ありがとうございます。目標達成日時は2020年10月9日ですね。

◼︎ 次回起動時
(自分)アレクサ、目標リマインダー
(Alexa)おかえりなさい、次の目標達成日時まで1年、残り12日です。目標達成に向けて本日も頑張りましょう
前提知識
1. AWS Lambdaについての最低限の知識
2. JavsaScriptについての最低限の知識
3. Alexa(スマートスピーカー)についての最低限の知識
STEP1 「ログイン」
まず、Amazon開発者アカウントを使って Alexa開発者コンソールにログインします。アカウントがない場合は、こちらで作成します。
STEP2 「スキルを作成」
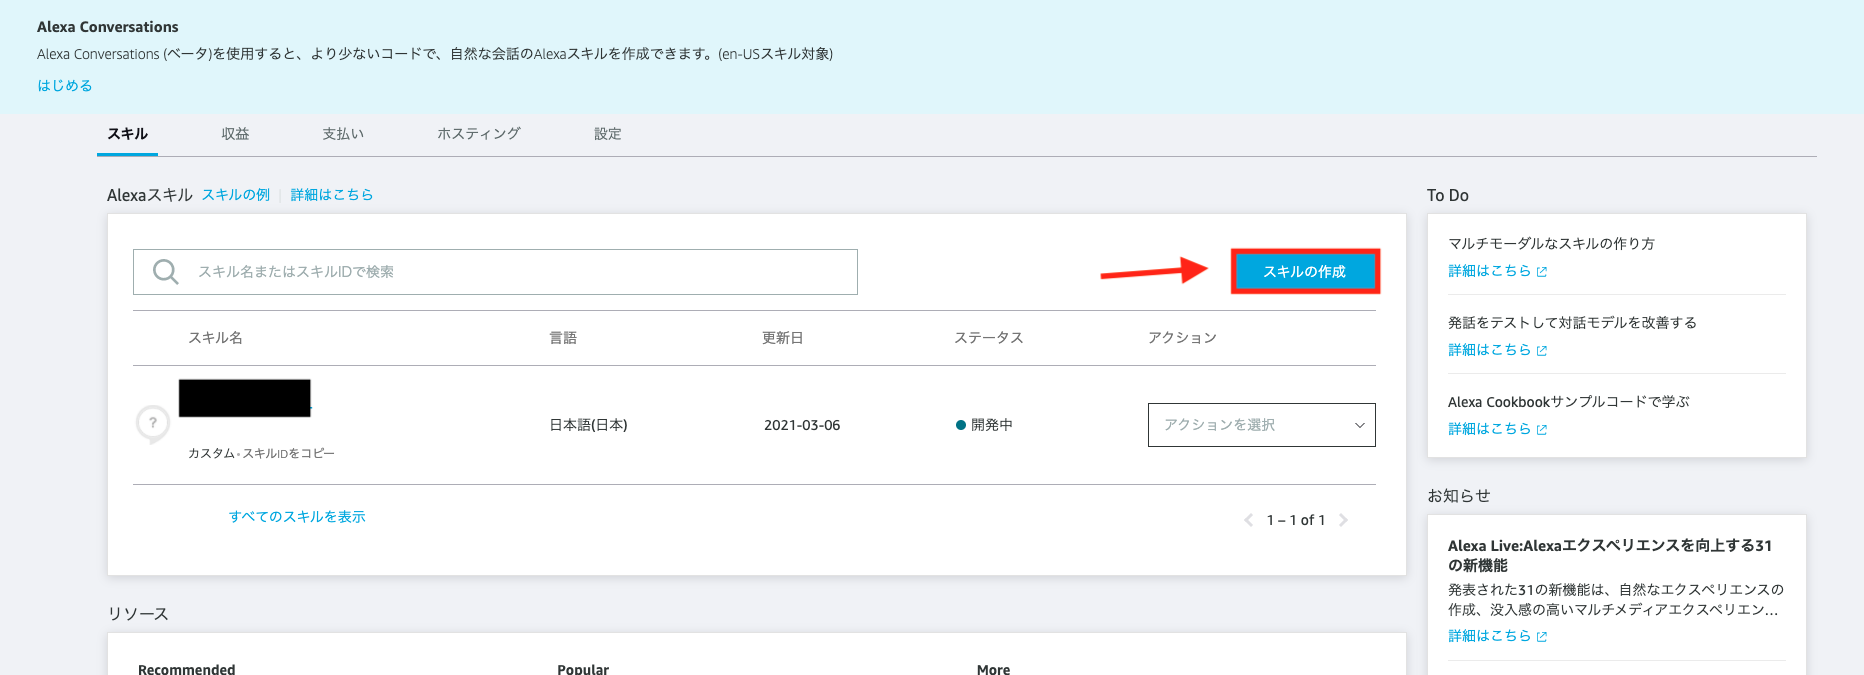
コンソールの右側にあるスキルの作成をクリックします。新しいページが表示されます。
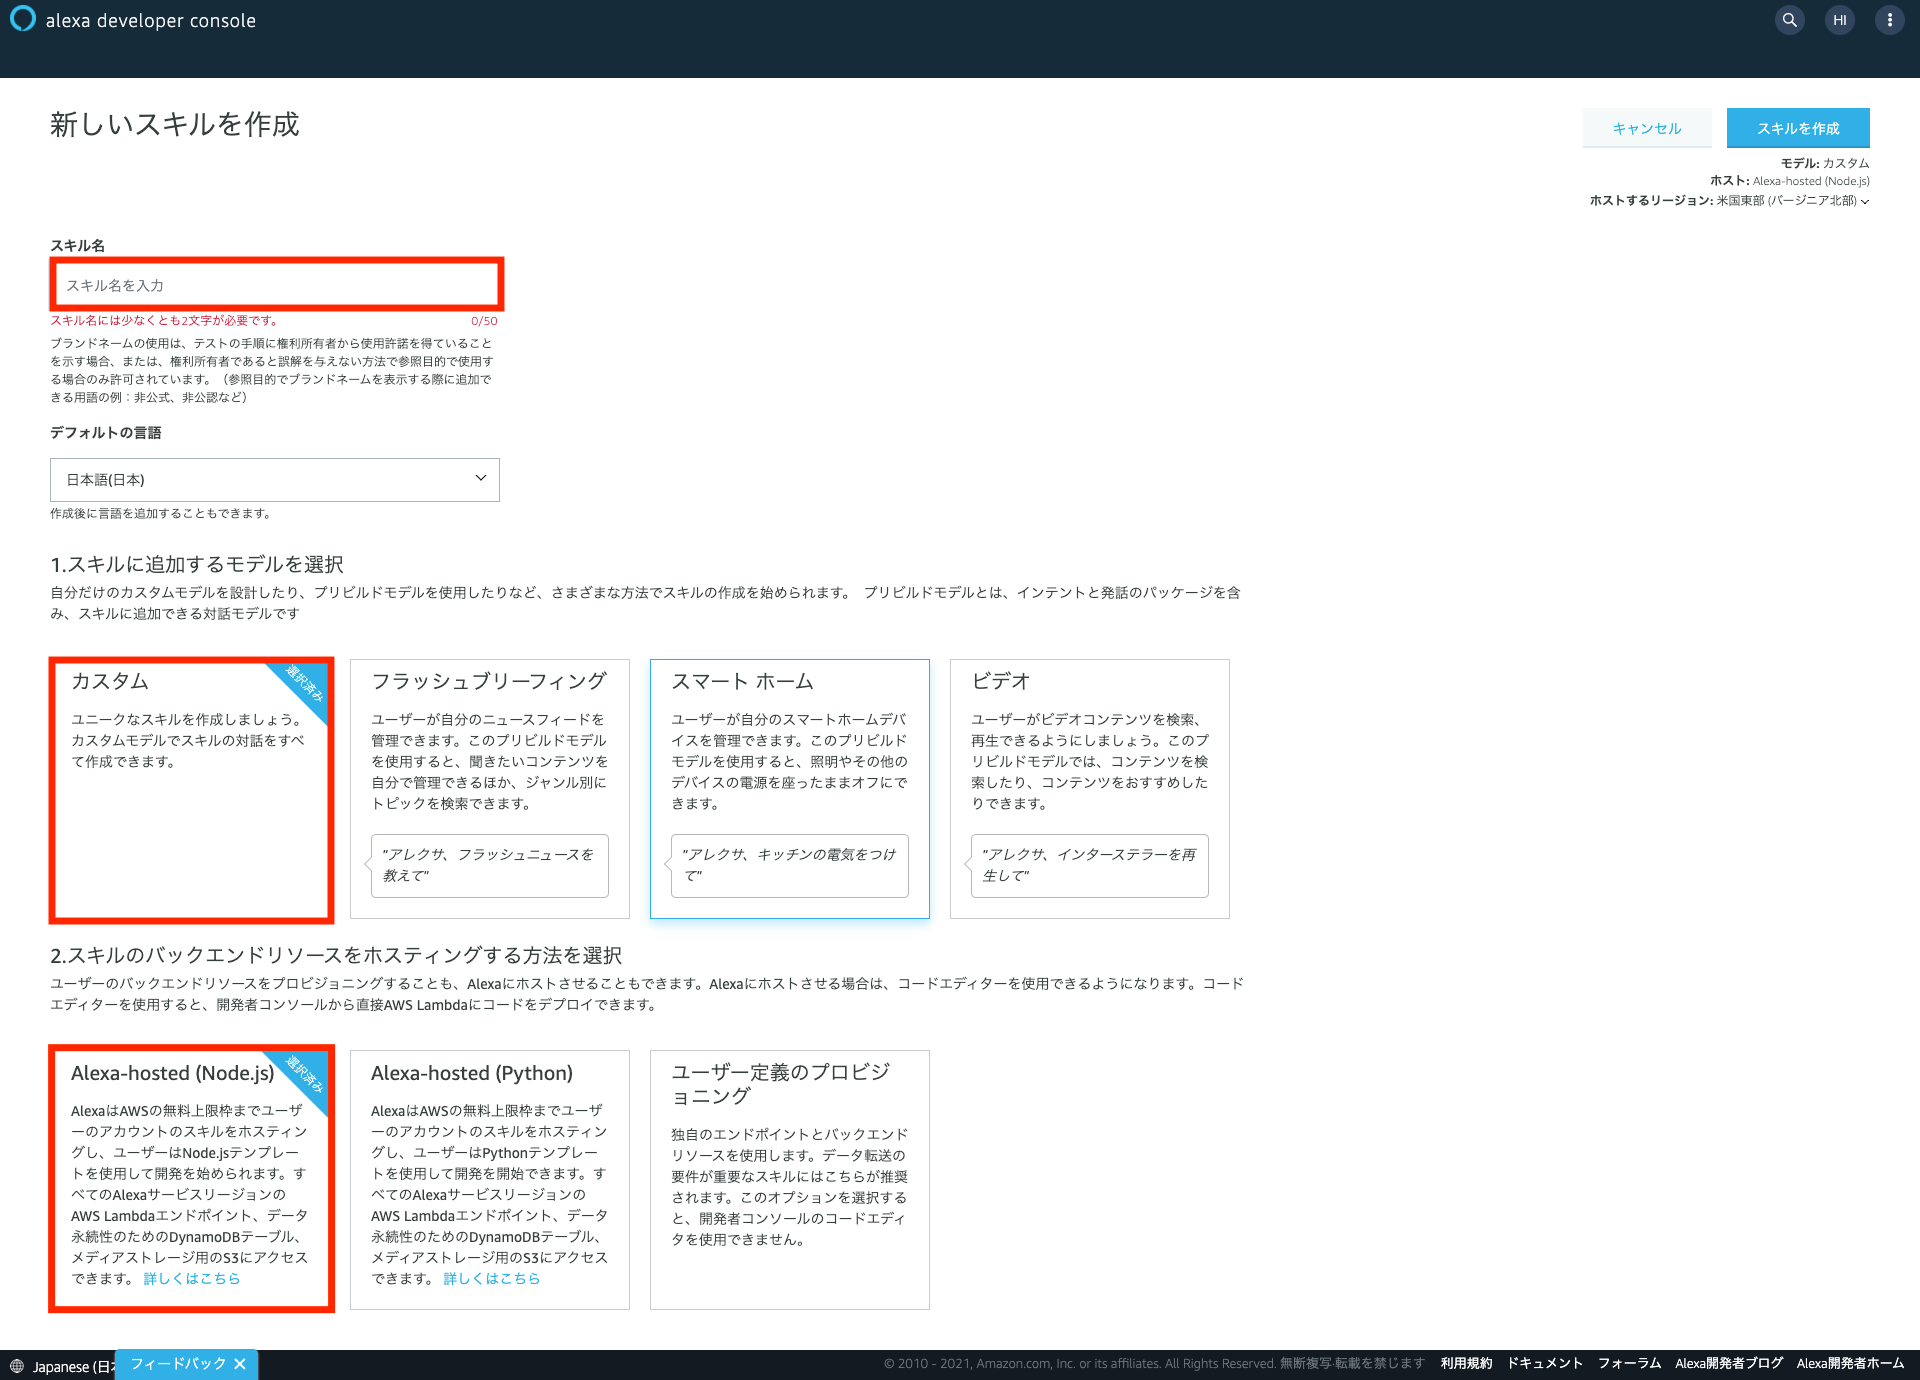
- スキル名を入力します。このスキル名が公開された時に表示される名前になります。
- スキルに追加するモデルを選択します。今回はオリジナルAlexaスキルを開発するのでカスタムを選択します。
- スキルのバックエンドリソースをホスティングする方法を選択します。今回はAlexaにホストを選択します。今回の開発言語はNode.jsにする。(AWSの無料枠には制限があるため、スキルの使用頻度が上がってきたら、独自にホスティングするオプションに変更するのがオススメ)
STEP3 「呼び出し名を作成」
呼び出し名とは自分が開発したAlexaスキルを呼び出すときに発生するワードになります。
アレクサ、目標リマインダーを開いて
この時の {{ 目標リマインダー }}が呼び出し名になります。
STEP4 「コードエディタでコードを書く」
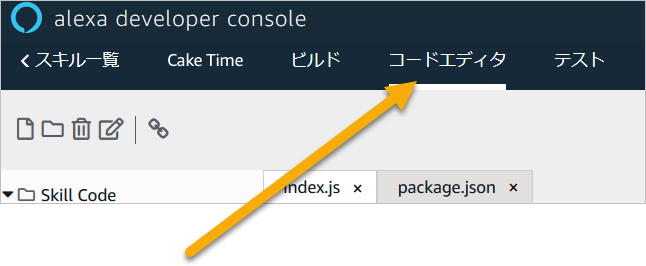
コードエディタタブをクリックします。コードエディタでindex.jsファイルが開きます。
今回開発した「目標設定リマインダー」の完成コードを記載します。
全てのコードを詳しく解説すると、永遠に終わらないので簡単な解説コメントのみ記載します
/* *
 * This sample demonstrates handling intents from an Alexa skill using the Alexa Skills Kit SDK (v2).
 * Please visit https://alexa.design/cookbook for additional examples on implementing slots, dialog management,
 * session persistence, api calls, and more.
 * *//* *
* ハンドラー関数について
* スキルがリクエストを受け取ると、各ハンドラーのcanHandle() 関数がそのハンドラーでリクエストに対応できるかを判断します。
* canHandle() 関数 -> ハンドラーが応答するリクエストを定義します(trueを返すことで、この処理を実行できる)
* handle() 関数 -> ユーザーに応答する内容を定義します
* const Alexa = require('ask-sdk-core');
* const persistenceAdapter = require('ask-sdk-s3-persistence-adapter');
* */constLaunchRequestHandler={canHandle(handlerInput){returnAlexa.getRequestType(handlerInput.requestEnvelope)==='LaunchRequest';},handle(handlerInput){//  起動時の挨拶constspeakOutput='こんにちは、目標リマインダーへようこそ。目標達成希望日時を教えてください。';// ユーザーが答えなかった場合に、もう一度たずねるconstrepromptOutput='私の目標達成日時は2020年10月1日です、あなたの目標達成希望日時を教えてください。';returnhandlerInput.responseBuilder.speak(speakOutput).reprompt(repromptOutput).getResponse();}};constHasDreamdayLaunchRequestHandler={// canHandle()関数はユーザーの目標達成日時がAmazon S3に保存されているかどうかをチェックします// 保存されていれば、ハンドラーはSDKに続行が可能である(ユーザーの誕生日が保存されているため、次の処理に進めると知らせます。// 保存されていない場合はLaunchRequestHandlerを呼び、目標達成日時の取得を行うcanHandle(handlerInput){constattributesManager=handlerInput.attributesManager;constsessionAttributes=attributesManager.getSessionAttributes()||{};constyear=sessionAttributes.hasOwnProperty('year')?sessionAttributes.year:0;constmonth=sessionAttributes.hasOwnProperty('month')?sessionAttributes.month:0;constday=sessionAttributes.hasOwnProperty('day')?sessionAttributes.day:0;returnhandlerInput.requestEnvelope.request.type==='LaunchRequest'&&year&&month&&day;},// handle()関数は、「おかえりなさい。Y歳の誕生日まであとX日です。」と言うようAlexaに指示します。// APIを使ってタイムゾーンを取得するため、応答を取得するまでに時間がかかる可能性がるので非同期処理にするasynchandle(handlerInput){//  ServiceClientファクトリーを作成constserviceClientFactory=handlerInput.serviceClientFactory;//  デバイスIDを取得constdeviceId=handlerInput.requestEnvelope.context.System.device.deviceId;constattributesManager=handlerInput.attributesManager;constsessionAttributes=attributesManager.getSessionAttributes()||{};constyear=sessionAttributes.hasOwnProperty('year')?sessionAttributes.year:0;constmonth=sessionAttributes.hasOwnProperty('month')?sessionAttributes.month:0;constday=sessionAttributes.hasOwnProperty('day')?sessionAttributes.day:0;// タイムゾーン取得、タイムゾーン取得失敗の時はエラーログ吐くletuserTimeZone;try{constupsServiceClient=serviceClientFactory.getUpsServiceClient();userTimeZone=awaitupsServiceClient.getSystemTimeZone(deviceId);}catch(error){if(error.name!=='ServiceError'){returnhandlerInput.responseBuilder.speak("サービスへの接続がうまく行きませんでした。").getResponse();}console.log('error',error.message);}// 現在の日付と時刻を取得しますconstcurrentDateTime=newDate(newDate().toLocaleString("ja-JP",{timeZone:userTimeZone}));// 日数計算の結果に影響するため、日付から時刻を取り除きますconstcurrentDate=newDate(currentDateTime.getFullYear(),currentDateTime.getMonth(),currentDateTime.getDate());// 現在年度を取得constcurrentYear=currentDate.getFullYear();// 目標達成日時の取得// todo: 変数名変更letnextBirthday=Date.parse(`${month}${day}, ${currentYear}`);// 目標達成日時が今年でなければ何年先かを求めるif(currentDate.getTime()>nextBirthday){consttermDay=(currentDate.getTime()-nextBirthday)/86400000;if(termDay>365){consttermYear=Math.floor(termDay/365)nextBirthday=Date.parse(`${month}${day}, ${currentYear+termYear}`);}}// 8640000(1日をミリ秒に換算したもの)constoneDay=24*60*60*1000;// 目標達成日時の場合はおめでとうと発生するletspeechText=`本日が目標達成日時になります。目標達成おめでとうございます。`;if(currentDate.getTime()!==nextBirthday){constdiffDays=Math.round(Math.abs((currentDate.getTime()-nextBirthday)/oneDay));speechText=`おかえりなさい、次の目標まで${currentYear-year}年、残り${diffDays}日です。目標達成に向けて本日も頑張りましょう`}returnhandlerInput.responseBuilder.speak(speechText).getResponse();}};constCaptureGoalIntentHandler={canHandle(handlerInput){returnhandlerInput.requestEnvelope.request.type==='IntentRequest'&&handlerInput.requestEnvelope.request.intent.name==='CaptureGoalIntent';},// 非同期処理で必要情報をs3保存asynchandle(handlerInput){constyear=handlerInput.requestEnvelope.request.intent.slots.year.value;constmonth=handlerInput.requestEnvelope.request.intent.slots.month.value;constday=handlerInput.requestEnvelope.request.intent.slots.day.value// ユーザーの目標達成日時を保存するconstattributesManager=handlerInput.attributesManager;// Amazon S3に値を保存する項目設定constdreamDayAttributes={"year":year,"month":month,"day":day};// ユーザーの情報がAmazon S3に送信されるまで実行完了を待つattributesManager.setPersistentAttributes(dreamDayAttributes);awaitattributesManager.savePersistentAttributes();constspeakOutput=`ありがとうございます。目標達成日時は${year}年${month}月${day}日ですね。`;returnhandlerInput.responseBuilder.speak(speakOutput)//.reprompt('add a reprompt if you want to keep the session open for the user to respond').getResponse();}};// ユーザ発話:「ヘルプ」と発した時の処理constHelpIntentHandler={canHandle(handlerInput){returnAlexa.getRequestType(handlerInput.requestEnvelope)==='IntentRequest'&&Alexa.getIntentName(handlerInput.requestEnvelope)==='AMAZON.HelpIntent';},handle(handlerInput){constspeakOutput='あなたの目標達成日時を教えてくれると私が目標達成日時までの残り時間を計算します。あなたの目標達成希望日時を教えてください。';returnhandlerInput.responseBuilder.speak(speakOutput).reprompt(speakOutput).getResponse();}};// ユーザ発話:「キャンセル」と発した時の処理constCancelAndStopIntentHandler={canHandle(handlerInput){returnAlexa.getRequestType(handlerInput.requestEnvelope)==='IntentRequest'&&(Alexa.getIntentName(handlerInput.requestEnvelope)==='AMAZON.CancelIntent'||Alexa.getIntentName(handlerInput.requestEnvelope)==='AMAZON.StopIntent');},handle(handlerInput){constspeakOutput='さようなら〜';returnhandlerInput.responseBuilder.speak(speakOutput).getResponse();}};/* *
 * FallbackIntent triggers when a customer says something that doesn’t map to any intents in your skill
 * It must also be defined in the language model (if the locale supports it)
 * This handler can be safely added but will be ingnored in locales that do not support it yet
 * */constFallbackIntentHandler={canHandle(handlerInput){returnAlexa.getRequestType(handlerInput.requestEnvelope)==='IntentRequest'&&Alexa.getIntentName(handlerInput.requestEnvelope)==='AMAZON.FallbackIntent';},handle(handlerInput){constspeakOutput='Sorry, I don\'t know about that. Please try again.';returnhandlerInput.responseBuilder.speak(speakOutput).reprompt(speakOutput).getResponse();}};// ユーザ発話:「終了」と発した時の処理constSessionEndedRequestHandler={canHandle(handlerInput){returnAlexa.getRequestType(handlerInput.requestEnvelope)==='SessionEndedRequest';},handle(handlerInput){console.log(`~~~~ Session ended: ${JSON.stringify(handlerInput.requestEnvelope)}`);// Any cleanup logic goes here.returnhandlerInput.responseBuilder.getResponse();// notice we send an empty response}};// ユーザ発話:「<カスタムインテントのサンプル発話(デバッグ用)>」constIntentReflectorHandler={canHandle(handlerInput){returnAlexa.getRequestType(handlerInput.requestEnvelope)==='IntentRequest';},handle(handlerInput){constintentName=Alexa.getIntentName(handlerInput.requestEnvelope);constspeakOutput=`You just triggered ${intentName}`;returnhandlerInput.responseBuilder.speak(speakOutput)//.reprompt('add a reprompt if you want to keep the session open for the user to respond').getResponse();}};// エラーハンドラconstErrorHandler={canHandle(){returntrue;},handle(handlerInput,error){constspeakOutput='すいません、ちょっと何言ってるかわからないです、もう一回話しかけてください';console.log(`~~~~ Error handled: ${JSON.stringify(error)}`);returnhandlerInput.responseBuilder.speak(speakOutput).reprompt(speakOutput).getResponse();}};// S3保存したデータを読み込む// Alexaがユーザーに目標日時をたずねる前にAmazon S3に保存したデータを読み込むconstLoadDreamdayInterceptor={asyncprocess(handlerInput){constattributesManager=handlerInput.attributesManager;constsessionAttributes=awaitattributesManager.getPersistentAttributes()||{};constyear=sessionAttributes.hasOwnProperty('year')?sessionAttributes.year:0;constmonth=sessionAttributes.hasOwnProperty('month')?sessionAttributes.month:0;constday=sessionAttributes.hasOwnProperty('day')?sessionAttributes.day:0;// データが存在-> s3に保存されている日時を取得してセットするif(year&&month&&day){attributesManager.setSessionAttributes(sessionAttributes);}}};/**
 * This handler acts as the entry point for your skill, routing all request and response
 * payloads to the handlers above. Make sure any new handlers or interceptors you've
 * defined are included below. The order matters - they're processed top to bottom
* */exports.handler=Alexa.SkillBuilders.custom().withApiClient(newAlexa.DefaultApiClient())// Amazon S3にデータを保存、読み込む設定.withPersistenceAdapter(newpersistenceAdapter.S3PersistenceAdapter({bucketName:process.env.S3_PERSISTENCE_BUCKET}))// 関数を呼び出す順に羅列する.addRequestHandlers(HasDreamdayLaunchRequestHandler,LaunchRequestHandler,CaptureGoalIntentHandler,HelpIntentHandler,CancelAndStopIntentHandler,FallbackIntentHandler,SessionEndedRequestHandler,IntentReflectorHandler)// インターセプターを登録するコードを追加して、SDKにその存在を知らせる.addRequestInterceptors(LoadDreamdayInterceptor)// エラーハンドリング.addErrorHandlers(ErrorHandler).withCustomUserAgent('sample/hello-world/v1.2').lambda();{"name":"dream-time","version":"1.2.0","description":"alexa utility for quickly building skills","main":"index.js","scripts":{"test":"echo \"Error: no test specified\"&& exit 1"},"author":"Amazon Alexa","license":"Apache License","dependencies":{"ask-sdk-core":"^2.7.0","ask-sdk-model":"^1.19.0","aws-sdk":"^2.326.0","ask-sdk-s3-persistence-adapter":"^2.0.0"}}STEP5 「インテントとスロットを使って情報を取得する」
ユーザーがAlexaの質問にどう答えるかを解釈するインテントを作成します。
インテントとは、ユーザーの音声によるリクエストを満たすアクションのことです。
インテントでは、スロットという引数を任意で使用することもできます。
インテント追加方法
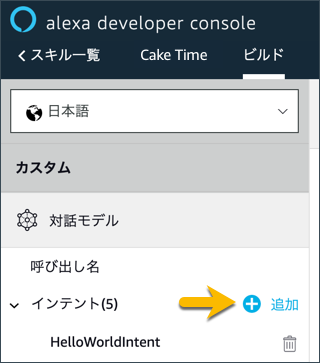
カスタムインテントを作成を選択し、インテント名としてCaptureGoalIntentを入力し、カスタムインテントを作成をクリックすると新規でインテントを作成できます。
CaptureGoalIntentはindex.jsで定義したインテント名になります。(これは自分で定義したカスタムインテントなので追加する必要があります)

スロット作成方法
次にスロットを作成しましょう。
今回の目標達成日時では、年、月、日という3つの重要な情報を収集します。
これらの情報をスロットと呼びます。Alexaにどの単語がスロットで、どのタイプのスロットなのかを知らせる必要があります。
私は2021年11月7日までに目標を達成します
人によって、動的に変更される箇所を波括弧({ })で囲んで適切な変数名に変更します。
私は{year} 年{month}月{day}日までに目標を達成します

スロットタイプドロップダウンメニューから、各スロットにスロットタイプを割り当てます。
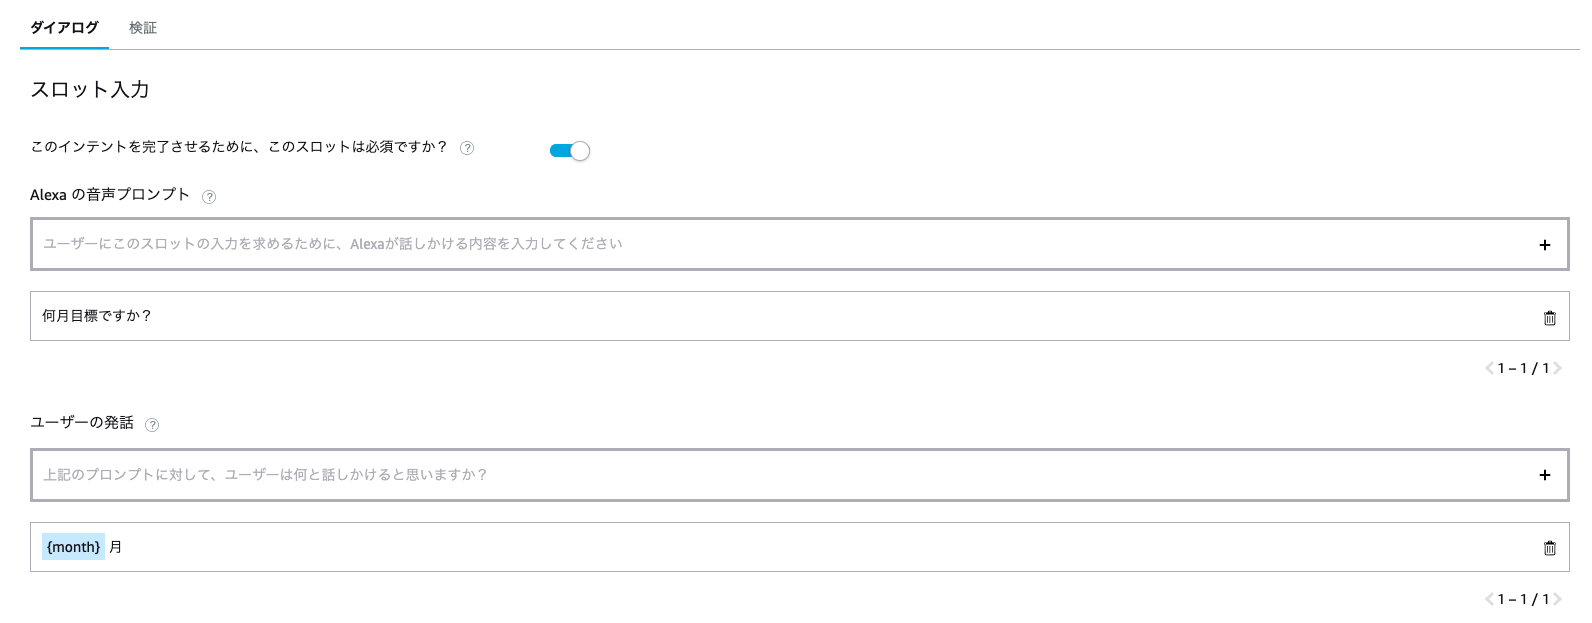
必須のスロットには必須の設定をしましょう。
スロットに右側にある「ダイアログを編集」をクリックし、下記のように必須のチェックボックスをONにします。
Alexaの音声プロンプトにはユーザーがmonthスロットの値を提供しなかった場合にAlexaが言うテキストを入力します。
ユーザーの発音にユーザーが想定する発話を入力します。
STEP6 「テストする」
最後の実際にスキルが正常に動くかテストしてみましょう。
テスト タブをクリックします。テストシミュレーターが開きます。
するとAlexaシュミレータが表示されるので、サンプル発話を入力していきましょう。(赤枠の箇所に入力もしくは発話でinputします)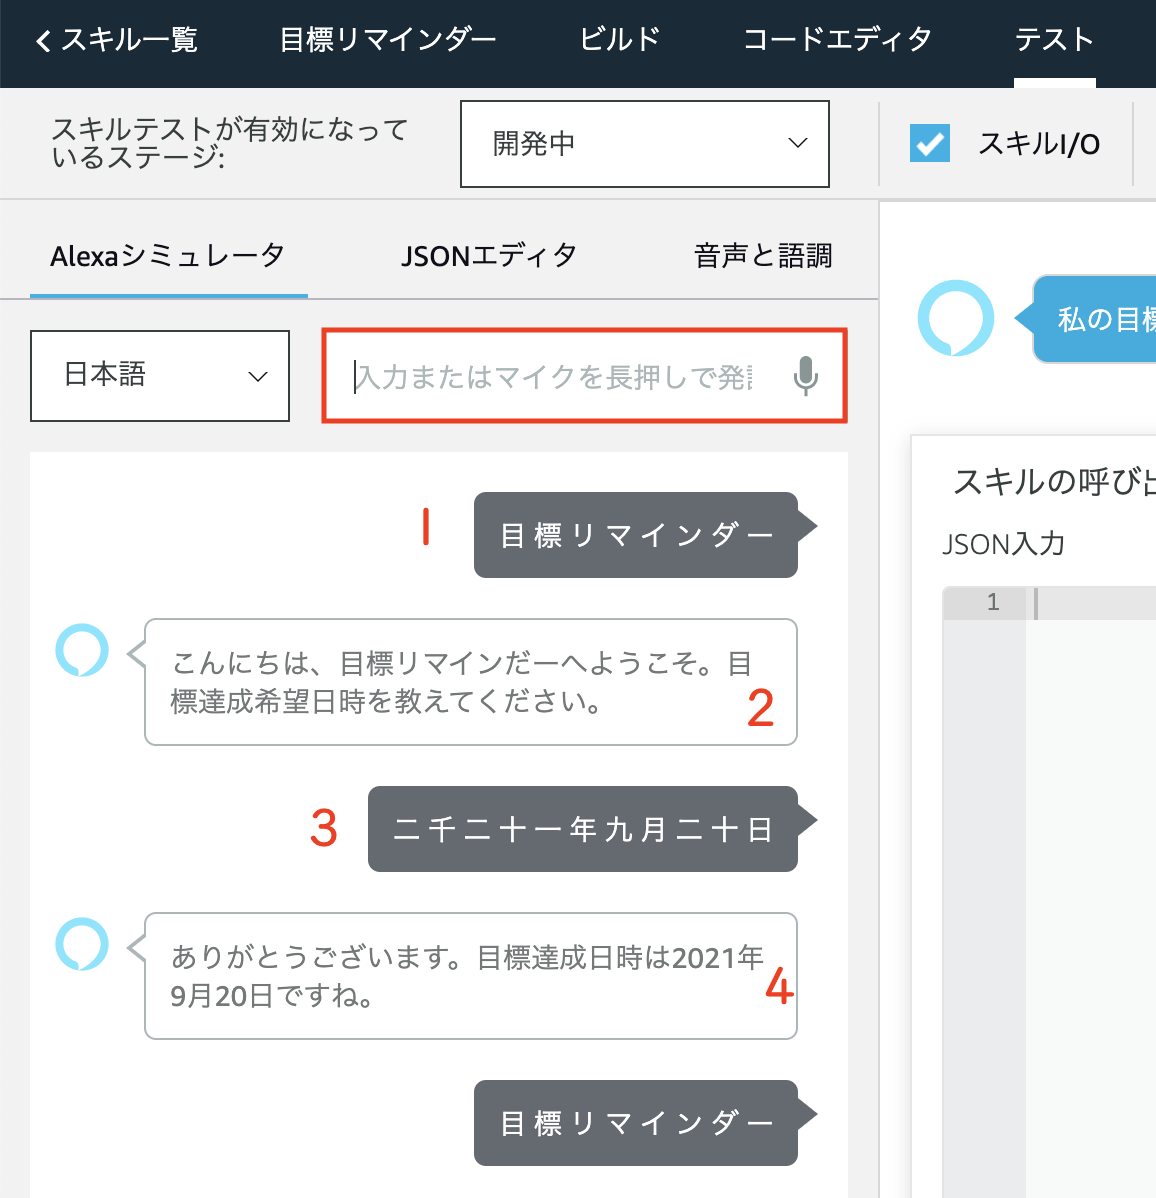
1. まず呼び出し名の「目標リマインダー」と発話する
2. アレクサスキルが挨拶と、質問をしてくる
3. 目標日時を発話する
4. アレクサスキルが目標達成日時を記憶する。
次に再度、アクレさを起動させたときに以前に記憶させた日時を記憶しており、現在日時から目標達成日時までの残り期間を自動計算してレスポンス返却してくれるかを確認します。
もう一度、アレクサを呼び出すと目標達成日時までの残り期間を自動計算してレスポンス返却成功です。

STEP7 「スキル公開」
ユーザーへの公開前にいくつかのステップを実施する必要があります。まず、Alexa開発者コンソールの公開タブで、必要な情報を入力します。
スキルのプレビュー設定
Alexaスキルストアにスキルがどう表示されるかに関する情報を入力します。(下記図参照)
プライバシーとコンプライアンス設定
プライバシーとコンプライアンス設定を行います(下記図参照)
公開範囲
Alexaスキルをどの範囲まで公開するかの設定を行います(下記図参照)
STEP8 「スキルの認定と公開」
公開範囲の設定が終われば、実際にスキルを申請してみましょう。
申請が完了したた下記図のようにステータスが申請中になります。
結果は数日後にメールにて連絡がきます。
申請に落ちた場合
審査に落ちた場合はAmazonより審査に落ちた理由をめちゃくちゃ丁寧に教えてくれるメールを送ってくれます。
下記の写真は自分が審査に落ちたときに送られてきたメールになります。(すごく丁寧に落ちた理由を教えてくれました)
指摘箇所を直し再審査可能なので、修正でき次第また審査に応募しましょう。

申請に合格した場合
スキルのステータスや、認証審査プロセスに関する最新情報は、認定>申請から確認できます。
申請に合格すると、ステータスが「認定済み」に変更されます。
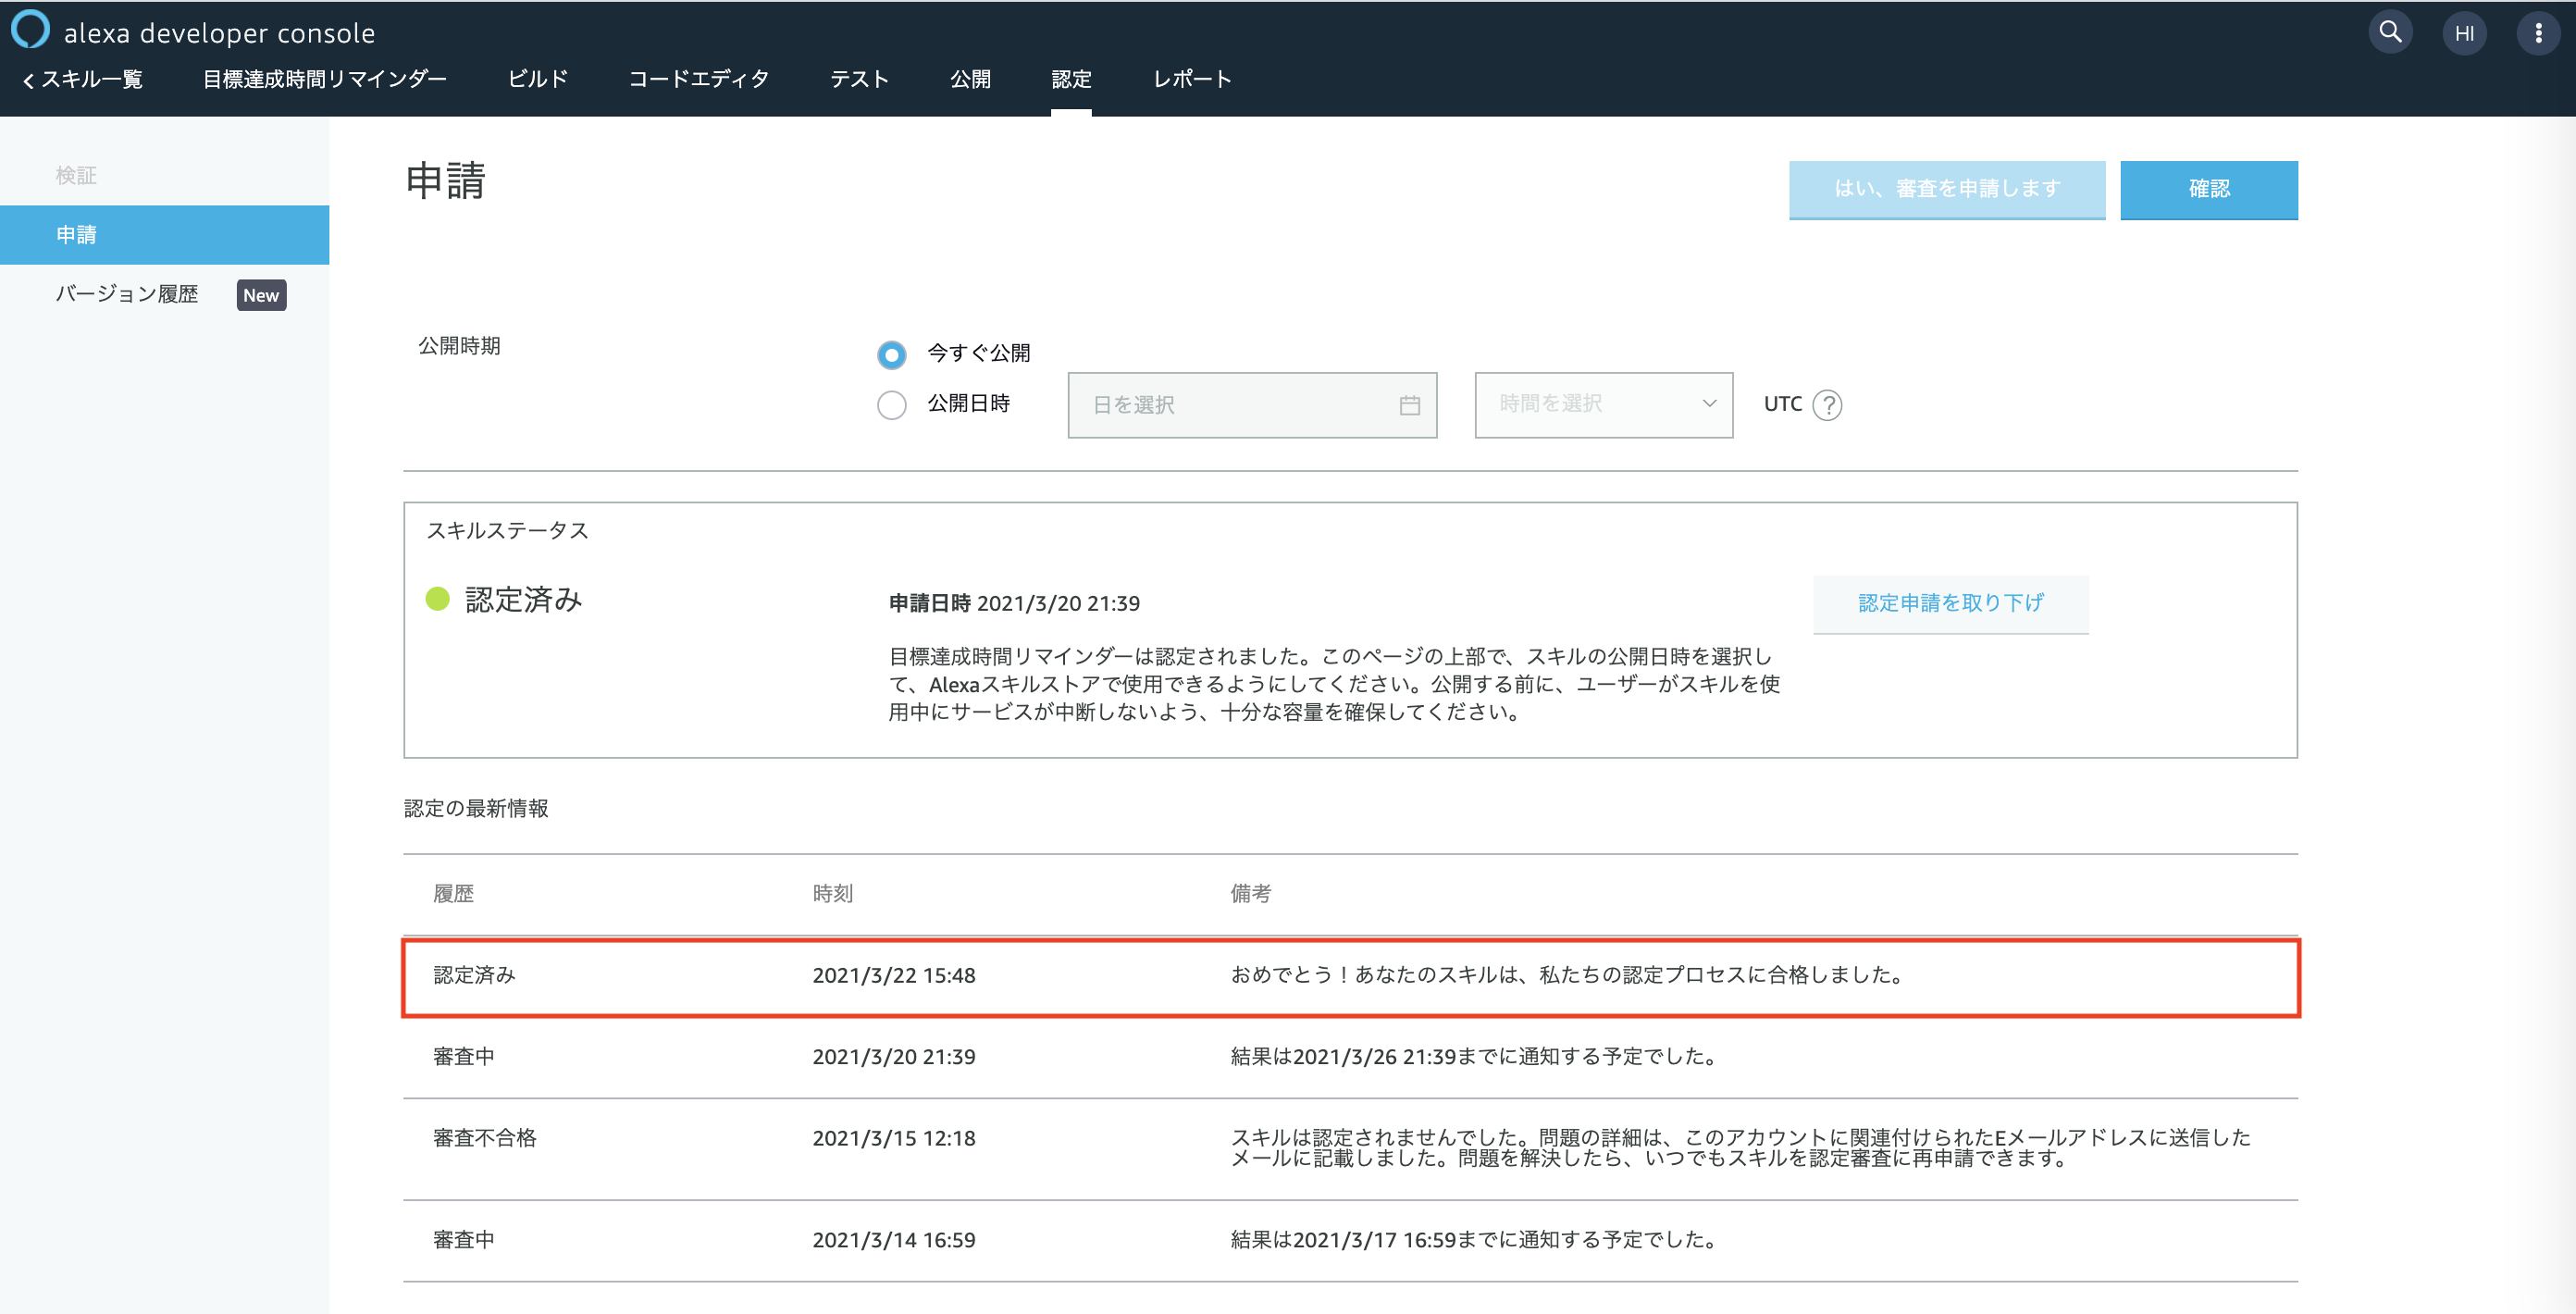
また、スキルが公開される時期の目安がEメールで通知されます。(公開時期を後から設定にした場合は公開時間を設定してくださいと表記される)
まとめ
今回はAWSアレクサの開発から公開までの流れをご紹介しました。
普段、利用しているAIスピーカーが裏側でどのように開発、運用されているかの勉強になりました。
興味ある方はぜひ開発に挑戦してみてください。