SC(非公式)Advent Calendar 2019の19日目です。
はじめに
最近JWT周りのなんやかんやを触る機会が多いです。
別の言語での取り回しなんかもできるのが、JWTでの検証の良いところだと思います。
今回は.NetCore3.0で追加された 暗号化キーのインポート/エクスポートで、
RSAではなくECDsa(楕円暗号方式)で署名/検証しました。
サーバー構成としては以下になります。
実行環境
OS: mac OS Mojave 10.14.6
IDE: VS2019 for Mac community 8.3.6
.NetCore: 3.1.100
node: 10.14.1
npm: 6.4.1
クライアント: POSTMAN
余談ですが、MacでわざわざC#を触る人ってキチガイですよね~。
と、後輩に言われました。
秘密鍵・公開鍵の作成
以下のコマンドで楕円曲線暗号方式で秘密鍵と公開鍵を作成します。
ssh-keygen -t ecdsa -b 256 -m PEM -f jwtES256.key
openssl ec -in jwtES256.key -pubout -outform PEM -out jwtES256.key.pub
C#でIDProviderを作成
JWTを発行するC#のプロジェクトを立ち上げます。
必要なパッケージとしてMicrosoft.AspNetCore.Authentication.JwtBearer
を追加しています。
# ワークフォルダ
mkdir JwtSample
cd JwtSample
# ソリューションの作成
dotnet new sln
# WebAPIテンプレートのプロジェクト作成
dotnet new webapi -o ./CSharpIDP
# ソリューションにプロジェクトを追加
dotnet sln add ./CSharpIDP
# JWTでの認証をするためにNugetパッケージを追加
dotnet add ./CSharpIDP package Microsoft.AspNetCore.Authentication.JwtBearer
いざJWTを生成
まずはAuthenticationControllerを新しく作成します。
全貌がこちら。
usingCSharpIDP.Utils;usingMicrosoft.AspNetCore.Mvc;usingMicrosoft.Extensions.Logging;usingMicrosoft.IdentityModel.Tokens;usingSystem;usingSystem.IdentityModel.Tokens.Jwt;usingSystem.Security.Claims;usingSystem.Security.Cryptography;usingSystem.Threading.Tasks;namespaceCSharpIDP.Controllers{[ApiController][Route("[controller]")]publicclassAuthenticationController:ControllerBase{privatereadonlyILogger<AuthenticationController>_logger;publicAuthenticationController(ILogger<AuthenticationController>logger){_logger=logger;}[HttpPost]publicasyncTask<IActionResult>Token([FromBody]LoginModelmodel){vartokenString=awaitAuthenticateAsync(model);if(tokenString!=""){returnOk(new{token=tokenString});}returnUnauthorized();}privateasyncTask<string>AuthenticateAsync([FromBody]LoginModelmodel){_logger.LogInformation("AuthenticateAsync");varuser=awaitFetchUserAsync(model.Email);// DB接続などを想定if(user.Email==model.Email&&user.Password==model.Password){vartokenString=GenerateToken(user);returntokenString;}return"";}privateasyncTask<UserInfo>FetchUserAsync(stringemail){_logger.LogInformation($"fetch user data by email={email}");returnawaitTask.Run(()=>newUserInfo{UserId=888,UserName="jwtSignningUser",Email="aaa@gmail.com",Password="password",Groups=newint[]{1,2,3}});}privatestringGenerateToken(UserInfouser){varclaims=new[]{newClaim(JwtRegisteredClaimNames.Jti,Guid.NewGuid().ToString()),newClaim(JwtRegisteredClaimNames.Sid,user.UserId.ToString()),newClaim(JwtRegisteredClaimNames.Sub,"JWT Sample for node.js"),newClaim(JwtRegisteredClaimNames.Email,user.Email)};varpemStr=System.IO.File.ReadAllText(@"./jwtES256.key");varder=StringUtil.ConvertX509PemToDer(pemStr);usingvarecdsa=ECDsa.Create();ecdsa.ImportECPrivateKey(der,out_);varkey=newECDsaSecurityKey(ecdsa);varcreds=newSigningCredentials(key,SecurityAlgorithms.EcdsaSha256);varjwtHeader=newJwtHeader(creds);varjwtPayload=newJwtPayload(issuer:"https://localhost:5001/",audience:"https://localhost:3000/",claims:claims,notBefore:DateTime.Now,expires:DateTime.Now.AddMinutes(600),issuedAt:DateTime.Now);vartoken=newJwtSecurityToken(jwtHeader,jwtPayload);returnnewJwtSecurityTokenHandler().WriteToken(token);}}publicclassLoginModel{publicstringEmail{get;set;}="";publicstringPassword{get;set;}="";}publicclassUserInfo{publicintUserId{get;set;}publicstring?UserName{get;set;}publicstring?Email{get;set;}publicstring?Password{get;set;}publicint[]?Groups{get;set;}}}ではでは、GenerateTokenメソッドの解説をしていきます
JWTのスキーマ
JWTは、RFC7519で定義されているスキーマを持っていて、大きく以下の3種類のスキーマ定義があります。詳しくはここのサイトが大変参考になります。(JSON Web Token(JWT)のClaimについて)
- Registered Claim Names
- Public Claim Names
- Private Claim Names
Registered Claim Names
Registered Claim Namesはあらかじめ決められた、「JWTならこれ持ってますよね」という定義です。
| 予約語 | 意味 | 役割 |
|---|---|---|
| iss | Issuer | JWTの発行者。文字列かURIの形式 |
| sub | Subject | JWTの用途。文字列かURIの形式 |
| aud | Audience | JWTの利用者。文字列かURIの形式 |
| exp | Expiration Time | JWTの失効する日時 |
| nbf | Not Before | JWTが有効になる日時 |
| iat | Issued At | JWTの発行日時 |
| jti | JWT ID | JWTを一意な識別子。UUIDなどを入れるのが一般的 |
これらのスキーマ定義に則って、JwtPayloadクラスの設定をしているのが、以下の部分です。
varclaims=new[]{newClaim(JwtRegisteredClaimNames.Jti,Guid.NewGuid().ToString()),newClaim(JwtRegisteredClaimNames.Sid,user.UserId.ToString()),newClaim(JwtRegisteredClaimNames.Sub,"JWT Sample for node.js"),newClaim(JwtRegisteredClaimNames.Email,user.Email)};// ... 略varjwtPayload=newJwtPayload(issuer:"https://localhost:5001/",audience:"http://localhost:3000/",claims:claims,notBefore:DateTime.Now,expires:DateTime.Now.AddMinutes(60),issuedAt:DateTime.Now);現在から有効な、http://localhost:3000向けのJWTを発行しています。
有効期限は現在から1時間です。
実際のアプリではユーザーIDなどを入れると思いますので、Private Claim NamesとしてSid属性に入れています。
ECDsaでの署名
今回は、どの言語でも汎用的に使用できるように、opensslで秘密鍵と公開鍵のファイルを作成しました。
もちろんC#のプログラムからキーの生成を行うこともできますが、PEMファイルを読み込むとき少しハマったので、ご紹介。
// 秘密鍵ファイルの内容を取得varpemStr=System.IO.File.ReadAllText(@"./jwtES256.key");// PEM形式からbase64にデコードvarder=StringUtil.ConvertX509PemToDer(pemStr);// ECDsaのインスタンス化usingvarecdsa=ECDsa.Create();// der形式のデータをインポートecdsa.ImportECPrivateKey(der,out_);// SecurityKeyインスタンス生成varkey=newECDsaSecurityKey(ecdsa);ECDsaのImportECPrivateKeyメソッドはこんな定義になっているので、
ファイルの余分な部分を削除して、base64デコードして渡してあげないとダメです。

ですので、Utilクラスでこんな泥くさいことをやっています。
publicstaticbyte[]ConvertX509PemToDer(stringpemContents){varbase64=pemContents.Replace("-----BEGIN EC PRIVATE KEY-----",string.Empty).Replace("-----END EC PRIVATE KEY-----",string.Empty).Replace("\r\n",string.Empty).Replace("\n",string.Empty);// Windowsだったらこの行は不要かもreturnConvert.FromBase64String(base64);}メールアドレス・パスワードでトークンを取得
POSTMANからメールアドレスとパスワードでアクセストークンを取得します。
| 定義 | 値 |
|---|---|
| URL | https://localhost:5001/authentication |
| メソッド | POST |
| ヘッダー | Content-Type:application/json |
| BODY | { "Email": "aaa@gmail.com", "Password": "password"} |

DECsaの形式で署名されたJWTを取得できました。
Node.jsで検証サーバーを作成
つづいてはアクセストークンを検証するサーバーをNode.jsで作っていきます。
Expressのテンプレートを作成するexpress-generatorをグローバルインストールして、
適当なアプリを作成します。
npm install -g express-generator
# ワークディレクトリ
mkdir Express
cd Express
# verifyappという名前で作成
express verifyapp -e
cd verifyapp
# パッケージをインストール
npm i
# JWTを扱うためのパッケージもインストール
npm i jsonwebtoken
# サーバー起動
npm start
これでhttp://localhost:3000でサーバーが立つはずです。
app.jsは以下のコードを追加します。
// ... 略+varjwt=require("jsonwebtoken");+varfs=require('fs');// ... 略// ... 略-app.use("/users",usersRouter);+app.use("/users",Authorize,usersRouter);+functionAuthorize(req,_,next){+constauthHeader=ParseAuthHeader(req.headers);+if(!authHeader)next(createError(401));+consttoken=authHeader.value;+constpublicKey=fs.readFileSync("./jwtES256.key.pub",{encoding:"utf8"+});+constoptions={+algorithms:["ES256"]// 署名オプション+};+constdecodedToken=jwt.verify(token,publicKey,options);+if(typeofdecodedToken!=="object")next(createError(401));+req.token=decodedToken;+next();+}+functionParseAuthHeader(headers){+constAUTH_HEADER="authorization";+constregex=/(\S+)\s+(\S+)/;+if(!headers[AUTH_HEADER])returnundefined;+if(typeofheaders[AUTH_HEADER]!=="string")returnundefined;+constmatches=headers[AUTH_HEADER].match(regex);+returnmatches&&{scheme:matches[1],value:matches[2]};+}// ... 略module.exports=app;Authorizeというミドルウェアを追加しています。
何をやっているか詳しく見ていくと、
functionAuthorize(req,_,next){// リクエストヘッダーのauthorizationヘッダーからベアラートークンを取得constauthHeader=ParseAuthHeader(req.headers);if(!authHeader)next(createError(401));consttoken=authHeader.value;// 公開鍵ファイルを読み込みconstpublicKey=fs.readFileSync("./jwtES256.key.pub",{encoding:"utf8"});constoptions={algorithms:["ES256"]// 署名アルゴリズムを指定};constdecodedToken=jwt.verify(token,publicKey,options);if(typeofdecodedToken!=="object")next(createError(401));// トークンからペイロードの情報が取れたら、reqにtokenとして保存req.token=decodedToken;next();}userRouterの先のuser.jsファイルはこんな感じになっています。
varexpress=require('express');varrouter=express.Router();/* GET users listing. */router.get('/',function(req,res,next){res.send(`${req.token.sub}さんからのリクエストです(${req.token.sid})`);});module.exports=router;では先ほど取得したトークン情報をauthorizationヘッダーに載せてアクセスしてみます。
POSTMANでAuthorizationタブからBaerer Tokenを選択して、Tokenに先ほど取得したToken値を入れてGetでSendするだけです。
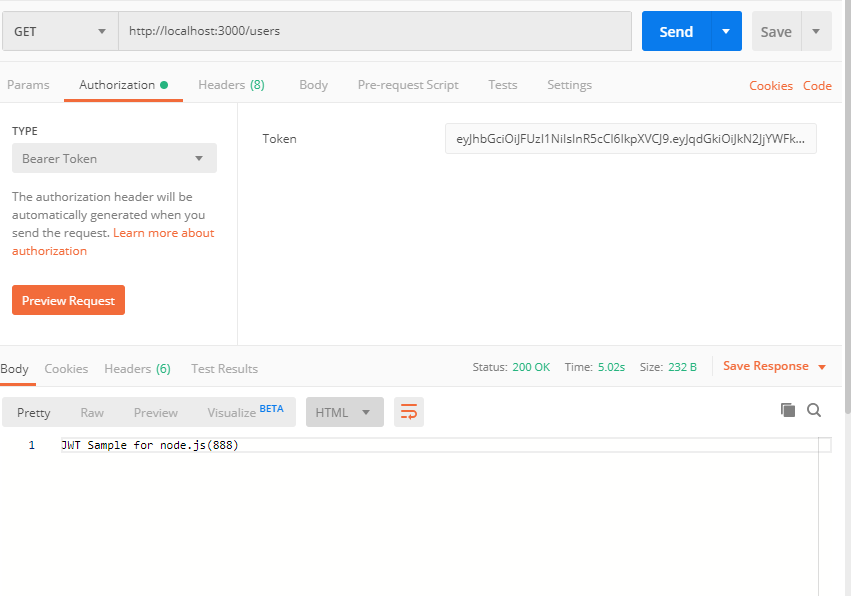
Tokenがなかった場合、きちんと401が返ってきます。

以上です。
C#での検証もためしてみたので、雑に載せときます。
usingCSharpIDP.Utils;usingMicrosoft.AspNetCore.Authentication.JwtBearer;usingMicrosoft.AspNetCore.Builder;usingMicrosoft.AspNetCore.Hosting;usingMicrosoft.Extensions.Configuration;usingMicrosoft.Extensions.DependencyInjection;usingMicrosoft.Extensions.Hosting;usingMicrosoft.IdentityModel.Tokens;usingSystem.IO;usingSystem.Security.Cryptography;namespaceCSharpIDP{publicclassStartup{publicStartup(IConfigurationconfiguration){Configuration=configuration;Ecdsa=ECDsa.Create();}~Startup(){Ecdsa.Dispose();}publicIConfigurationConfiguration{get;}privateECDsaEcdsa{get;}// This method gets called by the runtime. Use this method to add services to the container.publicvoidConfigureServices(IServiceCollectionservices){varpemStr=File.ReadAllText(@"./jwtES256.key.pub");varder=StringUtil.ConvertPubKeyToDer(pemStr);// 秘密鍵と同じことやってますEcdsa.ImportSubjectPublicKeyInfo(der,out_);services.AddAuthentication(options=>{options.DefaultAuthenticateScheme=JwtBearerDefaults.AuthenticationScheme;options.DefaultChallengeScheme=JwtBearerDefaults.AuthenticationScheme;}).AddJwtBearer(options=>{options.TokenValidationParameters=newTokenValidationParameters(){ValidateIssuer=true,ValidIssuer="https://localhost:5001/",ValidateIssuerSigningKey=true,IssuerSigningKey=newECDsaSecurityKey(Ecdsa),ValidateAudience=false,ValidateLifetime=false,};});services.AddControllers();}// This method gets called by the runtime. Use this method to configure the HTTP request pipeline.publicvoidConfigure(IApplicationBuilderapp,IWebHostEnvironmentenv){if(env.IsDevelopment()){app.UseDeveloperExceptionPage();}app.UseHttpsRedirection();app.UseRouting();app.UseAuthentication();// 追加app.UseAuthorization();app.UseEndpoints(endpoints=>{endpoints.MapControllers();});}}}これで、認可したいControllerに[Authorize]属性つければ、
認証のフィルターができるようになります。
参考
.NET Core 3.0 の新機能
Embracing nullable reference types
JWT Signing using ECDSA in .NET Core