はじめに
今回はFirebaseFunctionsのhttp関数を使用して特定のデバイスにPush通知を送る実装を行なっていきます。実装前に下記の準備項目が必要になります。
事前準備
- Firebaseプロジェクト
- Firebase/Messaging導入済のiosプロジェクト
- APNsのFirebaseアップロード
FirebaseCLIインストール
まずは、FirebaseCLIをインストールすることでFunctionsのDeployやプロジェクトの切り替えなどをCLIで操作できるようにします。今回はnpmでインストールを行います。
npmインストール
とりあえず最新のものをnodebrewで取得してきてPathを通すとこまで終わらせます。
    $ brew install nodebrew
    $ nodebrew install-binary 13.7.0
    $ nodebrew use  v7.0.0
    $ echo 'export PATH=$HOME/.nodebrew/current/bin:$PATH' >> ~/.bash_profile
    $ source ~/.bash_profile
firebase-toolsインストール
1.npmでfirebase-toolsをインストールします。
$ npm install -g firebase-tools
2.firebase-toolsコマンドを使用して、操作を行うユーザの認証をします。下記のコマンドを実行するとWebブラウザが立ち上がるので、Firebaseプロジェクトで編集権限のあるアカウントでログインを行います。
$ firebase login
3.firebaseのプロジェクトをuseコマンドを使って指定します。この操作によりfirebase/functionsなどのデプロイ先を変更できたりします。
$ firebase use firebase_project_id
Functionsプロジェクト作成
今回はFunctionsのみ使用するので下記のコマンドでプロジェクトを立ち上げます。
$ firebase init functions
すると下記のような構造のプロジェクトが立ち上がるので、主にindex.jsを編集して関数を作成して行きます。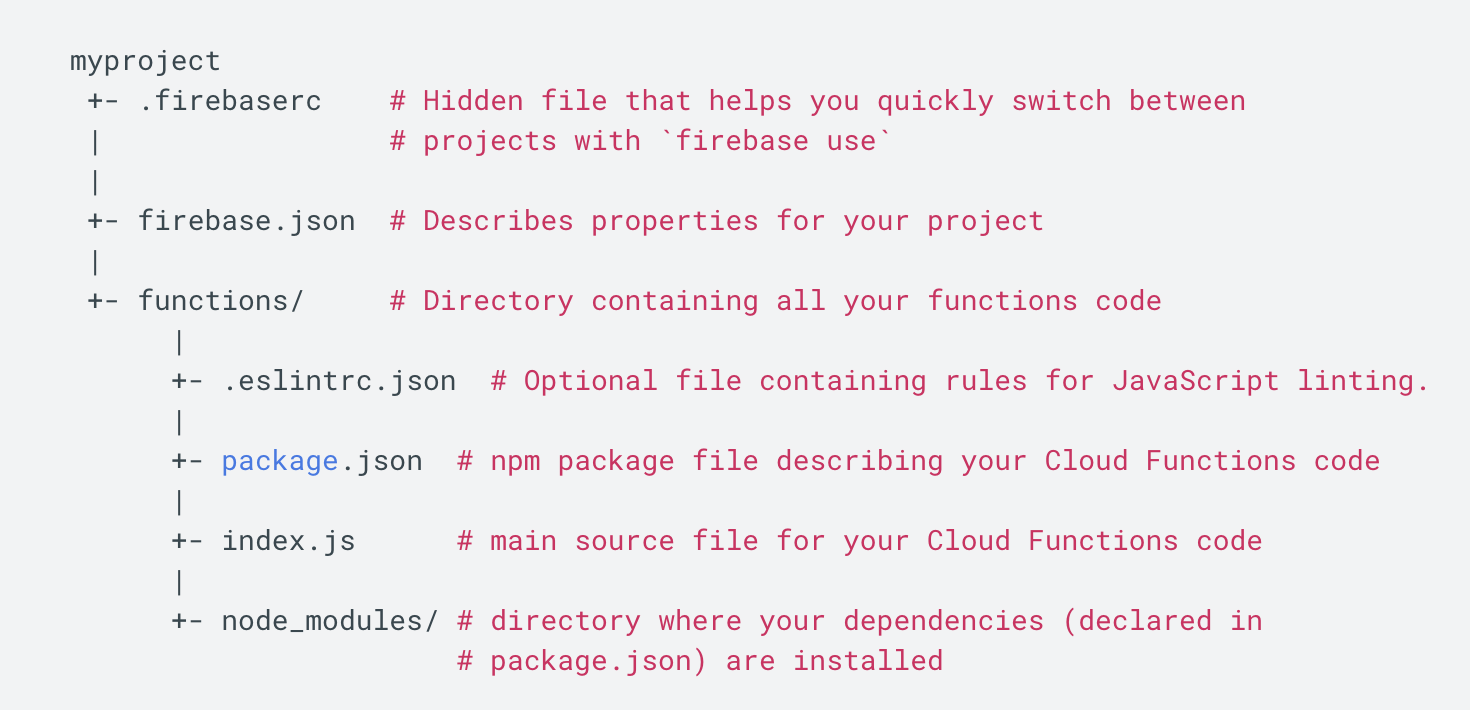
参照: https://firebase.google.com/docs/functions/get-started?hl=ja
FirebaseAdminSDKインストール
1.sdkの情報などを保存するpackage.jsonを作成します。
$ npm init
2.firebase-admin npmパッケージをインストールします。
$ npm install firebase-admin --save
3.次にfirebase-adminを初期化をするためにローカルの環境変数にFirebaseサービスアカウントの秘密鍵を生成したファイルへのパスを指定します。これを設定することでSDKの初期化時にキーが参照され、プロジェクトでの認証が完了します。CIなどでブランチごとにDeploy先を変更させたい時はどうやって秘密鍵を参照させるのがベストなんでしょうか?
$ export GOOGLE_APPLICATION_CREDENTIALS="/home/user/Downloads/service-account-file.json"
参照: https://firebase.google.com/docs/admin/setup?hl=ja
4.index.jsに移動してsdkの初期化コードを追加します。
constfunctions=require('firebase-functions');constadmin=require('firebase-admin');admin.initializeApp();node.jsの実装
constfunctions=require('firebase-functions');constadmin=require('firebase-admin');admin.initializeApp();//onRequestでhttpからの呼び出しを可能にします。exports.push=functions.https.onRequest((request,response)=>{if(request.query.device_token!==undefined&&request.body.message!==undefined){constdevice_token=request.query.device_tokenconstmessage=request.body.messageconstpayload={notification:{body:message,badge:"1",sound:"default",}};switch(request.method){case'POST':push(device_token,payload,response);breakdefault:response.status(400).send({error:'Invalid request method'})break}}else{response.status(400).send({error:'Invalid request parameters'})}})functionpush(token,payload,response){constoptions={priority:"high",};//FCMにAdminSDKを介してPush通知を送信します。admin.messaging().sendToDevice(token,payload,options).then(pushResponse=>{console.log("Successfully sent message:",pushResponse);response.status(200).send({message:'Successfully sent message'})}).catch(error=>{response.status(400).send({error:'Error sending message'})});}swiftの実装
importUIKitimportFirebaseimportUserNotificationsimportFirebaseMessaging@UIApplicationMainclassAppDelegate:UIResponder,UIApplicationDelegate{varwindow:UIWindow?privatevarmainTabViewController:MainTabViewController?funcapplication(_application:UIApplication,didFinishLaunchingWithOptionslaunchOptions:[UIApplication.LaunchOptionsKey:Any]?)->Bool{//環境ごとにプロジェクトを変えてるためplistを変更しています。letfilePath=Bundle.main.path(forResource:Config.Server.instance.firebaseInfoPlistName,ofType:"plist")//Forced Unwrapping🚨FirebaseApp.configure(options:FirebaseOptions(contentsOfFile:filePath!)!)initFirebaseMessaging()initRemoteNotification(application)window=UIWindow(frame:UIScreen.main.bounds)window!.makeKeyAndVisible()navigate()returntrue}funcnavigate(_isTrial:Bool=false){guardletwindow=windowelse{assert(false)return}letpreviousVC=window.rootViewControllerforvinwindow.subviews{v.removeFromSuperview()}letvc=MainTabViewController()mainTabViewController=vcwindow.rootViewController=vcifletpreviousVC=previousVC{previousVC.dismiss(animated:false){previousVC.view.removeFromSuperview()}}}privatefuncinitRemoteNotification(_application:UIApplication){UNUserNotificationCenter.current().delegate=selfletauthOptions:UNAuthorizationOptions=[.alert,.badge,.sound]//TODO: Relocate requestAuthorization method.UNUserNotificationCenter.current().requestAuthorization(options:authOptions,completionHandler:{_,_in})application.registerForRemoteNotifications()}privatefuncinitFirebaseMessaging(){//DelegateでdeviceTokenの変更を監視します。Messaging.messaging().delegate=self//明示的にdeviceTokenを取得します。InstanceID.instanceID().instanceID{(result,error)inifleterror=error{//TODO: Error handling.print("Error fetching remote instance ID: \(error)")}elseifletresult=result{//TODO: Send token to parnovi api for update user fcm token. if authorized == trueprint("Remote instance ID token: \(result.token)")}}}}extensionAppDelegate:UNUserNotificationCenterDelegate{funcuserNotificationCenter(_center:UNUserNotificationCenter,willPresentnotification:UNNotification,withCompletionHandlercompletionHandler:@escaping(UNNotificationPresentationOptions)->Void){completionHandler([.badge,.sound,.alert])}funcuserNotificationCenter(_center:UNUserNotificationCenter,didReceiveresponse:UNNotificationResponse,withCompletionHandlercompletionHandler:@escaping()->Void){completionHandler()}}extensionAppDelegate:MessagingDelegate{//Observe firebase messaging token.funcmessaging(_messaging:Messaging,didReceiveRegistrationTokenfcmToken:String){}}FunctionsのDeploy
実際に関数をデプロイしてPush通知を送信してみます。
$ firebase deploy --only functions
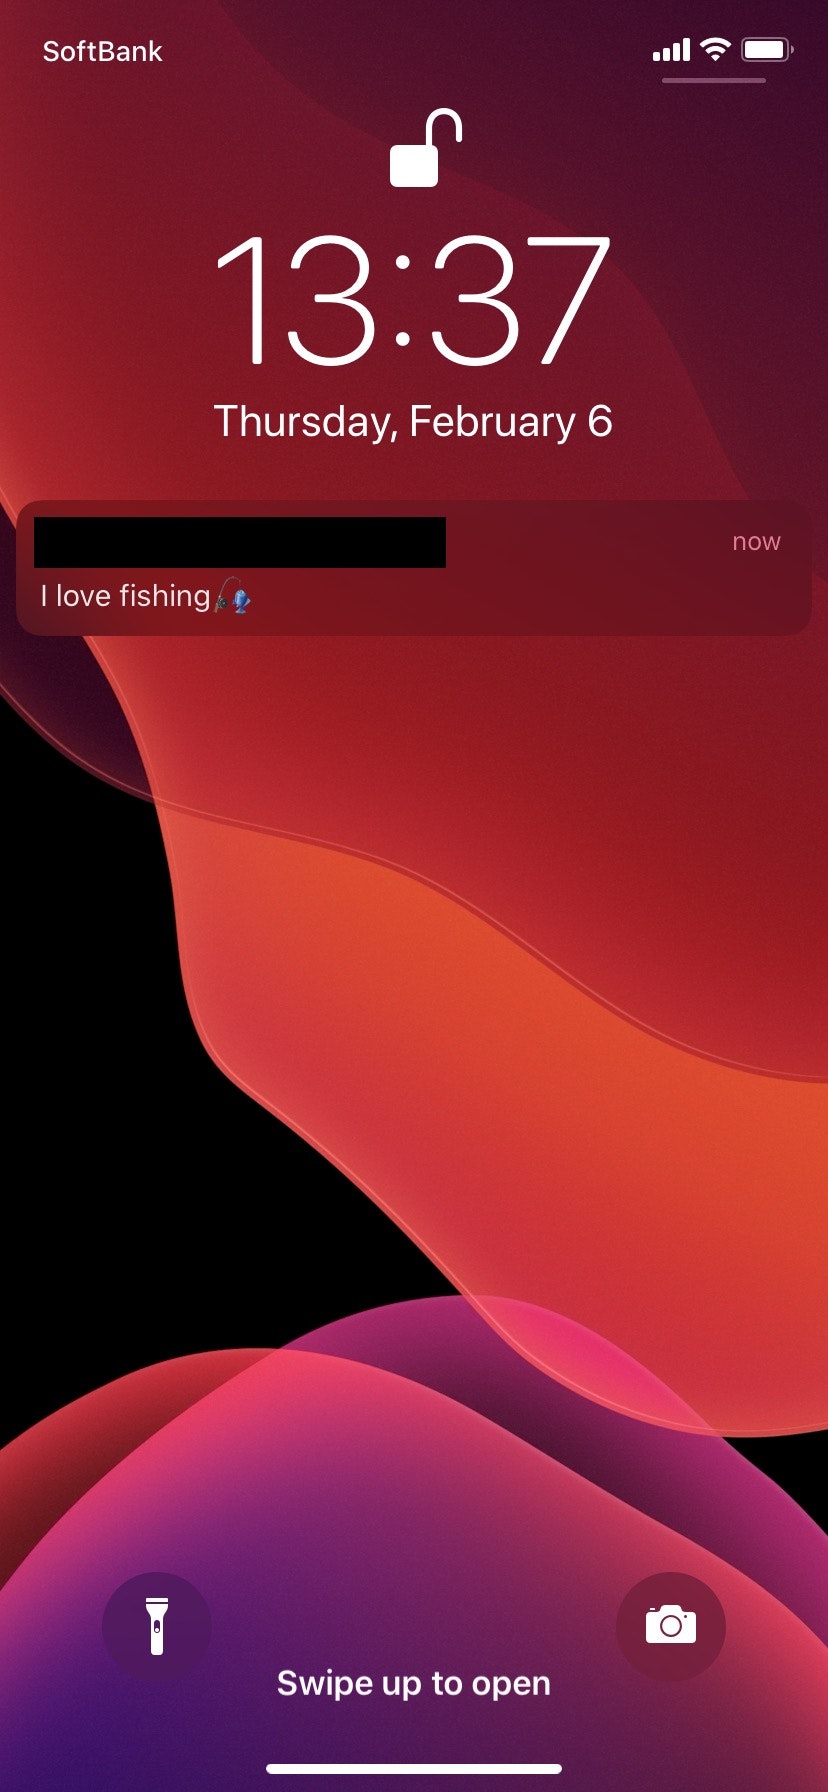
swiftのInstanceID.instanceID().instanceIDで取得したDeviceTokenを使ってcurlで実際にPushを送信してみます。
$ curl -X POST https://yout-functions-url/push?device_token=your-device-token -d "message=I love fishing🎣"
結果
さいごに
今回はテスト的に実行できるようにするため、httpリクエストに認証は設定していませんでしたが、また実装し直したら編集しようと思います。また、CIなどを使ってfirebase/functionsなどをデプロイするとき、どのようにFirebaseプロジェクトの秘密鍵を参照させるのがベストなのでしょうか。。