概要
問い合わせフォーム(javascript) ⇒ APIGateway ⇒ Lambda(Node.js) ⇒ Lambda(Node.js) の流れで簡単な問い合わせサイトを作ります。
一応レスポンシブにします。
バリデーションもあります。

index.htmlのコーディング
index.html
<!DOCTYPE html><htmllang="ja"><head><metacharset="UTF-8"/><metaname="viewport"content="width=device-width, initial-scale=1.0"/><metahttp-equiv="X-UA-Compatible"content="ie=edge"/><linkrel="stylesheet"href="style.css"/><title>問い合わせ</title></head><body><divclass="header"><ahref="#"class="logo">Hoge Hoge Company</a><aclass="active"href="#">Home</a></div><mainclass="main-container"><h2>問い合わせフォーム</h2><divclass="container"><formid="form"><divclass="row"><divclass="col-20"><labelfor="name">名前</label></div><divclass="col-80"><inputtype="text"id="name"name="name"placeholder="Your name.."/></div></div><divid="name-alert"class="alert-message"hidden>入力値が不正です。</div><divclass="row"><divclass="col-20"><labelfor="email">E-Mail</label></div><divclass="col-80"><inputtype="email"id="email"name="email"placeholder="Your E-Mail.."/></div></div><divid="email-alert"class="alert-message"hidden>入力値が不正です。</div><divclass="row"><divclass="col-20"><labelfor="dept">所属</label></div><divclass="col-80"><inputtype="text"id="dept"name="dept"placeholder="Ex: Example Co., Ltd."/></div></div><divid="dept-alert"class="alert-message"hidden>入力値が不正です。</div><divclass="row"><divclass="col-20"><labelfor="body">内容</label></div><divclass="col-80"><textareaid="body"name="body"placeholder="お気軽にお問い合わせください。"style="height:200px"></textarea></div></div><divid="body-alert"class="alert-message"hidden>入力値が不正です。</div><divclass="row"><buttonid="submitBtn">送信</button></div></form></div><!-- The Modal --><divid="myModal"class="modal"><!-- Modal content --><divid="modal-content"><spanclass="close">×</span><pid="result"></p><pid="detail"style="font-size: small;"></p></div></div></main><script src="main.js"defer></script></body></html>CSSのコーディング
style.css
*{margin:0;padding:0;font-family:"Hiragino Kaku Gothic Pro","ヒラギノ角ゴ Pro W3","メイリオ",Meiryo,"MS Pゴシック",sans-serif;}/* Style the header with a grey background and some padding */.header{display:flex;flex-flow:rowwrap;align-items:center;justify-content:space-between;background-color:#000000;padding:20px10px;}/* Style the header links */.headera{color:#f2f2f2;text-align:center;padding:12px;text-decoration:none;font-size:18px;line-height:25px;border-radius:4px;}/* Style the logo link (notice that we set the same value of line-height and font-size to prevent the header to increase when the font gets bigger */.headera.logo{font-size:25px;font-weight:bold;}/* Change the background color on mouse-over */.headera:hover{background-color:#ddd;color:black;}/* Style the active/current link*/.headera.active{background-color:dodgerblue;color:white;}/* Add media queries for responsiveness - when the screen is 500px wide or less, stack the links on top of each other */@mediascreenand(max-width:500px){.header{justify-content:center;}.headera{padding:12px;}}.main-container{width:90%;margin:auto;}.main-containerh2{margin-top:12px;}/* Style inputs, select elements and textareas */input,textarea{width:100%;padding:12px;border:1pxsolid#ccc;border-radius:4px;box-sizing:border-box;resize:vertical;}.alert-red{border:#ff45002pxsolid;}.alert-green{border:#00ff7f2pxsolid;}.alert-message{color:#ff4500;font-size:small;text-align:end;margin-bottom:10px;}/* Style the label to display next to the inputs */label{padding:12px12px12px0;display:inline-block;}/* Style the submit button */#submitBtn{background-color:#4caf50;color:white;padding:10px18px;border:none;border-radius:4px;cursor:pointer;font-size:15px;float:right;}/* Style the container */.container{border-radius:5px;background-color:#f2f2f2;padding:20px;}/* Floating column for labels: 25% width */.col-20{float:left;width:20%;margin-top:6px;}/* Floating column for inputs: 75% width */.col-80{float:left;width:80%;margin-top:6px;}/* Clear floats after the columns */.row:after{content:"";display:table;clear:both;}/* Responsive layout - when the screen is less than 600px wide, make the two columns stack on top of each other instead of next to each other */@mediascreenand(max-width:600px){.col-20,.col-80,#submitBtn{width:100%;margin-top:0;}}/* The Modal (background) */.modal{display:none;/* Hidden by default */position:fixed;/* Stay in place */z-index:1;/* Sit on top */left:0;top:0;width:100%;/* Full width */height:100%;/* Full height */overflow:auto;/* Enable scroll if needed */background-color:rgb(0,0,0);/* Fallback color */background-color:rgba(0,0,0,0.4);/* Black w/ opacity */}/* Modal Content/Box */#modal-content{background-color:#fefefe;margin:15%auto;/* 15% from the top and centered */padding:20px;width:80%;/* Could be more or less, depending on screen size */}.request-loading{border:1pxsolid#888;}.request-success{border:1pxsolid#00ff7f;}.request-fail{border:1pxsolid#ff4500;}/* The Close Button */.close{color:#aaa;float:right;font-size:28px;font-weight:bold;}.close:hover,.close:focus{color:black;text-decoration:none;cursor:pointer;}javascriptのコーディング
変数URLはAPIGatewayで発行してから実装します。
main.js
constURL='https://';// APIGatewayで作成したURLconstLOADING='処理中...';constRESULT_OK='リクエストを受け付けました。';constRESULT_OK_DETAIL="正常に処理が完了すると 'support@hogehoge.com' からメールが配信されます。";constRESULT_NG='リクエストの受付に失敗しました';constRESULT_NG_DETAIL='大変申し訳ありません。担当者へ直接お問い合わせください。';constDOMAIN='@sample.com';document.getElementById('email').value=DOMAIN;(()=>{constmodal=document.getElementById('myModal');constmodalContent=document.getElementById('modal-content');constsendBtn=document.getElementById('submitBtn');constspan=document.getElementsByClassName('close')[0];constresult=document.getElementById('result');constform=document.getElementById('form');constnameAlert=document.getElementById('name-alert');constemailAlert=document.getElementById('email-alert');constdeptAlert=document.getElementById('dept-alert');constbodyAlert=document.getElementById('body-alert');constresultDetail=document.getElementById('detail');constinputValueClear=()=>{form.name.value='';form.name.setAttribute('class','');form.email.value=DOMAIN;form.email.setAttribute('class','');form.dept.value='';form.dept.setAttribute('class','');form.body.value='';form.body.setAttribute('class','');result.innerHTML='';};// When the user clicks on <span> (x), close the modalspan.onclick=()=>{if(result.innerHTML!==LOADING){modal.style.display='none';if(result.innerHTML===RESULT_OK)inputValueClear();}};// When the user clicks anywhere outside of the modal, close itwindow.onclick=event=>{if(event.target===modal){if(result.innerHTML!==LOADING){modal.style.display='none';if(result.innerHTML===RESULT_OK)inputValueClear();}}};sendBtn.addEventListener('click',asyncevent=>{event.preventDefault();constname=form.name.value.trim();form.name.value=name;constemail=form.email.value.trim();form.email.value=email;constdept=form.dept.value.trim();form.dept.value=dept;constbody=form.body.value.trim();form.body.value=body;// validation checkif(validation(name,email,dept,body))return;result.innerHTML=LOADING;modalContent.setAttribute('class','request-loading');modal.style.display='block';constjsonData=JSON.stringify({name,email,dept,body});try{constres=awaitfetch(URL,{method:'POST',mode:'cors',cache:'no-cache',body:jsonData,headers:{'Content-Type':'application/json; charset=utf-8'}});console.log('Response!!',res.status);modalContent.setAttribute('class','request-success');result.innerHTML=RESULT_OK;resultDetail.innerHTML=RESULT_OK_DETAIL;}catch(error){console.log(error);modalContent.setAttribute('class','request-fail');result.innerHTML=RESULT_NG;resultDetail.innerHTML=RESULT_NG_DETAIL;}});constvalidation=(name,email,dept,body)=>{letvalidationResult=false;if(!name.length){form.name.setAttribute('class','alert-red');nameAlert.hidden=false;validationResult=true;}else{form.name.setAttribute('class','alert-green');nameAlert.hidden=true;}if(!email.length||!/^[^@]+@sample.com$/.test(email)){form.email.setAttribute('class','alert-red');emailAlert.hidden=false;validationResult=true;}else{form.email.setAttribute('class','alert-green');emailAlert.hidden=true;}if(!dept.length){form.dept.setAttribute('class','alert-red');deptAlert.hidden=false;validationResult=true;}else{form.dept.setAttribute('class','alert-green');deptAlert.hidden=true;}if(!body.length){form.body.setAttribute('class','alert-red');bodyAlert.hidden=false;validationResult=true;}else{form.body.setAttribute('class','alert-green');bodyAlert.hidden=true;}returnvalidationResult;};form.name.addEventListener('input',event=>{constname=event.target.value.trim();if(!name){event.target.setAttribute('class','alert-red');nameAlert.hidden=false;}else{event.target.setAttribute('class','alert-green');nameAlert.hidden=true;}});form.email.addEventListener('input',event=>{constemail=event.target.value.trim();event.target.value=email;if(!email||!/^[^@]+@sample.com$/.test(email)){event.target.setAttribute('class','alert-red');emailAlert.hidden=false;}else{event.target.setAttribute('class','alert-green');emailAlert.hidden=true;}});form.dept.addEventListener('input',event=>{constdept=event.target.value.trim();event.target.value=dept;if(!dept){event.target.setAttribute('class','alert-red');deptAlert.hidden=false;}else{event.target.setAttribute('class','alert-green');deptAlert.hidden=true;}});form.body.addEventListener('input',event=>{constbody=event.target.value.trim();if(!body){event.target.setAttribute('class','alert-red');bodyAlert.hidden=false;}else{event.target.setAttribute('class','alert-green');bodyAlert.hidden=true;}});})();AWS SES(Simple Email Service)を設定
※ドメインはRoute53で取得済みの前提
※併せてACM(AWS Certificate Manager)で証明書を取得済み
※SESは送信のみの設定です。
- AWSへログイン
- SESのコンソールへ移動
- リージョンはバージニア北部を選択
- 左のナビゲーションから
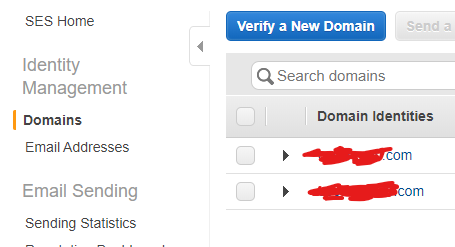
Domainsを選択![image.png]()
![image.png]() をクリック
をクリック- ↓のように入力。自分のドメインとDKIM設定をチェックして、
![image.png]() をクリック
をクリック![image.png]()
- 次のモーダルではCNAMEやTXTが表示され、登録しろと指示が出る。Route53を利用している場合は、このモーダル上でDNSの登録がすべて完了する。
- こんな感じになればOK!(※現時点ではサンドボックス上での制限された利用が可能)
![image.png]()
- 左のナビゲーションで
Email Addressesを選択![image.png]()
Veryfy a New Email Addressでサンドボックス上で利用できるメールアドレスを登録する。- 登録したメールアドレスを
Send a Test Emailで登録したドメインからメールが送られるかテストして正常な動作を確認


最後に起動するLambdaを作成
- Lambdaのコンソールページへ移動
![image.png]() をクリック
をクリック![image.png]() を選択
を選択![image.png]() 適当な関数名を入力
適当な関数名を入力- ランタイムは
Node.js 12.xを選択 - そのほかはデフォルトのままでOK
![image.png]() をクリック
をクリック- 環境変数へ配信元のアドレスを設定
![image.png]()
- 実行ロールにはSESの権限を許可
![image.png]()
- 関数コードへ↓のコードを実装


index.js
'use strict'constSES=require("aws-sdk/clients/ses");constses=newSES({region:"us-east-1"});// 米国東部(バージニア北部)constFROM=process.env.FROM;// 環境変数から取得exports.handler=async(event)=>{console.log(event);constTO=[event.email];constparams={Destination:{ToAddresses:TO},Message:{Body:{Text:{Data:[event.dept+''+event.name+'様','','Hoge Hoge Companyです。','お問い合わせしていただきありがとうございます。','下記の内容で承りました。','','[お問い合わせ内容]'+"\n"+event.body,].join("\n"),Charset:"utf-8"}},Subject:{Data:'受付完了:Webからの問い合わせ',Charset:"utf-8"}},// FromSource:FROM};constresult={statusCode:200};try{constresponse=awaitses.sendEmail(params).promise();console.log('Response: ',response);result.body='OK!!!!!';}catch(error){console.log('Error: ',error);result.statusCode=error.code;result.body=error.message;}returnresult;};※process.envでは環境変数で設定したキーと値が利用可能(暗号化も可能)
最後に起動するLambdaのテスト
![image.png]() テストイベントの選択をクリック
テストイベントの選択をクリック- ↓のようにテストを作成(※emailキーにはSESで登録したアドレスを記載すること)
![image.png]()
![image.png]() をクリックしてテスト実行
をクリックしてテスト実行- 成功となればOK。失敗ならログを確認。
![image.png]()
- テストでemailキーに指定したアドレスにメールが配信されていればOK


最初に起動するLambdaを作成
- Lambdaのコンソールページへ移動
![image.png]() をクリック
をクリック![image.png]() を選択
を選択![image.png]() 適当な関数名を入力
適当な関数名を入力- ランタイムは
Node.js 12.xを選択 - そのほかはデフォルトのままでOK
![image.png]() をクリック
をクリック- 環境変数へ配信元のアドレスと受付先のアドレスを入力
![image.png]()
- 実行ロールはSESとLambdaの権限を追加
![image.png]()
- 関数コードへ↓のコードを実装


index.js
'use strict'constSES=require("aws-sdk/clients/ses");constses=newSES({region:"us-east-1"});// 米国東部(バージニア北部)constTO=[process.env.TO];// 環境変数からの値を取得constFROM=process.env.FROM;// 次のLambdaを起動するための設定constLambda=require("aws-sdk/clients/lambda");constlambda=newLambda({region:"ap-northeast-1"});exports.handler=async(event)=>{constname=event.form.name;constemail=event.form.email;constdept=event.form.dept;constbody=event.form.body;constsesParams={Destination:{ToAddresses:TO},Message:{Body:{Text:{Data:['[名前] : '+name,'[メールアドレス] : '+email,'[所属部署] : '+dept,'[お問い合わせ] : '+"\n"+body,].join("\n"),Charset:"utf-8"}},Subject:{Data:'Webからの問い合わせ',Charset:"utf-8"}},// FromSource:FROM};// 次のLambdaに送るデータconstpayload={name,email,dept,body};console.log('payload: ',payload);constlambdaParams={FunctionName:"inpuirySendMailForm_2nd",// 最後に起動するLambdaの名称InvocationType:"Event",Payload:JSON.stringify(payload)};constresult={statusCode:200};try{constresponse=awaitses.sendEmail(sesParams).promise();console.log('Response: ',response);constcallLambda=awaitlambda.invoke(lambdaParams).promise();console.log("Lambda Response: ",callLambda);result.body='OK!!!!!';}catch(error){console.log('Error: ',error);result.statusCode=error.code;result.body=error.message;}returnresult;};最初に起動するLambdaのテスト(次のLambdaも起動する)
![image.png]() テストイベントの選択をクリック
テストイベントの選択をクリック- ↓のようにテストを作成
![image.png]()
![image.png]() をクリックしてテスト実行
をクリックしてテスト実行- 成功となればOK。失敗ならログを確認。
![image.png]()
- テストでemailキーに指定したアドレスに受付完了メールが配信され、環境変数でTOに指定した受付先アドレスへ問い合わせ内容が配信されていればOK

APIGatewayの設定
![image.png]() をクリック
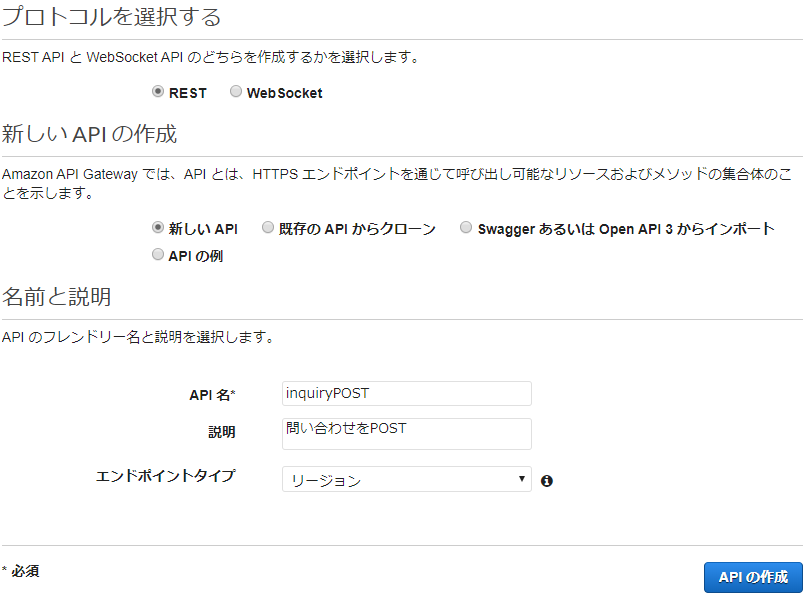
をクリックREST APIの構築を選択![image.png]()
API名と説明を入力してAPIの作成をクリック(他はデフォルト)![image.png]()
- アクション⇒リソースの作成を選択⇒リソース名を入力(リソースパスは自動入力)⇒CORSを有効化⇒リソースの作成をクリック
- アクション⇒メソッドの作成⇒POSTを選択⇒セットアップで最初に起動するLambda関数名を入力⇒保存をクリック
- 統合リクエストをクリック⇒マッピングテンプレートを追加⇒Content-Typeは
application/json⇒テンプレートには↓を入力⇒保存をクリック


{"form":{"name":"$util.escapeJavaScript($input.path('$.name'))","email":"$util.escapeJavaScript($input.path('$.email'))","dept":"$util.escapeJavaScript($input.path('$.dept'))","body":"$util.escapeJavaScript($input.path('$.body'))"}}APIGatewayのテスト
- テストを実行する
![image.png]()
- Lambdaが起動してメールが配信されればOK

APIGatewayのステージを作成
今回はv1というステージを作成
APIGatewayのデプロイ
リソース⇒アクション⇒APIのデプロイを選択⇒v1ステージを選択して⇒デプロイをクリック
発行されたURLをjavascriptのURL変数へ割り当て
全体の動作確認
問い合わせフォームへSESで登録したアドレスと必要事項を入力し、送信ボタンをクリックして動作を確認
実用化に向けて
- LambdaのSDK呼び出しは動作確認ができているバージョンが呼び出されるようにする必要あり。
- SESの上限緩和申請が必要。
- APIGatewayでリソースポリシーを指定して不要なアクセスを防ぐ
最後に
かなり大雑把に書きました。
小規模利用なら十分かと思います。
役に立つかな?
計画性なく作ってしまったのでここからブラッシュアップ