Quantcast
Channel: Node.jsタグが付けられた新着記事 - Qiita
Viewing all 8835 articles
Browse latest View live

node.js の --max-old-space-size のデフォルト値は 1400MB

$
0
0

node.js の V8 のヒープのメモリ容量を設定するオプション --max-old-space-size のデフォルト値は 1.4GB みたい。

https://github.com/nodejs/node/blob/master/deps/v8/src/heap/heap.cc

    max_old_generation_size_ = 700ul * (kSystemPointerSize / 4) * MB;

64bit OS だと kSystemPointerSizeは 8 だろうから、1400MB になりそう。
実際の値をみると、--max-old-space-size=1400の結果とマッチした。

node --max-old-space-size=1000 -e 'console.log(Math.floor(v8.getHeapStatistics().heap_size_limit/1024/1024))'
# 1049

node --max-old-space-size=1400 -e 'console.log(Math.floor(v8.getHeapStatistics().heap_size_limit/1024/1024))'
# => 1456

node -e 'console.log(Math.floor(v8.getHeapStatistics().heap_size_limit/1024/1024))'
# => 1456

node --max-old-space-size=2000 -e 'console.log(Math.floor(v8.getHeapStatistics().heap_size_limit/1024/1024))'
# => 2066

node --max-old-space-size=3000 -e 'console.log(Math.floor(v8.getHeapStatistics().heap_size_limit/1024/1024))'
# => 3083

まとめ:
--max-old-space-size=1000にすると、デフォルトより3割くらい減る。
--max-old-space-size=2000にすると、デフォルトより4割くらい増える。
--max-old-space-size=3000にすると、デフォルトより2倍ちょっと増える。

他の記事で --max-old-space-size=2000をよくみるのは、増やしすぎない按配なのか。


【比較検証】Next.js の Server Side Rendering (SSR) を理解する。create-react-app と比べてみた。

$
0
0

image.png

Next.jsのサイト、かっこいいですよね 😊
クールで、パフォーマンスにも優れていてエンジニアを魅了します。
日本では Nuxt.js が人気のようですが、個人的には Next.js を推しています。

さて、先日 Next.js のチュートリアルを通してサーバサイドレンダリングについて考えさせられる機会がありました。本記事では、そもそもサーバサイドレンダリングのメリットとは?というところから初めて、create-react-appによって実装された SPA と、nextによって実装された SSR ではどのような違いがあるのかを検証してみました。

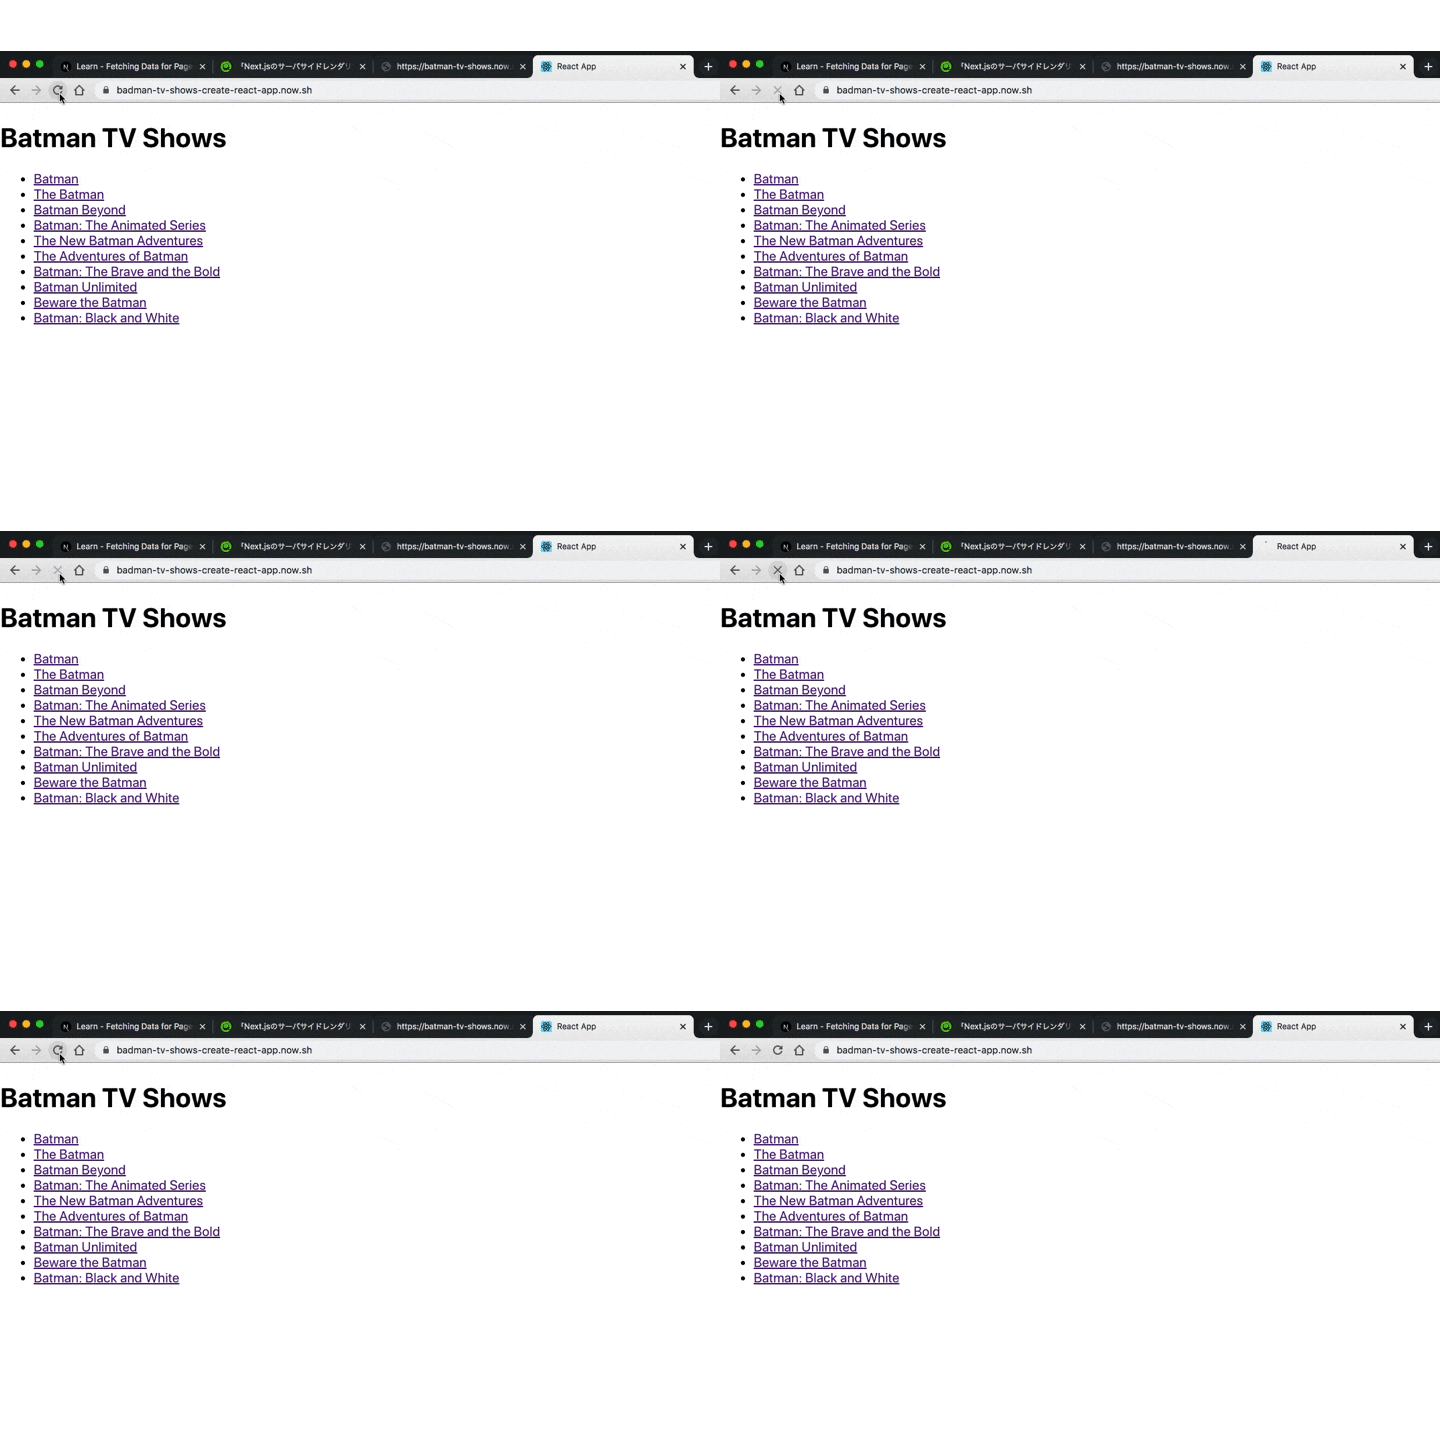
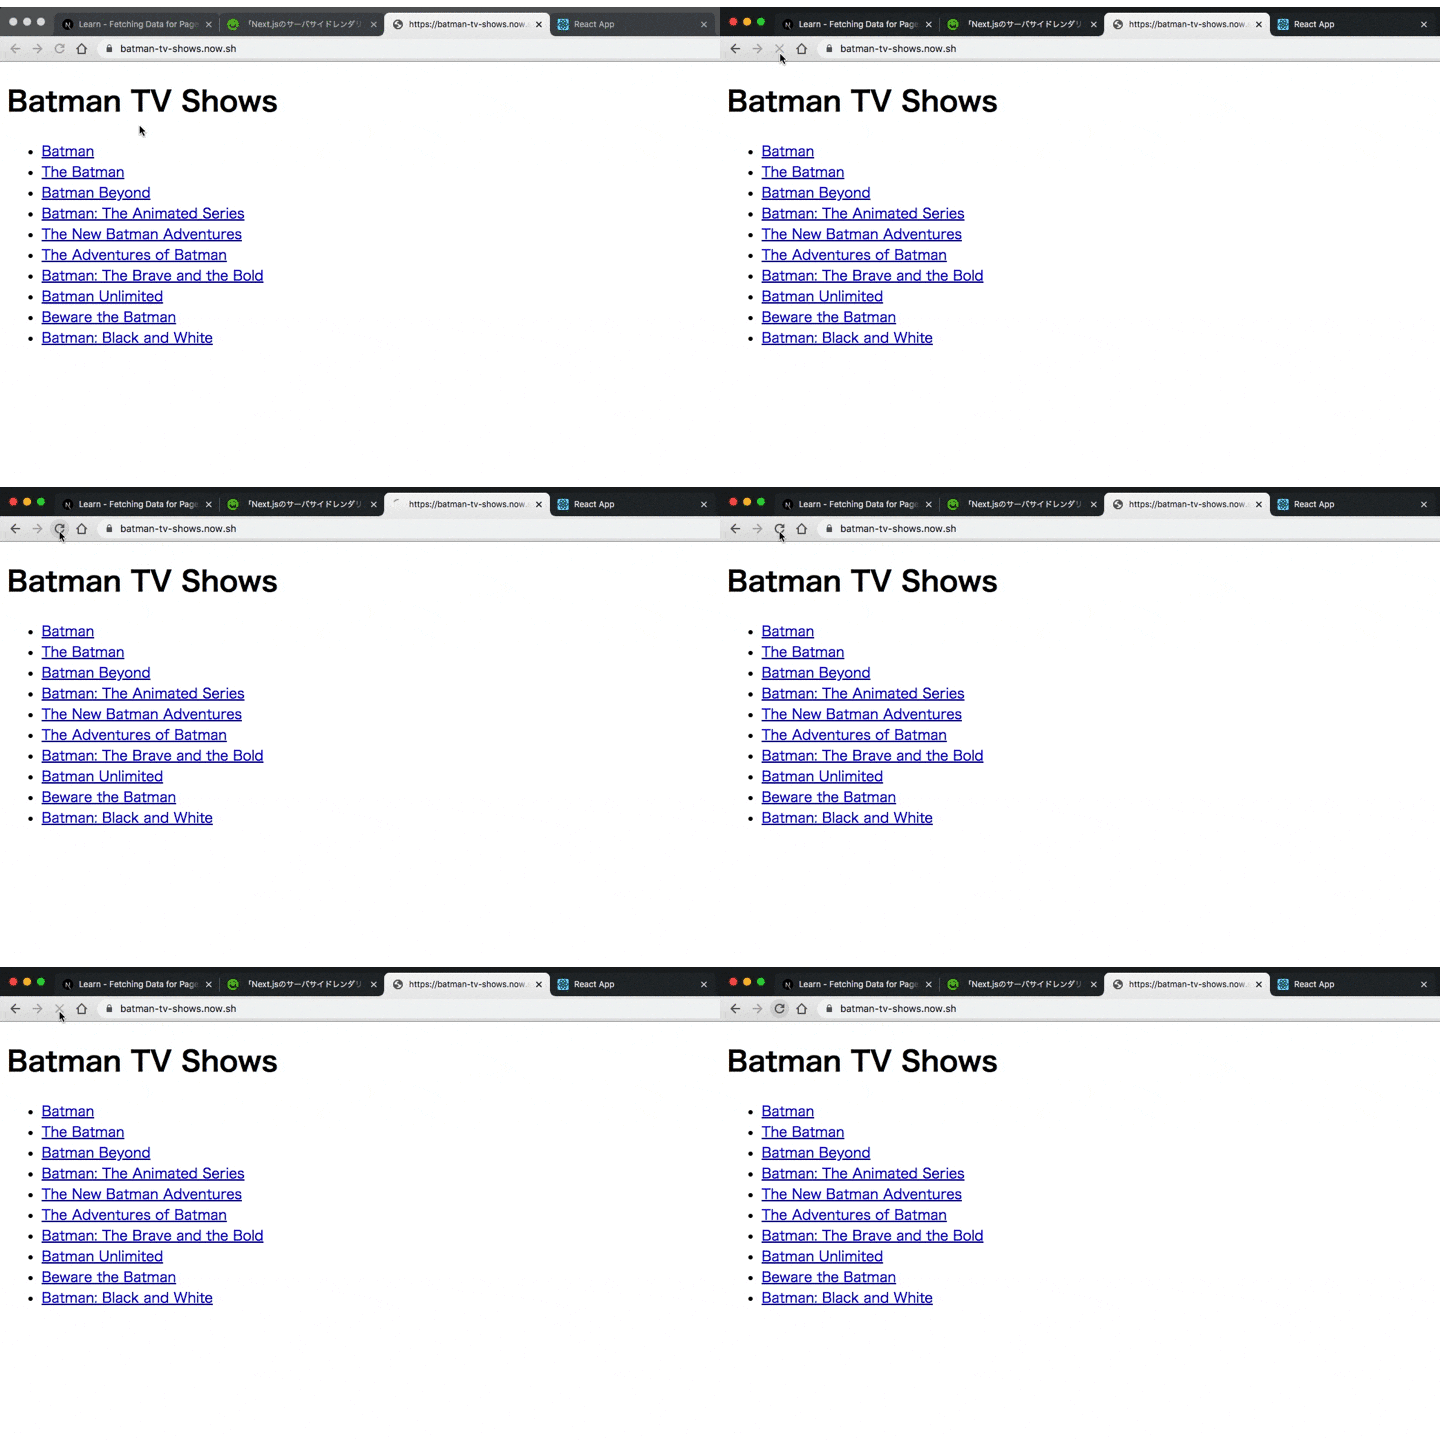
以下の動画は本記事のサマリーです。
作成したアプリケーションへのリンクも貼っておきます。
右の方がちょっとだけ描画が遅いのがわかりますね。

nextreact

👆(左)next.js で SSR、(右)create-react-app で SPA👆

サーバサイドレンダリング(SSR)とは

main.png

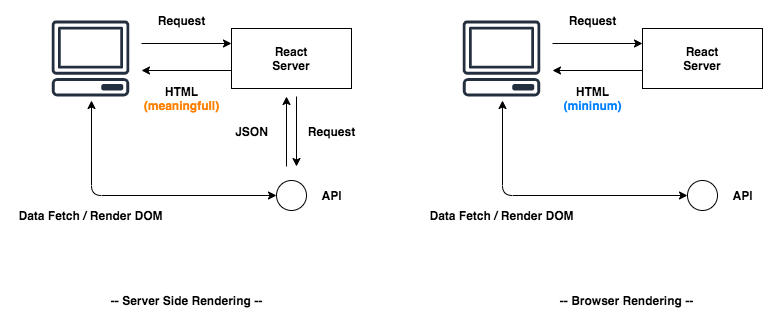
従来の React ベースのアプリケーションの構成を振り返ってみましょう(右図)。この構成の場合、ユーザからのリクエストは、まずはじめに React サーバ(S3 や Netlify)から JavaScript のソースと必要最小限のほとんど空っぽな HTML を返します。それからフロントエンドで HTML 要素をレンダリングする方法をとります。

このようにバックエンド API とフロントエンドの描画を完全に分離する事によって、開発体制を分離した生産性向上や、ユーザに優れた UX を提供できるようになりました。
その一方で、過度なネットワーク通信が発生したり、JavaScript によって生成された Web サイトを検索エンジンのクローラが検知できなくなりました。その結果として、Google の検索項目の上位に自サイトが表示されにくいなどのデメリットも招いてしました。※こちらの記事で紹介されていますが、最近ではあまり問題にならなくなっているようです。

さて、このような問題を解消するためのテクニックがサーバサイドレンダリング(ServerSideRendering)です(左図)。サーバサイドレンダリングは従来フロントエンドで行なっていたレンダリングをバックエンドの Node.js サーバにも移譲しようという考え方です。これにより、モバイル端末がどんなに脆弱でも、ハイパフォーマンスなサーバを使用してレンダリングできます。さらに無駄なネットワーク通信回数も最小限に減らせるでしょう。「バックエンドの Node.js サーバにも」と強調しているのは、フロントエンドでももちろん描画ができる、ということです。初期ページの一部だけはサーバサイドでレンダリングして、残りの要素はフロントエンドからフェッチしてきてレンダリングするといったように用途に応じて使い分けができます。

パフォーマンス

遅いデバイスを使用していると、最初のページのレンダリングに時間がかかり、ユーザ体験が低下します。計算をより強力なサーバーにオフロードすることで、ユーザーが待機する時間を最小限に抑えることができます。
また、サーバーで初期データをプリフェッチしてページを構築すると、サイトを表示するために必要なラウンドトリップの回数が大幅に削減されます。これにより、待ち時間の短縮と帯域幅消費の削減につながります。

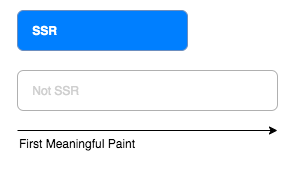
fmp.png

SEO 対策

SSR を行なっているサイトは、ページが検索エンジンで簡単にインデックス化されます。クライアント側でルーティング制御を行なっていると、検索エンジンのウェブクロールを遅らせてしまいます。この結果、検索エンジンの上位にリンクを表示することが難しくなります。

Next.js ことはじめ

SSR を理解するために必要最小限の構成で Next.js アプリケーションを組み立てていきます。

必要なライブラリとアプリケーションの実行

$mkdir next.ssr
$cd next.ssr
$yarn init -y

Next.js を最小構成で始めるために必要なライブラリは nextreact, react-domだけです。早速 yarnでインストールしましょう(npmでもよいですよ)

$yarn add react react-dom next

package.jsonには以下の npm scriptsを記載しておいて開発を楽に進められるようにしておきましょう。

package.json
"scripts":{"dev":"next","build":"next build","start":"next start"}

それぞれのコマンドは以下のように使用します。

  • dev - ローカルでアプリケーションを起動します。
  • build - プロダクション用にアプリケーションをビルドします。
  • start - プロダクション環境でアプリケーションを実行します。

ルーティング

Next.js は非常にシンプルな設計思想でフロント画面が作れるように構成されています。/pagesディレクトリ配下に配置されている js ファイルごとにパスルーティングが行われます。はじめの一歩として /pages/index.jsにファイルを配置して、/という URL で表示できるようにしてみましょう。詳細なドキュメントはこちら

$mkdir pages
$touch pages/index.js
pages/index.js
constIndex=()=>{return<h1>Hello World</h1>;};exportdefaultIndex;

ファイルパスと URL パスには以下のような対応関係があります。

ファイルパスURL パス
pages/index.js/
pages/blog/index.js/blog
pages/blog/first-post.js/blog/first-post
pages/dashboard/settings/username.js/dashboard/settings/username
pages/blog/[slug].js/blog/:slug (/blog/hello-world)
pages/[username]/settings.js/:username/settings (/foo/settings)
pages/post/[...all].js/post/* (/post/2020/id/title)

さて、ここまでできれば準備完了です。アプリケーションを起動してみましょう。

$yarn dev

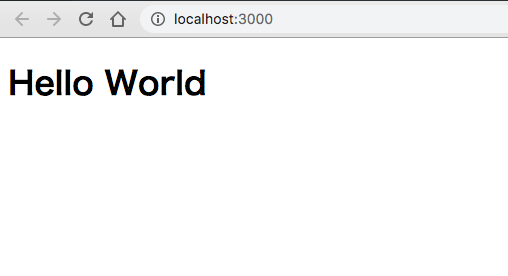
ブラウザを起動し、/にアクセスすると画面が表示されるはずです。

image.png

サーバサイドレンダリングの実装

ここから SSR ができるような機能を作っていきましょう。

<Link>コンポートを使用して、他ページに遷移します。以下の例だと /shows/[id]へ遷移させようとしています。また、Next.js には、ページのデータを取得するための標準 API が付属しています。 getInitialPropsという非同期関数を使用して実行します。
getInitialPropsを使用すると、特定のページのデータをフェッチしてページに渡すことができます。 getInitialPropsはサーバーとクライアントの両方で動作します。
この getInitialPropsの振る舞いを観測し、SSR を理解していきましょう。

index.js
importLinkfrom"next/link";importfetchfrom"isomorphic-unfetch";constIndex=props=>(<div><h1>Batman TV Shows</h1><ul>{props.shows.map(show=>(<likey={show.id}><Linkhref="/shows/[id]"as={`/shows/${show.id}`}><a>{show.name}</a></Link></li>))}</ul></div>);Index.getInitialProps=asyncfunction(){constres=awaitfetch("https://api.tvmaze.com/search/shows?q=batman");constdata=awaitres.json();console.log(`Show data fetched. Count: ${data.length}`);return{shows:data.map(entry=>entry.show)};};exportdefaultIndex;

pages配下に /shows/[id].jsを配置し、Dynamic Routingができるようにしておきます。

pages/[id].js
importfetchfrom"isomorphic-unfetch";constPost=props=>(<div><h1>{props.show.name}</h1><p>{props.show.summary.replace(/<[/]?[pb]>/g,"")}</p>{props.show.image?<imgsrc={props.show.image.medium}/>:null}</div>);Post.getInitialProps=asyncfunction(context){const{id}=context.query;constres=awaitfetch(`https://api.tvmaze.com/shows/${id}`);constshow=awaitres.json();console.log(`Fetched show: ${show.name}`);return{show};};exportdefaultPost;

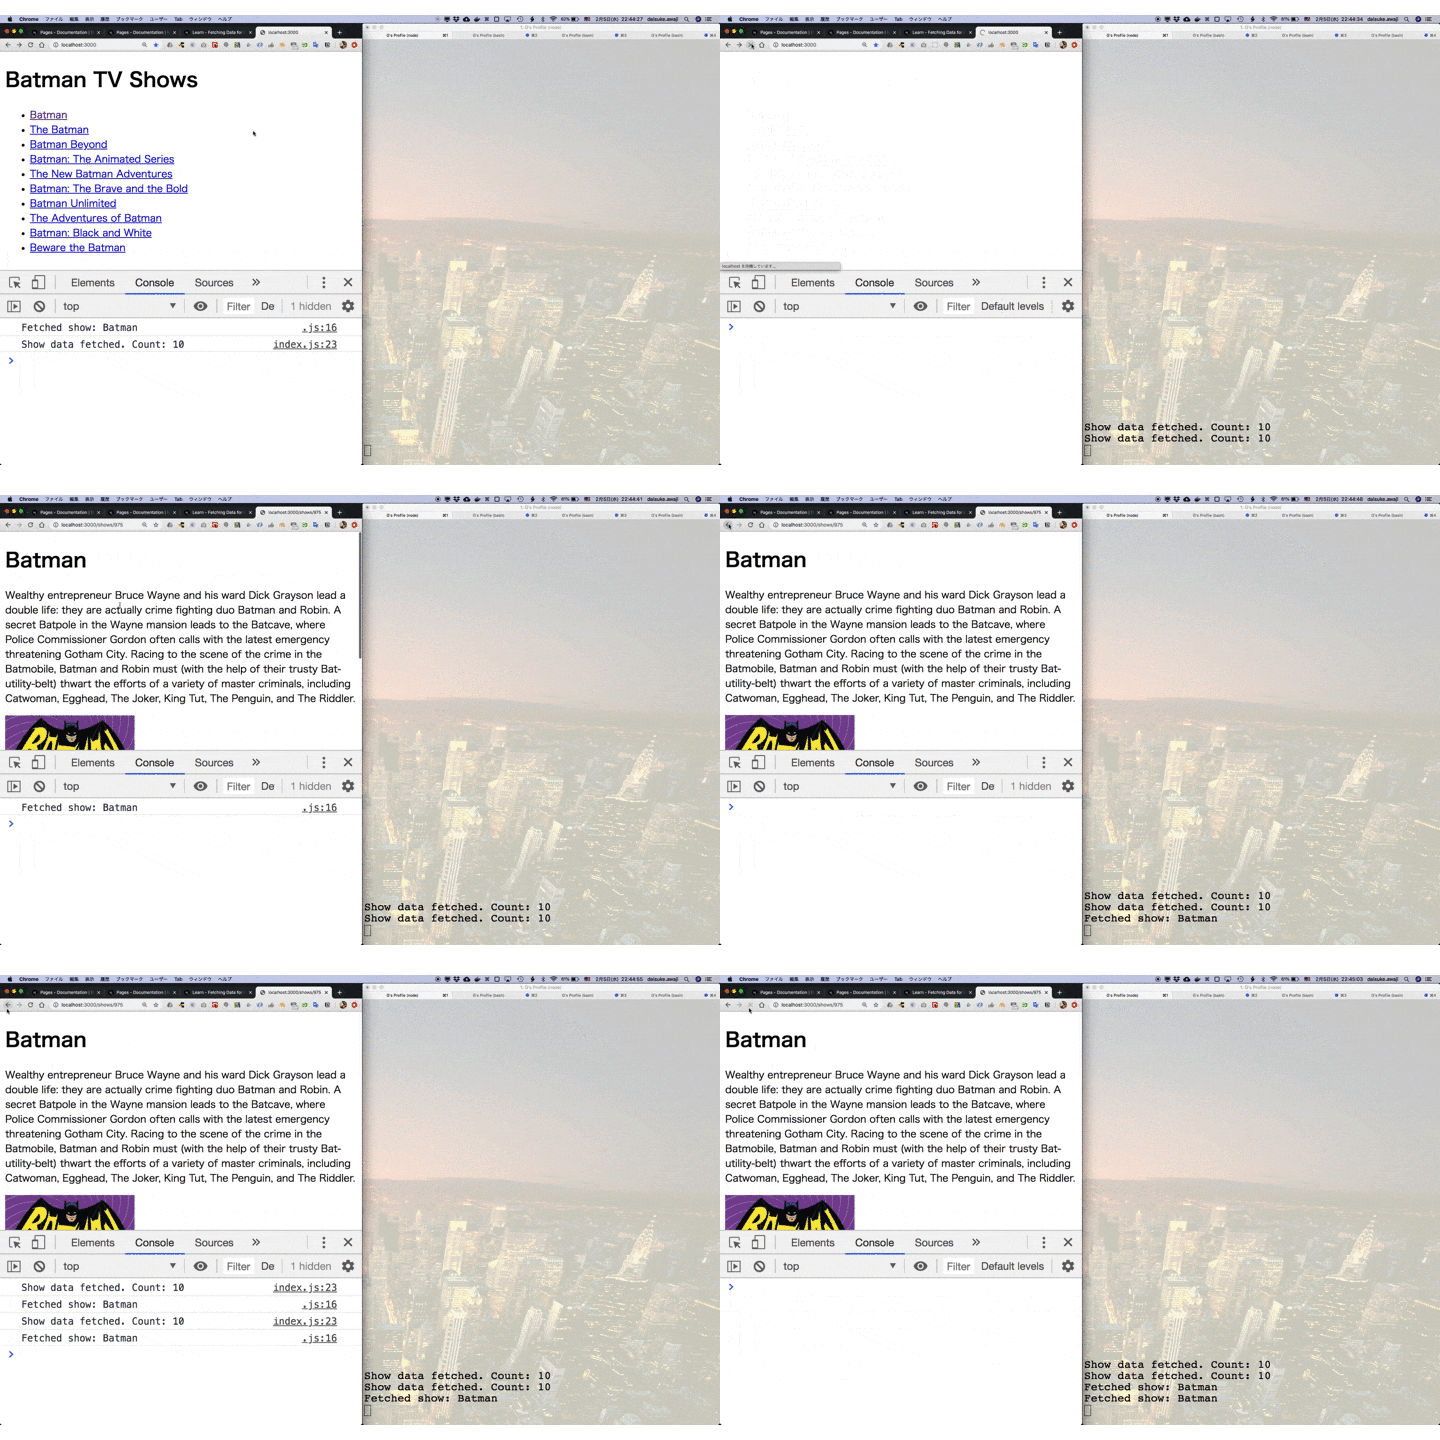
/を表示してみましょう。サーバサイドにログ Show data fetched: 10が表示されるはずです。 index.jsをサーバサイドでレンダリングしたという事になりますね。
次にリンクをクリックして /shows/975に遷移するとブラウザのコンソールにログが表示されてます。これはフロントエンドでデータフェッチとレンダリングが行われたということを意味しています。

ssr.gif

デプロイ

最後にビルドして、デプロイします。ZEIT の now にデプロイします。素晴らしい DX(DeveloperExperimence)です。本当に必要な要素以外全て削ぎ落とした、最高の PaaS だと思ってます。いつも愛用しています。こちらの記事にて丁寧に解説されていました。

bash
$yarn build # ビルド$now        # デプロイ

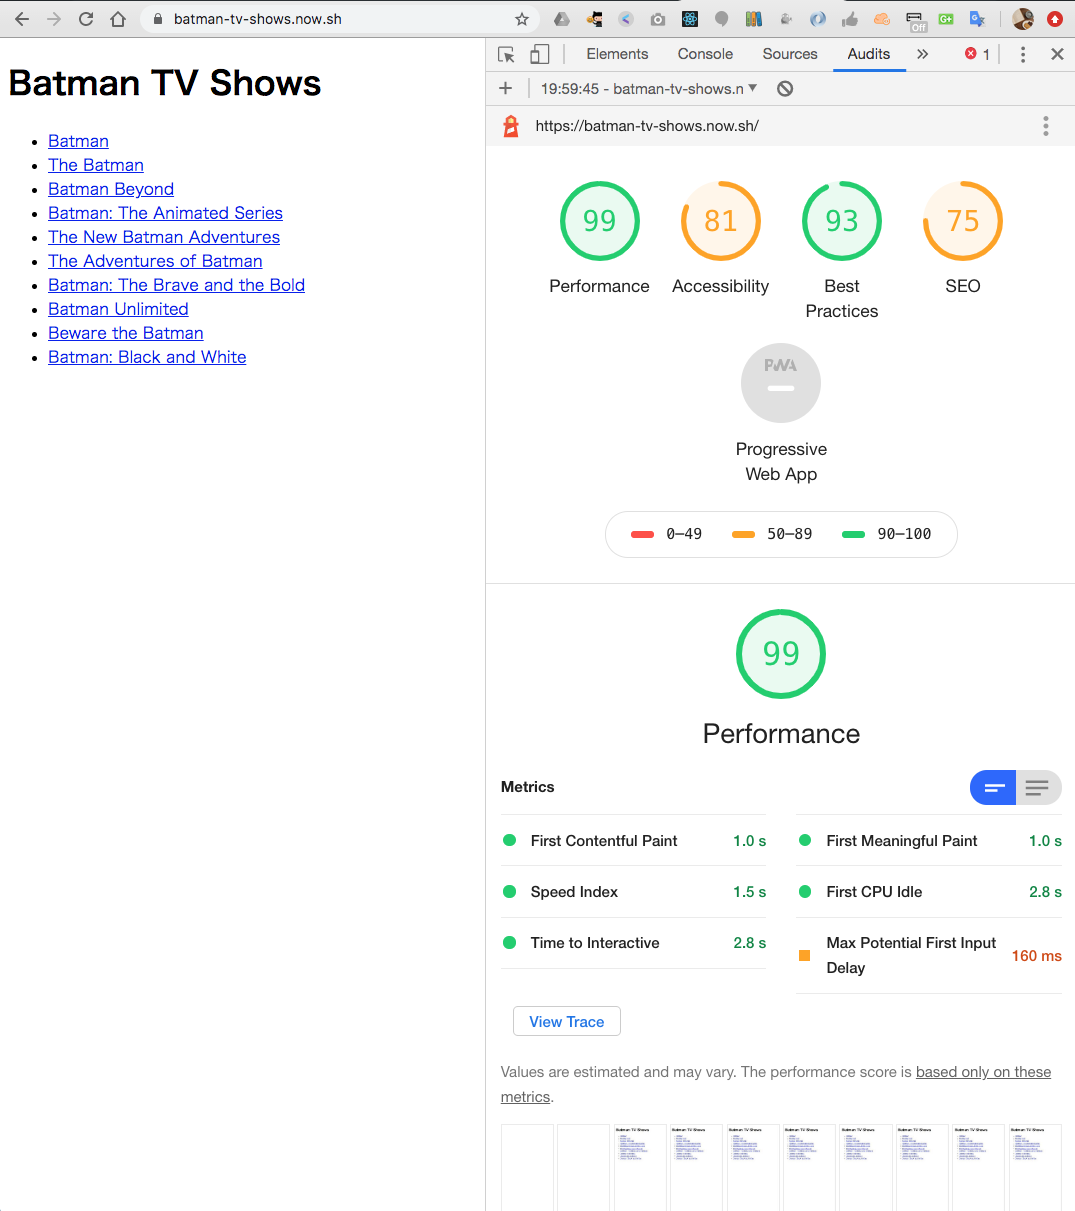
デプロイしたら動作を確認してパフォーマンスを検証しましょう。Chrome の開発者コンソールを開き、Audit を実行します。

https://batman-tv-shows.geeawa.now.sh/

First Meaningful Paint が 1.0s とでました。まずまずです。

image.png

create-react-app との比較

ここまでできたので Next.js で作成されたアプリケーションと create-react-appで作成されたアプリケーションを比較してみましょう。

以下のようにほぼ同様のソースを使用して、create-react-appアプリケーションを作成します。以下にデプロイしてあります。

https://badman-tv-shows-create-react-app.now.sh/

index.js
importReactfrom"react";importfetchfrom"isomorphic-unfetch";classIndexextendsReact.Component{constructor(props){super(props);this.state={shows:[]};}asynccomponentDidMount(){constres=awaitfetch("https://api.tvmaze.com/search/shows?q=batman");constdata=awaitres.json();console.log(`Show data fetched. Count: ${data.length}`);this.setState({shows:data.map(entry=>entry.show)});}render(){return(<div><h1>Batman TV Shows</h1><ul>{this.state.shows.map(show=>(<likey={show.id}><ahref="">{show.name}</a></li>))}</ul></div>);}}exportdefaultIndex;

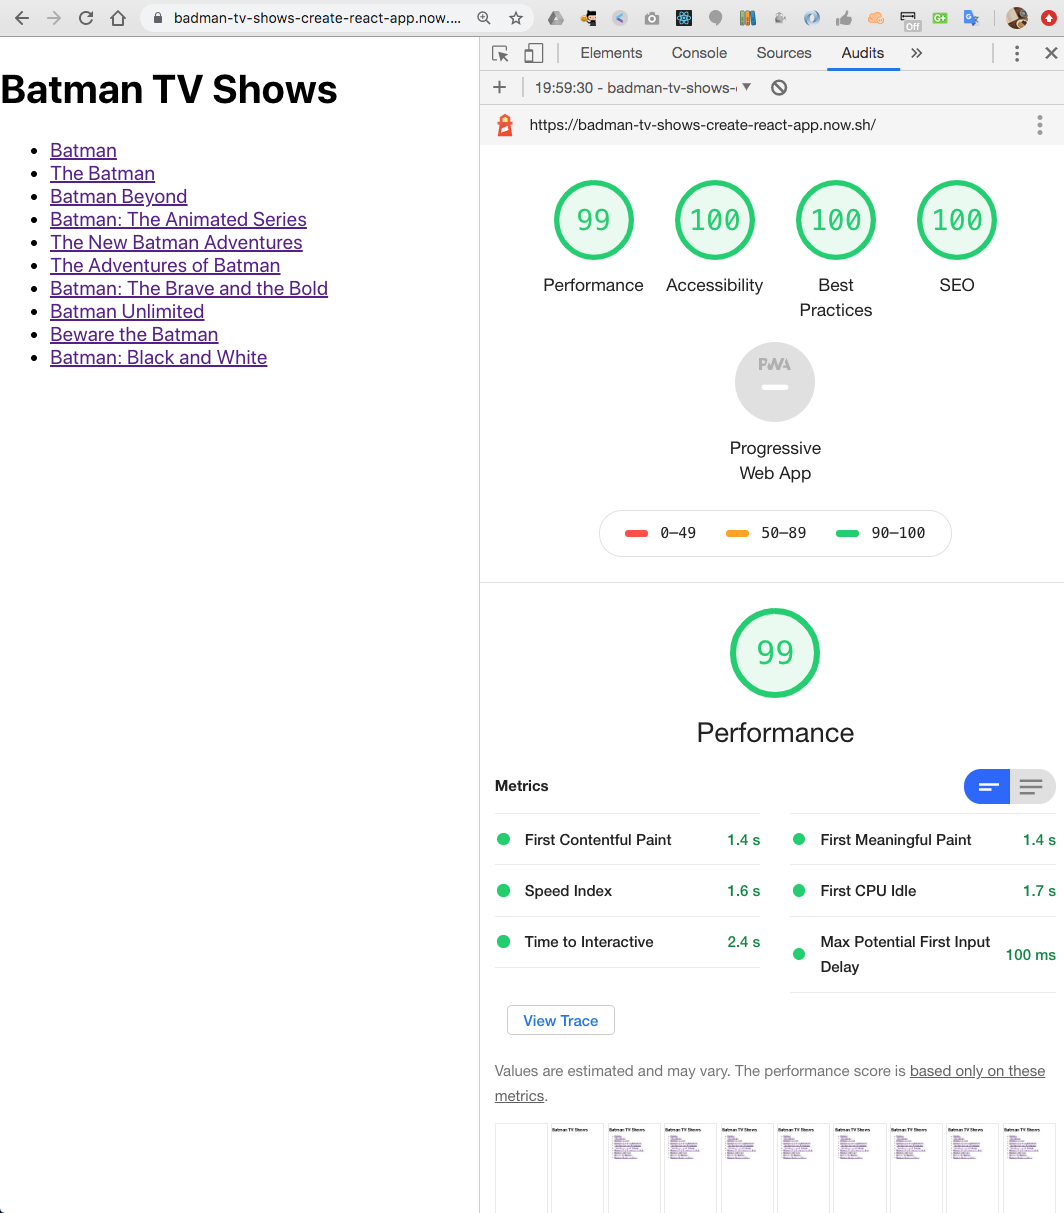
デプロイができたので Audit を実行します。
First Meaningful Paint は 1.4s となり、Next.js によって SSR できるようになったサイトと比較すると少しだけ遅い結果がでました。

image.png

さいごに

今回作成されたアプリケーションは非常にシンプルで、1つの API しか実行しませんし、レンダリングする DOM 要素も少なかったためパフォーマンスにそれほど大きな違いはみられませんでした。それでもアプリケーションが肥大したり、ネットワークの遅い環境、古くて脆弱なモバイルデバイスを使用するとパフォーマンスの違いは顕著になってくるでしょう。SSR の技術は適材適所を見極めて投下していきたいですね。

Fix: WSUS Connection Error Reset Server Node On Windows Server 2012

$
0
0

Error: Connection Error

An error occurred trying to connect the WSUS server. The error can happen for a number of reasons. Check connectivity with the server. Please contact your network administrator if the problem persists

Click Reset server node to try to connect to the server again.

Follow the below steps to Fix: WSUS Connection Error Reset Server Node On Windows Server 2012:
Open IIS
Click on Application Pools
Click on WsusPool
Click Advanced Settings
Scroll down and increase the Private Memory Limit and decrease the Regular Time Interval.

Read More https://www.itsmarttricks.com/fix-wsus-connection-error-reset-server-node-on-windows-server-2012/

SlackからGitHub Actionsにパラメータを渡して実行する

$
0
0

以下のサービスを組み合わせて、ポチポチCIツールを作成します。

  • Slack
  • GitHub Actions、REST API v3
  • AWS Lambda ( Node.js 12.x (@slack/bolt 1.5.0) )

test.gif

外観図

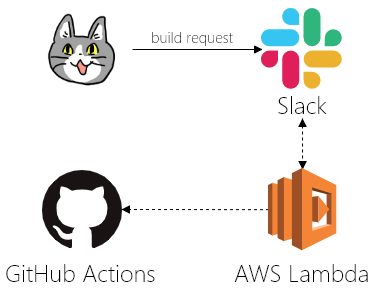
Slackに対してリクエストすると、SlackとLambdaがやりとりをしてGitHubに命令を出してくれます。

image.png

素材

猫の顔: https://kumamine.blogspot.com/2019/12/blog-post_27.html
Slack: Cacoo内の素材
AWS Lambda: Cacoo内の素材
GitHub: Cacoo内の素材

GitHub ActionsのJobを外部から実行する

GitHub Actionsはプルリク作成やコミットプッシュなどの何らかの「トリガー」で走るCIツールです。
GitHubのAPIを利用し、「トリガー」を発生させることで、外部からActionsのJobを実行することができます。

準備

GitHub ActionsをWebAPIから実行するための準備を行います。

  1. Github Actions用のリポジトリを作成して、ローカルにcloneしておきます。
    https://help.github.com/ja/github/getting-started-with-github/create-a-repo
  2. GitHub REST API v3を利用するためにアクセストークンを作成します。権限にはrepoを付加しておきましょう。
    https://help.github.com/ja/github/authenticating-to-github/creating-a-personal-access-token-for-the-command-line
  3. GitHubからcloneしてきたプロジェクト上に、Github Actionsのワークフロー構文ファイルを作成します。作成したファイルはデフォルトブランチ(いわゆるmasterブランチ)に置きましょう。
.github/workflows/main.yml
# Actionの名前name:Sample# Jobが実行されるトリガー# pushされた場合、もしくはイベント種別が「hoge」のリポジトリディスパッチイベントが作成された場合に実行するon:push:repository_dispatch:types:[hoge]jobs:sample_job:runs-on:ubuntu-latestname:sample_jobsteps:-uses:actions/checkout@v1# ブランチが指定されていた場合は、指定されているブランチを利用する-if:github.event.client_payloaduses:actions/checkout@v1with:ref:${{ github.event.client_payload.ref }}# 「echo_string」要素が指定されていた場合は、その要素の内容を表示する-if:github.event.client_payload.echo_stringname:echo stringrun:echo ${{ toJSON(github.event.client_payload.echo_string) }}

Github ActionsのJobを端末から実行する

準備ができたら、端末からGitHub Actionsに文字列を渡して、Jobのログ上に表示させてみましょう。

# 扱いやすいように変数にアクセストークンを代入するGITHUB_TOKEN={アクセストークン}# 実行ブランチBRANCH={ブランチ名}# Actionの実行
curl -X POST https://api.github.com/repos/:owner/:repo/dispatches \-H"Authorization: token $GITHUB_TOKEN"\-H"Accept: application/vnd.github.everest-preview+json"\--data"{\"event_type\": \"hoge\", \"client_payload\": {\"ref\": \"$BRANCH\", \"echo_string\": \"hugahuga\"}}"

curlコマンドの--dataの、
event_typeには、ワークフロー構文ファイルのon.repository_dispatch.typesの文字列を指定します。
client_payload.refには、実行するブランチ名称を指定します。
client_payload.echo_stringには、表示する文字列を指定します。

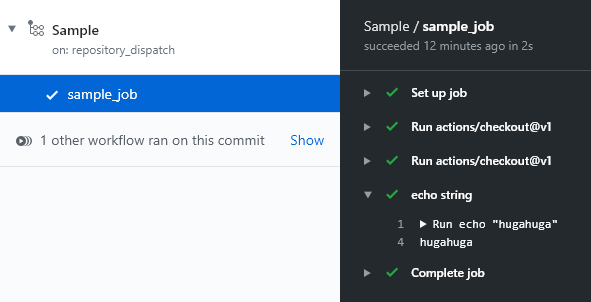
curlで実行した場合の結果

下図はGithub Actions上の実行結果です。
curlコマンドの--dataで指定したclient_payload.echo_stringの文字列が表示されます。

image.png

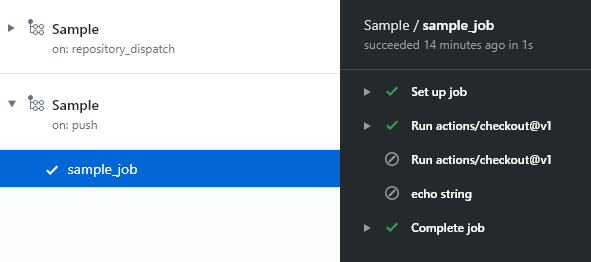
pushした場合の結果

ブランチの切り替えも文字列の表示も行いません。
pushされたブランチで処理が行われます。

image.png

ここまでの作業で察した方もいらっしゃると思いますが、デフォルトブランチ上にワークフロー構文ファイルが存在しないと、Jobが実行されません。理由は、APIがデフォルトブランチに対してイベントを発生させているためです。ではどこでブランチが切り替わっているのかというと、Github ActionsのJob中で切り替わっています。
ブランチに対してイベントを発生させるAPIも存在するのですが、本来の使い方ではない上に、意味のないログがプルリクなどに残ってしまうため、今回はdispatchesイベントを採用しました。

※ GitHub Actions用のAPIも用意されているようですが、まだパブリックベータ版のようですし、ジョブが実行できるわけではないみたいです。内容が頻繁に変更される可能性があるため、マスターがリリースされ次第、都合がよさそうであれば記事内容を書き換えようかなと思っています。(2020.02.02)

参考

https://developer.github.com/v3/repos/#create-a-repository-dispatch-event
https://help.github.com/ja/actions/automating-your-workflow-with-github-actions/events-that-trigger-workflows
https://swfz.hatenablog.com/entry/2020/01/23/080000
https://qiita.com/proudust/items/51599abd2b107b708e1e

Slackにモーダルウィンドウを表示して、入力値を取得する

Slackから提供されているWebAPIを組み合わせることで、モーダルウィンドウなどのインターフェースを実装することができます。
今回はそのラッパーであるBoltフレームワークを利用して実装していきます。

準備

  1. Slackのワークスペースを作成します。
    https://slack.com/intl/ja-jp/help/articles/206845317
  2. SlackのAppsを作成します。https://api.slack.com/appsからCreate New Appを押して、App NameDevelopment Slack Workspaceの項目を入力してCreate Appを押せばOKです。(2020.02.02現在)
    https://api.slack.com/start/overview
  3. Features > OAuth & Permissions > Scopes > Bot Token Scopes にapp_mentioned:readchat:writecommandsを追加します。
    https://api.slack.com/apps/{APP_ID}/oauth
  4. Settings > Install App からアプリをワークスペースにインストールします。
    https://api.slack.com/apps/{APP_ID}/install-on-team

アプリをハンドリングするサーバの作成

今回はServerless FrameworkとAWS Lambdaを利用してサーバを作成します。
まずは、端末で以下のコマンドを実行し、プロジェクトを作成します。

# プロジェクトの作成
npm init

# ライブラリのインストール
npm install serverless \
            aws-serverless-express \
            dotenv \
            @slack/bolt \
            axios

# サーバーレスフレームワークプロジェクトの作成
npx serverless create --template aws-nodejs

サーバーレスの設定を追加します。

serverless.yml
service:sampleprovider:name:awsruntime:nodejs12.xregion:ap-northeast-1functions:events:handler:handler.apptimeout:30events:# Bolt App-http:method:postpath:/slack/events# OAuth Flow-http:method:getpath:/slack/installation-http:method:getpath:/slack/oauth

内部のロジックを作成します。
/repos/:owner/:repo/dispatchesの部分は「Github ActionsのJobを外部から実行する」で利用したリポジトリを指定してください。

handler.js
'use strict';// ------------------------------// AWS Lambda handler// ------------------------------require('dotenv').config();const{App,LogLevel,ExpressReceiver}=require('@slack/bolt');constexpressReceiver=newExpressReceiver({signingSecret:process.env.SLACK_SIGNING_SECRET});constapp=newApp({token:process.env.SLACK_BOT_TOKEN,receiver:expressReceiver,logLevel:LogLevel.DEBUG});constawsServerlessExpress=require('aws-serverless-express');constserver=awsServerlessExpress.createServer(expressReceiver.app);module.exports.app=(event,context)=>{console.log('⚡️ Bolt app is running');console.log(event);awsServerlessExpress.proxy(server,event,context)}app.error(printCompleteJSON);// ------------------------------// Application Logic// ------------------------------// slash commandでモーダルウィンドウを表示するためのロジックapp.command('/build',async({ack,body,context})=>{ack();constresult=app.client.views.open({"token":context.botToken,"trigger_id":body.trigger_id,"view":{"type":"modal","callback_id":"task-modal","private_metadata":JSON.stringify(body),"title":{"type":"plain_text","text":"Github Actions","emoji":true},"submit":{"type":"plain_text","text":"Submit","emoji":true},"close":{"type":"plain_text","text":"Cancel","emoji":true},"blocks":[{"type":"input","block_id":"input-title","element":{"type":"plain_text_input","action_id":"input","initial_value":body.text},"label":{"type":"plain_text","text":"branch","emoji":true},"optional":false},{"type":"input","block_id":"input-description","element":{"type":"plain_text_input","action_id":"input","multiline":true},"label":{"type":"plain_text","text":"echo string","emoji":true},"optional":true}]}});console.log(awaitresult);});// モーダルウィンドウから送信された値を受け取って、処理を行うロジックapp.view('task-modal',async({body,ack,context})=>{// モーダルウィンドウでのデータ送信イベントを確認ack();// ユーザーにメッセージを送信try{app.client.chat.postMessage({token:context.botToken,channel:body['user']['id'],text:'Build request received!'});}catch(error){console.error(error);}// ------------------------------// axios flow// ------------------------------constaxiosBase=require('axios');constaxios=axiosBase.create({baseURL:'https://api.github.com',headers:{"Authorization":`token ${process.env.GITHUB_TOKEN}`,"Accept":"application/vnd.github.everest-preview+json"}});constrequestBody=JSON.stringify({event_type:"hoge",client_payload:{ref:body.view.state.values['input-title'].input.value,echo_string:body.view.state.values['input-description'].input.value}});// GitHubへのリクエスト処理axios.post('/repos/:owner/:repo/dispatches',requestBody).then(response=>(this.info=response)).catch(function(e){console.log(e);});});functionprintCompleteJSON(error){console.log(JSON.stringify(error));}

環境変数ファイルを作成して、センシティブな情報を入力します。

SLACK_SIGNING_SECRET : Features > OAuth & Permissions > OAuth Tokens & Redirect URLs > Tokens for Your Workspace > Bot User OAuth Access Token ( https://api.slack.com/apps/{APP_ID}/oauth
SLACK_BOT_TOKEN : Basic Information > App Credentials > Signing Secret
GITHUB_TOKEN : GitHub REST API v3を利用するためにアクセストークン

# .envファイルの作成touch .env
.env
SLACK_SIGNING_SECRET=xxxxxxxxxx
SLACK_BOT_TOKEN=xoxb-xxxxxxxxxx
GITHUB_TOKEN=xxxxxxxxxx

作成し終わったらデプロイします。

$ serverless deploy
 :
endpoints:
  POST - https://xxx.execute-api.ap-northeast-1.amazonaws.com/dev/slack/events
  GET - https://xxx.execute-api.ap-northeast-1.amazonaws.com/dev/slack/installation
  GET - https://xxx.execute-api.ap-northeast-1.amazonaws.com/dev/slack/oauth
# => デプロイ後のURLをメモしておく

中身はこれで完成です。

Slackのコマンドの設定を行う

  1. Features > Interactive Components > Interactivity を有効化します。また、Request URL にデプロイ後のPOST URL(https://xxx.execute-api.ap-northeast-1.amazonaws.com/dev/slack/events)を貼り付けて保存します。
    https://api.slack.com/apps/{APP_ID}/interactive-messages
  2. Features > Slash Commands で/buildというスラッシュコマンドを作成します。URLにはhttps://xxx.execute-api.ap-northeast-1.amazonaws.com/dev/slack/eventsを設定します。
    https://api.slack.com/apps/{APP_ID}/slash-commands
  3. Features > Event Subscriptions へアクセスし、有効化します。Enable Events > Request URL にはhttps://xxx.execute-api.ap-northeast-1.amazonaws.com/dev/slack/eventsを設定します。Subscribe to bot events にはapp_mentionを追加します。
    https://api.slack.com/apps/{APP_ID}/event-subscriptions
  4. アプリを再インストールします。
    https://api.slack.com/apps/{APP_ID}/install-on-team

ここまでの設定は「参考」の1つ目のseratchさんの手順書と、2つ目のチュートリアルがとても参考になります。
また、開発のノウハウも書かれていますので一読をオススメします。

SlackからGitHub Actionsにパラメータを渡して実行する

  1. ワークスペースの適当なチャンネルにアプリを追加します。
  2. テキストボックスに/buildと打ち込み、送信します。
  3. モーダルウィンドウが現れるので、項目を入力し、Submitボタンを押します。
  4. うまく設定できていれば、GitHub ActionsのJobが実行されます。

以上です。おつかれさまでした。

参考

https://github.com/seratch/bolt-starter
https://slack.dev/bolt/ja-jp/tutorial/getting-started
https://github.com/okimurak/slack-bolt-sample-app-aws
https://api.slack.com/dialogs
https://api.slack.com/surfaces/modals/using
https://dev.classmethod.jp/tool/slack-multistep-modal-example/

おわりに

うまく組み込めば、スマホから手軽に緊急対応できるようになっていいかもしれませんね。
それと、GitHub ActionsのJob終了時に、Slackに通知を送るようにすると色々と捗るかも。

また、時間がある時に少しいじってみようと思います。

【2020年2月】プロジェクトごとのnode.jsのバージョンを、direnv+nvmで【強制】【固定】

$
0
0

プロジェクトごとにNode.jsのバージョンが異なって辛みマシマシ

そんな時は以下の処方箋がおススメ。
例えば node.js 10 を強制的に使用する場合は以下のようにプロジェクトのフォルダ直下に.envrcファイルを作成し、nvm で 10を指定しておきます。

.envrc
[[-s ~/.nvm/nvm.sh ]]&&. ~/.nvm/nvm.sh
nvm use 10

で、コマンドから direnv を有効にします。

$ direnv allow .

以上!

direnv、nvm のリンク

文字列で記載している年月日を日付として取得し前日、翌日を表示させる方法

$
0
0

環境

 node.js 8.11.4
 MariaDB 10.3.10.0

やりたいこと

 MariaDBに登録しているYYYYMMDD(VARCHAR)をdate型に変換して前日および翌日を取得し、HTMLで表示させる。

やったこと

 //date.parseで変換 NaN
//var ddate = Date.parse(days);
//console.log(ddate.toString());

//newDateで変換 Invalid Date
var ddate = new Date('YYYYMMDD');
console.log(ddate.toString());

初歩的な質問でしたら大変申し訳ございませんが何卒よろしくお願い申し上げます。

[Node]mysql2でRDS証明書更新対応した

$
0
0

対象

  • mysql2を使用している
  • DBへ接続するのオプションに、ssl: "Amazon RDS"を使ってる

更新方法

以下のコマンドでパッケージのアップデートを行う

npm up mysql2

何が変わる?

constansに指定されている証明書が変更される
以下はnode-mysql2のGithub

https://github.com/sidorares/node-mysql2/blob/master/lib/constants/ssl_profiles.js

確認

開発プロジェクト内の
node_modules > mysql2 > lib > constans > ssl_profile.js
を確認して

Updated for 2015となっている場合RDSの証明書更新に合わせて更新する様にしましょう。

'use strict';// Certificate for Amazon RDS (Updated for 2015)exports['Amazon RDS']={ca:[...省略

CircleCI 2.1 設定サンプル(Node + MySQL)

$
0
0

環境

  • Circle CI 2.1
  • Node + MySQL(ですが、主にCircle CIの設定のため、←の環境には大きく依存していません)

設定例

version:2.1executors:default:docker:-image:circleci/node:10.18.0-busterextended:docker:-image:circleci/node:10.18.0-buster-image:circleci/mysql:5.7environment:MYSQL_ALLOW_EMPTY_PASSWORD:'yes'MYSQL_DATABASE:your_database_name_comes_herecommands:restore_node_dependencies:steps:-restore_cache:name:Restore node dependencies cachekeys:-v1-node-dependencies-{{ checksum "yarn.lock" }}-v1-node-dependenciesinstall_node_dependencies:steps:-run:name:Install node dependenciescommand:yarn install --frozen-lockfilesave_node_dependencies:steps:-save_cache:name:Save node dependencies cachekey:v1-node-dependencies-{{ checksum "yarn.lock" }}paths:-node_moduleswait_for_db_start_up:steps:-run:name:Wait for db start upcommand:dockerize -wait tcp://127.0.0.1:3306 -timeout 1mrun_test:steps:-run:name:Run testcommand:yarn run testjobs:build:executor:defaultsteps:-checkout-restore_node_dependencies-install_node_dependencies-save_node_dependenciestest:executor:extendedsteps:-checkout-restore_node_dependencies-wait_for_db_start_up-run_testworkflows:build_and_test:jobs:-build-test:requires:-build

ポイント

  • 2.1の機能(executorscommands)を使って、設定をわかりやすくする。
  • executorを最適化する。
    • 例えば、DBのセットアップは数十秒かかるので(※実測で20秒程)、不要なところでは行わない。
    • 上記の例では、buildyarn install)にDBは不要なので、DBが無いexecutor(= default)を使っています。
    • executorの名前(defaultやextended)は任意です。
  • テスト実行前に、DBの起動待ちをする(dockerize -wait)。
  • step内でnameを付ける。
    • 無くてもいいですが、その場合はCircleCIのデフォルトが使われます。restore_cacheなどは全てRestoring Cacheとなり、中を見ないとどのステップか分からなくなるので、付けています。

参照先

yarn install--frozen-lockfileオプションを付ける

version: 2.1では workflowsの version 指定は不要。

その他


Node.jsの関数をBashでパイプぽく使えるコマンド

$
0
0

Node.jsの関数をBashで使おうと思うことがあるのでしょうか……?
私は今まではありませんでした。

@takuya_1stさんのnodeの関数をbashシェルで使えるようにする。という記事が面白かったのでコマンドを作ってみました。

下記コマンドでインストールできます。

$ npm i -g @amanoese/nodep

使い方

例えば、下記のようにしてQueryStringを無駄にEncode,Decodeした後にJSONに変換することができます。

$ echo-n'a=b' | nodep encodeURIComponent @ decodeURIComponent @ "require('querystring').parse" @ JSON.stringify
{"a":"b"}

Node関数同士の接続は bash の "|" ではなく "@" になります。

また、元の記事の方ではNode.jsの関数を実際にコマンドとして利用できるようにしていましたが、
コマンドが増えて煩雑になりそうかつ登録で名前の衝突とかしそうと感じたので、1つのコマンド内で処理が完結するようにできるようにしています。

少し実用的な使い方?

下記のように使えばjqでは処理できない?JSONぽいJavaScriptオブジェクトを処理するとき役に立つかもしれません。

$ echo-n'{a:1}' | sed's/^/x=/' | nodep eval @ JSON.stringify | jq .{"a": 1
}

感想

Node.jsの関数がつかえるとたのしいですね。
余談

パイプライン演算子の実装がきたら下記のようなコマンドにしてJavaScriptぽくしたほうが面白いかもしれません。

$ echo-n'a=b' | nodep '$stdin |> encodeURIComponent |> decodeURIComponent |> require("querystring").parse |> JSON.stringify'

あと、npmでインストールできますが、このコマンドはShellScriptでできています。

FirebaseFunctionsでPush通知をHTTP関数呼び出しで送信する

$
0
0

はじめに

今回はFirebaseFunctionsのhttp関数を使用して特定のデバイスにPush通知を送る実装を行なっていきます。実装前に下記の準備項目が必要になります。

事前準備

  • Firebaseプロジェクト
  • Firebase/Messaging導入済のiosプロジェクト
  • APNsのFirebaseアップロード

FirebaseCLIインストール

まずは、FirebaseCLIをインストールすることでFunctionsのDeployやプロジェクトの切り替えなどをCLIで操作できるようにします。今回はnpmでインストールを行います。

npmインストール

とりあえず最新のものをnodebrewで取得してきてPathを通すとこまで終わらせます。

    $ brew install nodebrew
    $ nodebrew install-binary 13.7.0
    $ nodebrew use  v7.0.0
    $ echo 'export PATH=$HOME/.nodebrew/current/bin:$PATH' >> ~/.bash_profile
    $ source ~/.bash_profile

firebase-toolsインストール

1.npmでfirebase-toolsをインストールします。

    $ npm install -g firebase-tools

2.firebase-toolsコマンドを使用して、操作を行うユーザの認証をします。下記のコマンドを実行するとWebブラウザが立ち上がるので、Firebaseプロジェクトで編集権限のあるアカウントでログインを行います。

    $ firebase login

3.firebaseのプロジェクトをuseコマンドを使って指定します。この操作によりfirebase/functionsなどのデプロイ先を変更できたりします。

    $ firebase use firebase_project_id

Functionsプロジェクト作成

今回はFunctionsのみ使用するので下記のコマンドでプロジェクトを立ち上げます。

    $ firebase init functions

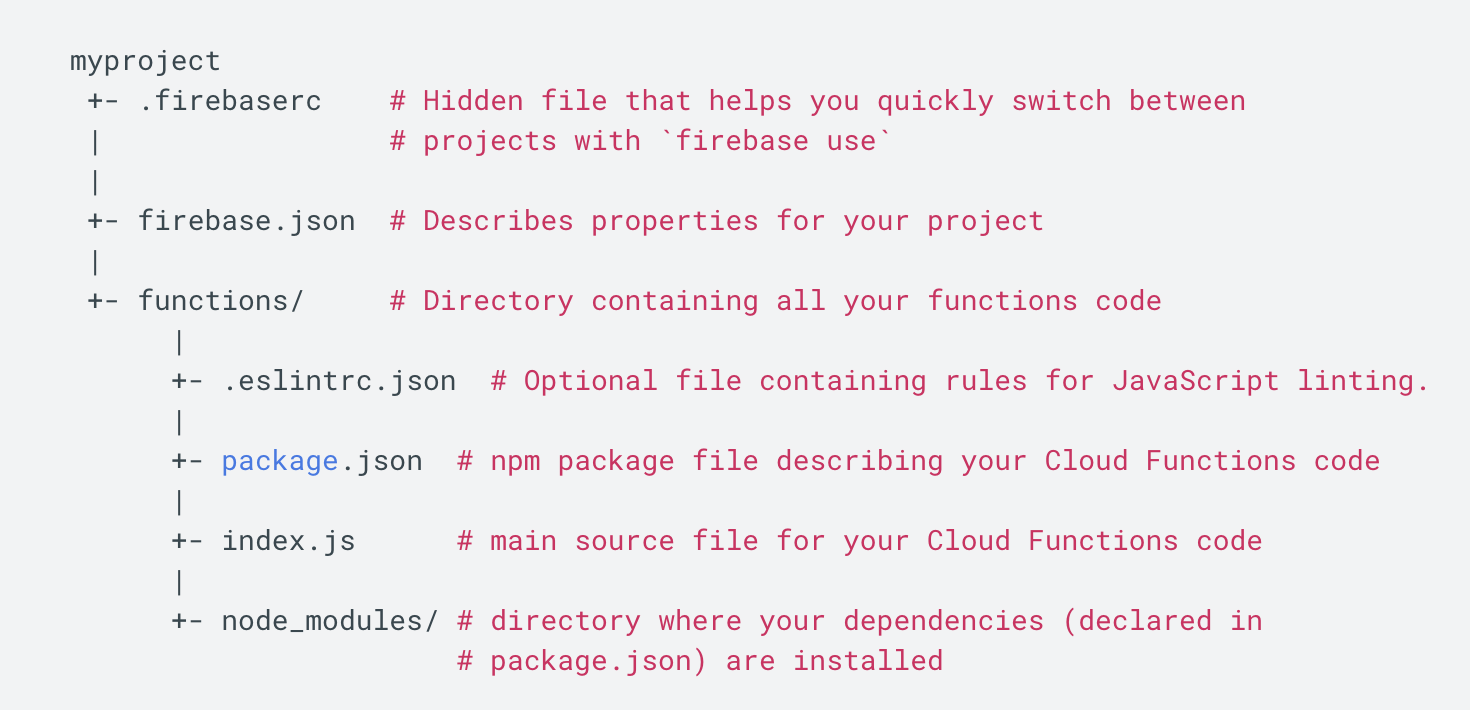
すると下記のような構造のプロジェクトが立ち上がるので、主にindex.jsを編集して関数を作成して行きます。
スクリーンショット 2020-02-05 22.25.27.png

参照: https://firebase.google.com/docs/functions/get-started?hl=ja

FirebaseAdminSDKインストール

1.sdkの情報などを保存するpackage.jsonを作成します。

    $ npm init

2.firebase-admin npmパッケージをインストールします。

   $ npm install firebase-admin --save

3.次にfirebase-adminを初期化をするためにローカルの環境変数にFirebaseサービスアカウントの秘密鍵を生成したファイルへのパスを指定します。これを設定することでSDKの初期化時にキーが参照され、プロジェクトでの認証が完了します。CIなどでブランチごとにDeploy先を変更させたい時はどうやって秘密鍵を参照させるのがベストなんでしょうか?

   $ export GOOGLE_APPLICATION_CREDENTIALS="/home/user/Downloads/service-account-file.json"

参照: https://firebase.google.com/docs/admin/setup?hl=ja

4.index.jsに移動してsdkの初期化コードを追加します。

index.js
constfunctions=require('firebase-functions');constadmin=require('firebase-admin');admin.initializeApp();

node.jsの実装

index.js
constfunctions=require('firebase-functions');constadmin=require('firebase-admin');admin.initializeApp();//onRequestでhttpからの呼び出しを可能にします。exports.push=functions.https.onRequest((request,response)=>{if(request.query.device_token!==undefined&&request.body.message!==undefined){constdevice_token=request.query.device_tokenconstmessage=request.body.messageconstpayload={notification:{body:message,badge:"1",sound:"default",}};switch(request.method){case'POST':push(device_token,payload,response);breakdefault:response.status(400).send({error:'Invalid request method'})break}}else{response.status(400).send({error:'Invalid request parameters'})}})functionpush(token,payload,response){constoptions={priority:"high",};//FCMにAdminSDKを介してPush通知を送信します。admin.messaging().sendToDevice(token,payload,options).then(pushResponse=>{console.log("Successfully sent message:",pushResponse);response.status(200).send({message:'Successfully sent message'})}).catch(error=>{response.status(400).send({error:'Error sending message'})});}

swiftの実装

AppDelegate.swift
importUIKitimportFirebaseimportUserNotificationsimportFirebaseMessaging@UIApplicationMainclassAppDelegate:UIResponder,UIApplicationDelegate{varwindow:UIWindow?privatevarmainTabViewController:MainTabViewController?funcapplication(_application:UIApplication,didFinishLaunchingWithOptionslaunchOptions:[UIApplication.LaunchOptionsKey:Any]?)->Bool{//環境ごとにプロジェクトを変えてるためplistを変更しています。letfilePath=Bundle.main.path(forResource:Config.Server.instance.firebaseInfoPlistName,ofType:"plist")//Forced Unwrapping🚨FirebaseApp.configure(options:FirebaseOptions(contentsOfFile:filePath!)!)initFirebaseMessaging()initRemoteNotification(application)window=UIWindow(frame:UIScreen.main.bounds)window!.makeKeyAndVisible()navigate()returntrue}funcnavigate(_isTrial:Bool=false){guardletwindow=windowelse{assert(false)return}letpreviousVC=window.rootViewControllerforvinwindow.subviews{v.removeFromSuperview()}letvc=MainTabViewController()mainTabViewController=vcwindow.rootViewController=vcifletpreviousVC=previousVC{previousVC.dismiss(animated:false){previousVC.view.removeFromSuperview()}}}privatefuncinitRemoteNotification(_application:UIApplication){UNUserNotificationCenter.current().delegate=selfletauthOptions:UNAuthorizationOptions=[.alert,.badge,.sound]//TODO: Relocate requestAuthorization method.UNUserNotificationCenter.current().requestAuthorization(options:authOptions,completionHandler:{_,_in})application.registerForRemoteNotifications()}privatefuncinitFirebaseMessaging(){//DelegateでdeviceTokenの変更を監視します。Messaging.messaging().delegate=self//明示的にdeviceTokenを取得します。InstanceID.instanceID().instanceID{(result,error)inifleterror=error{//TODO: Error handling.print("Error fetching remote instance ID: \(error)")}elseifletresult=result{//TODO: Send token to parnovi api for update user fcm token. if authorized == trueprint("Remote instance ID token: \(result.token)")}}}}extensionAppDelegate:UNUserNotificationCenterDelegate{funcuserNotificationCenter(_center:UNUserNotificationCenter,willPresentnotification:UNNotification,withCompletionHandlercompletionHandler:@escaping(UNNotificationPresentationOptions)->Void){completionHandler([.badge,.sound,.alert])}funcuserNotificationCenter(_center:UNUserNotificationCenter,didReceiveresponse:UNNotificationResponse,withCompletionHandlercompletionHandler:@escaping()->Void){completionHandler()}}extensionAppDelegate:MessagingDelegate{//Observe firebase messaging token.funcmessaging(_messaging:Messaging,didReceiveRegistrationTokenfcmToken:String){}}

FunctionsのDeploy

実際に関数をデプロイしてPush通知を送信してみます。

    $ firebase deploy --only functions

swiftのInstanceID.instanceID().instanceIDで取得したDeviceTokenを使ってcurlで実際にPushを送信してみます。

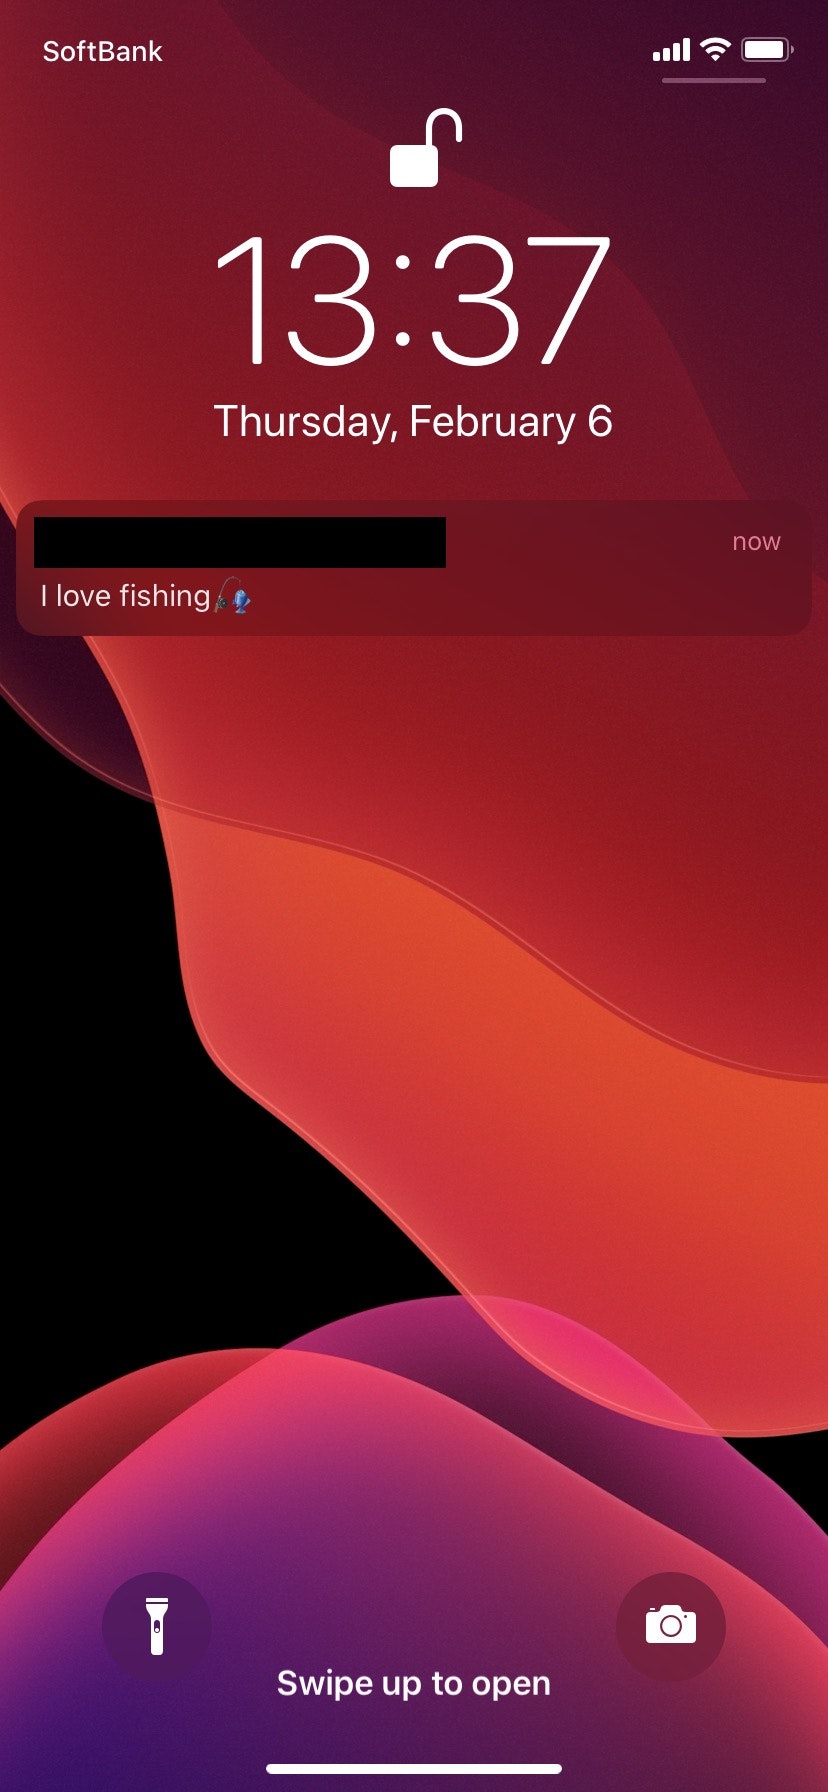
    $ curl -X POST https://yout-functions-url/push?device_token=your-device-token -d "message=I love fishing🎣"

結果

IMG_0964.jpg

さいごに

今回はテスト的に実行できるようにするため、httpリクエストに認証は設定していませんでしたが、また実装し直したら編集しようと思います。また、CIなどを使ってfirebase/functionsなどをデプロイするとき、どのようにFirebaseプロジェクトの秘密鍵を参照させるのがベストなのでしょうか。。

【環境構築】 Windows で Vagrant を使って Ubuntu に Node.js を導入して create-react-app できるようになるまで

$
0
0

自分用の備忘録なので、細かな説明は省略しています:sweat_smile:
(というか、完全には理解できていません。汗)
VM(Ubuntu) に Node.js の環境構築をしました。
Reactアプリを create-react-app で作れるようになるまでの記録です。

0. 前提

エディション:Windows 10 Home
システムの種類:64 ビット オペレーティング システム、x64 ベース プロセッサ
VirtualBox と Vagrant はインストール済み

1. Ubuntu の導入

$mkdir Ubuntu
$cd Ubuntu
$vagrant init ubuntu/xenial64
$vagrant up --provider virtualbox

2. Vagrantfile に、以下を追記

config.vm.network"private_network",ip: "192.168.33.10"config.vm.network"forwarded_port",guest: 3000,host: 3000

3. 再起動

$vagrant reload

4. ssh 接続

$vagrant ssh

5. Ubuntu のパッケージマネージャー APT を利用

$sudo apt-get update
$sudo apt-get install-y build-essential libssl-dev
$sudo apt-get install-y curl

6. nvm のインストール

$curl -o- https://raw.githubusercontent.com/creationix/nvm/v0.33.1/install.sh | bash
$source ~/.bashrc
$nvm install stable --latest-npm$nvm alias default stable

7. yarn のインストール

$npm install--global yarn

8. create-react-app を使えるようにする

$yarn global add create-react-app

9. 試しにReactアプリを作ってみる

$npx create-react-app my-app
$cd my-app
$yarn start

http://localhost:3000にアクセスして確認

参考にさせていただいた記事

nvm(Node Version Manager)を使ってNode.jsをインストールする手順
React 開発環境構築
新しい React アプリを作る

Ubuntu + Node.js + Express の環境から、外部DB(MySQL)へ接続しデータを表示する

$
0
0

前回、Expressの環境は作ったので、その環境で作業する。

MySQL をインストールする

Expressの環境にMySQLデータベースを置くんじゃなくて、参照用に必要。

npm install mysql --save

test.js を作る

app.js 作ってたフォルダ内で、test.js を作る

test.js
constmysql=require('mysql');constcon=mysql.createConnection({host:'192.168.123.223',user:'root',password:'root',database:'test_database'});con.connect((err)=>{if(err)throwerr;console.log('Connected');con.query('select * from test_table',function(error,results,fields){if(error)throwerror;console.log(results[0]);});});

node.js で実行

  • node test.js を起動

うまく接続出来れば、↓のようになるはず。

$ node test.js
Connected
RowDataPacket {
  id: 1,
  name: 'TOM',
  created_at: 2020-02-05T15:00:00.000Z,
  updated_at: 2020-02-05T15:00:00.000Z
}
  • 接続できなくてエラーになった場合
    • Vagrantfile に config.vm.network "private_network", ip: "192.168.123.223"が記載されているか?
    • 特に Vagrantfile をいじくって無ければ、この設定だけで接続できる。
      • Vagrantfile については、コレを参照してください。
      • VirtualBox の設定で言うと、「NAT」と「ホストオンリーアダプター」の2種類のネットワーク設定が必要

app.js を修正する

前回作った app.js を修正して、MySQLのデータを参照する

app.js
varexpress=require('express');varapp=express();varmysql=require('mysql');varconnection=mysql.createConnection({host:'192.168.123.223',user:'root',password:'root',database:'test_database',debug:false,});app.get('/',function(req,res){connection.connect();connection.query('select * from test_table',function(error,results,fields){if(error){connection.end();throwerror;}res.send(results[0]);});connection.end();});app.listen(3000,function(){console.log('Example app listening on port 3000!');});

node.js で実行

  • node app.js を起動

実行すると、コンソールにはコレが出る

Example app listening on port 3000!

ブラウザで、 http://192.168.123.223:3000にアクセスすると、
image.png
こんなのが出るはず。

これで、ようやくExpressからMySQLへ接続し、データが参照できるようになった。

参考

#twitch の配信中のチャットログを #discord でロギングするBOT

nodeコマンド(non-blockngとblockingについてメモ)

$
0
0

コマンドライン上で操作

node.jsではブラウザなどを使用せずにコマンドライン上で操作ができる

# コマンドライン上での操作開始を宣言$ node

# この状態で処理を書くと実行される> console.log('hello world')# 出力結果: hello world# 終了する> .exit

jsファイルから実行

jsファイルsample.jsを作成し、処理を実行させる

# コマンドライン上でjsファイルの処理開始を宣言$ node sample.js

non-blockngとblockingな書き方

  • nodeはメインのスレッドが1つであるため、処理がブロックされるような書き方はnodeの処理の速さの特徴を殺してしまうためやめるべきである
  • setTimeoutなどのタイマー処理やデータベースへのアクセス、ファイルの書き込みといった命令は処理に時間を要するため、次の命令をブロックしないように書く必要がある

そこで、non-blockingな書き方を採用し、時間がかかりそうな関数はcallback関数で実装することが望ましい

non-blockingな書き方

次の処理をブロックしない書き方のこと

setTimeout(function(){console.log('hello');},1000);conosole.log('world')

setTimeout内の関数をcallback関数という
setTimeoutの内の処理を待たずに次の処理が実行される

blockingな書き方

varstart=newData().getTime();while(newData().getTime()<start+1000);console.log('world');

Node.js - Mysql「Error: Cannot enqueue Query after invoking quit.」の対処(Connection pool)

$
0
0

はじめに

本記事はデータベースにおけるコネクションプール(connection pool)について触れていくものです。

実際にハマったシチュエーションをもとに説明していきたいと思います。

  • 事象の詳細
  • 原因
  • 状況を再現してみる
  • 適切な対処方法
  • コネクションプールの実装

事象の詳細

Node.jsにて、Mysqlからデータを取得しようとしたとき、以下のエラーが発生した。

Error: Cannot enqueue Query after invoking quit.

どうやら2回目のGET:/api/todoを呼び出した時に必ず発生するようです。
その時のソースコードは以下です。

constexpress=require("express");constmysql=require("mysql");constapp=express();// データベースへのコネクションを生成constconnection=mysql.createConnection({// DB接続に関するオプション設定});connection.connect();app.get("/api/todo",(req,res)=>{constquery="SELECT * FROM todo;";connection.query(query,(err,rows)=>{if(err)console.log("err: ",err);res.json(rows);});connection.end();});// サーバー起動app.listen(8081,()=>console.log("Example app listening on port 8081!"));

原因

コネクションは再利用できない。

変数connectionに対して、end()を呼び出し、丁寧に接続を切っています。
そこで再度connection()を呼び出せばまた接続できるのでは?という発想でした。

状況を再現してみる

実装した処理

同一のコネクションに対して、複数回接続を行う処理を作成してみました。

constmysql=require("mysql");constconnection=mysql.createConnection({// DB接続に関するオプション設定});for(letindex=0;index<2;index++){connection.connect();constquery=connection.query("SELECT * FROM todo;");query.on("result",(row,index)=>{console.log("--- result ---");console.log(row);console.log(index);});connection.end();}

処理結果

nodeコマンドを使って、この処理を実行すると、以下のようなエラーになります。

Error: Cannot enqueue Handshake after invoking quit.

一度使ったんだから、ちゃんと破棄してくれってことですね。

適切な対処方法

何度もアクセス要求ができる接続窓口を作ってあげる。

実際のWebアプリケーションでは、同一のデータベースに対して何度も接続する処理が行われます。
規模にもよりますが、多人数で利用することを考えると、その数は膨大なものになります。

よって、以下の観点からコネクション確立処理は極力減らしたほうが良いです。

  • 本処理自体がオーバーヘッド(overhead)である
  • コネクション確立には時間がかかるため、ユーザーを都度待たせてしまう
  • コネクションの数だけDB側でメモリを確保する必要があるため、高負荷状態になりやすい

それらを実現するのがコネクションプール(connection pool)です。

  • コネクションの状態を保持し、そのコネクションを使いまわすことができる
  • コネクション数に上限を設けることができる

コネクションプールの実装

mysql - Pooling connectionsを参考に、コネクションプールを作成し、複数回のデータベース接続処理を行ってみます。

使用する関数はcreatePool()です。
実行するクエリが一つの場合、以下のような書き方でOKです。

constmysql=require("mysql");constpool=mysql.createPool({// DB接続に関するオプション設定});pool.query("SELECT * FROM todo;",(error,results)=>{if(error)throwerror;console.log(results[0]);});

プールが持つquery関数はpool.getConnection()connection.query()connection.release()を省略してくれます。

複数回のクエリ実行を行いたい場合などは以下です。

pool.getConnection((err,connection)=>{if(err)throwerr;connection.query("SELECT something FROM sometable",(error,results)=>{connection.release();if(error)throwerror;console.log(results[0])});});

おわり

データベースに関する基礎的な知識が不足していたせいで、こんなところでハマってしまいました。
基礎的な部分を固めることができたと思うので、次の課題に取り組んでいきたいと思います。

あと、mysqlライブラリのドキュメントに書いてあるとおりに実装していくと、コールバック地獄に陥りそうですね。
async/awaitなどを使ってもっとスマートに実装していきたいです。


Node.jsでGoogle Slides APIを触ってみる

$
0
0

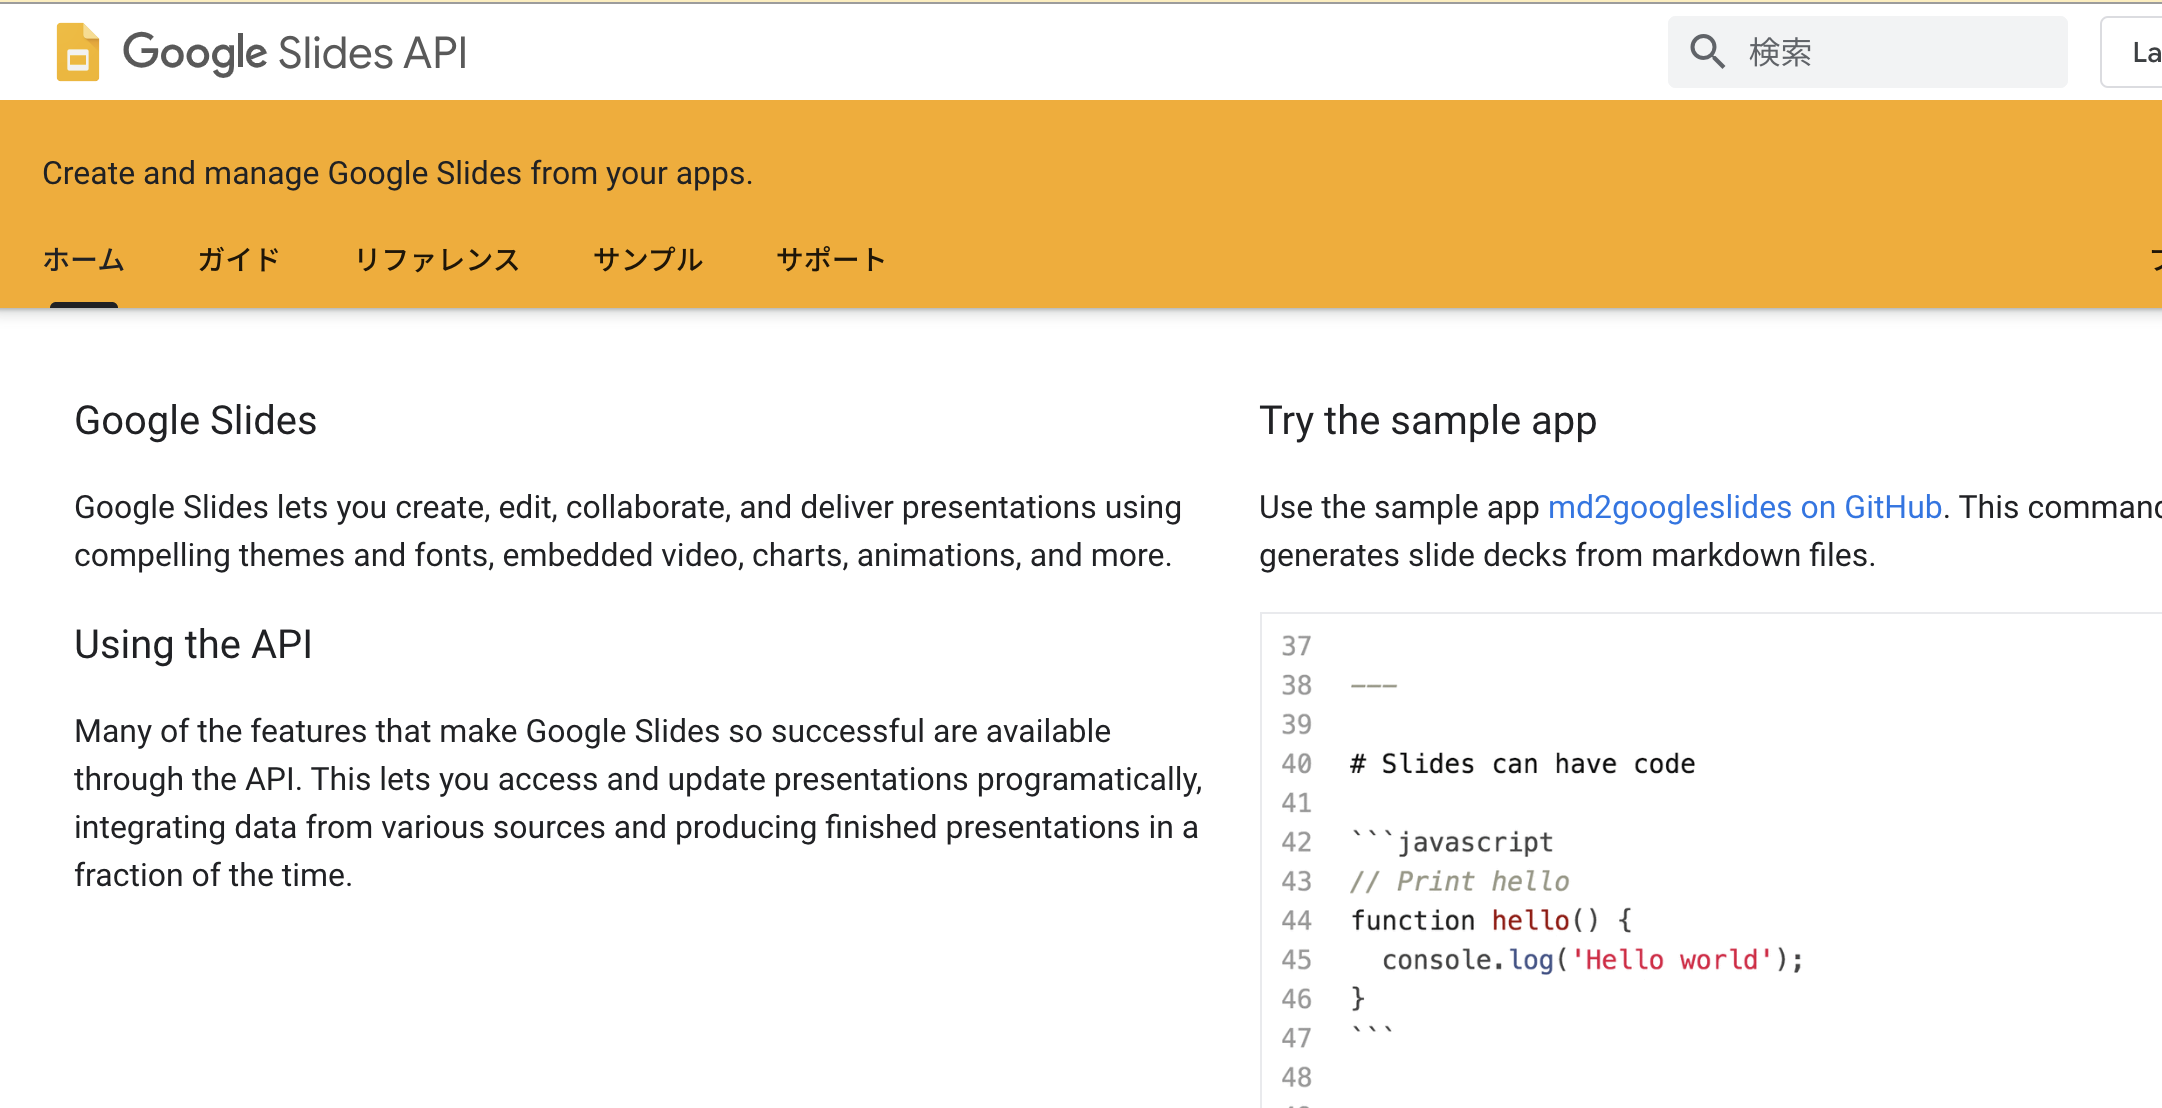
Google SlidesのAPIをNode.jsで触ってみます。

公式チュートリアルになぞりつつ試したメモ
です。

準備

Node.jsのバージョンは13.7.0です。

  • 作業フォルダ作成
$ mkdir slidesapitest
$ cd slidesapitest
  • 利用モジュールをインストール
$ npm init -y$ npm i googleapis@39
  • app.jsファイルを作成
$ touch app.js

APIをオンにして、 credentials.jsonを作成

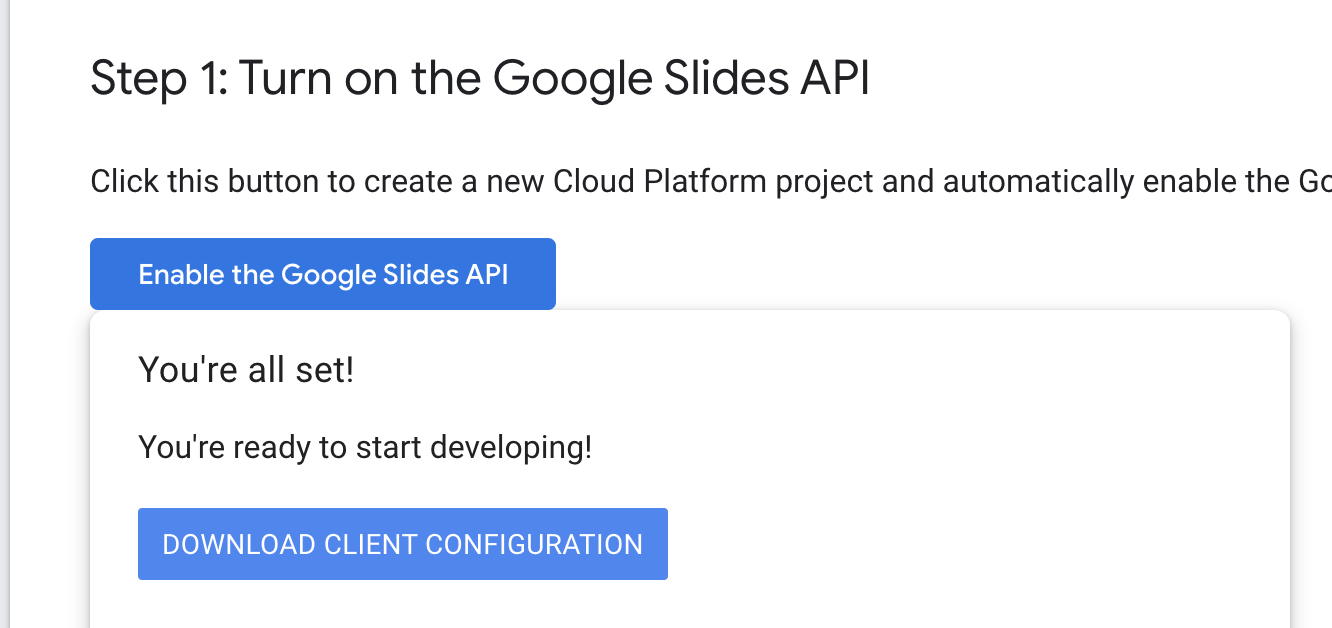
公式チュートリアルEnable the Google Slides APIボタンを押して、APIを有効にし、credentials.jsonを作業フォルダのapp.jsと同じ階層に保存します。

ソースコード

app.jsの中身に以下をコピペ。 公式のままです。

app.js
constfs=require('fs');constreadline=require('readline');const{google}=require('googleapis');// If modifying these scopes, delete token.json.constSCOPES=['https://www.googleapis.com/auth/presentations.readonly'];// The file token.json stores the user's access and refresh tokens, and is// created automatically when the authorization flow completes for the first// time.constTOKEN_PATH='token.json';// Load client secrets from a local file.fs.readFile('credentials.json',(err,content)=>{if(err)returnconsole.log('Error loading client secret file:',err);// Authorize a client with credentials, then call the Google Slides API.authorize(JSON.parse(content),listSlides);});/**
 * Create an OAuth2 client with the given credentials, and then execute the
 * given callback function.
 * @param {Object} credentials The authorization client credentials.
 * @param {function} callback The callback to call with the authorized client.
 */functionauthorize(credentials,callback){const{client_secret,client_id,redirect_uris}=credentials.installed;constoAuth2Client=newgoogle.auth.OAuth2(client_id,client_secret,redirect_uris[0]);// Check if we have previously stored a token.fs.readFile(TOKEN_PATH,(err,token)=>{if(err)returngetNewToken(oAuth2Client,callback);oAuth2Client.setCredentials(JSON.parse(token));callback(oAuth2Client);});}/**
 * Get and store new token after prompting for user authorization, and then
 * execute the given callback with the authorized OAuth2 client.
 * @param {google.auth.OAuth2} oAuth2Client The OAuth2 client to get token for.
 * @param {getEventsCallback} callback The callback for the authorized client.
 */functiongetNewToken(oAuth2Client,callback){constauthUrl=oAuth2Client.generateAuthUrl({access_type:'offline',scope:SCOPES,});console.log('Authorize this app by visiting this url:',authUrl);constrl=readline.createInterface({input:process.stdin,output:process.stdout,});rl.question('Enter the code from that page here: ',(code)=>{rl.close();oAuth2Client.getToken(code,(err,token)=>{if(err)returnconsole.error('Error retrieving access token',err);oAuth2Client.setCredentials(token);// Store the token to disk for later program executionsfs.writeFile(TOKEN_PATH,JSON.stringify(token),(err)=>{if(err)returnconsole.error(err);console.log('Token stored to',TOKEN_PATH);});callback(oAuth2Client);});});}/**
 * Prints the number of slides and elements in a sample presentation:
 * https://docs.google.com/presentation/d/1EAYk18WDjIG-zp_0vLm3CsfQh_i8eXc67Jo2O9C6Vuc/edit
 * @param {google.auth.OAuth2} auth The authenticated Google OAuth client.
 */functionlistSlides(auth){constslides=google.slides({version:'v1',auth});slides.presentations.get({presentationId:'1EAYk18WDjIG-zp_0vLm3CsfQh_i8eXc67Jo2O9C6Vuc',},(err,res)=>{if(err)returnconsole.log('The API returned an error: '+err);constlength=res.data.slides.length;console.log('The presentation contains %s slides:',length);res.data.slides.map((slide,i)=>{console.log(`- Slide #${i+1} contains ${slide.pageElements.length} elements.`);});});}

アクセストークンの発行

app.jsを実行します。

$ node app.js

実行すると、こんな感じのURLが表示されます。

Authorize this app by visiting this url: https://accounts.google.com/o/oauth2/v2/auth?access_type=offline&scope=https%3A%2F%2Fwww.googleapis.com%2Fauth%2Fpresentations.readonly&response_type=code&client_id=xxxxxxxxxxxx.apps.googleusercontent.com&redirect_uri=urn%3Aietf%3Awg%3Aoauth%3A2.0%3Aoob
Enter the code from that page here: <ここにコードをペースト>

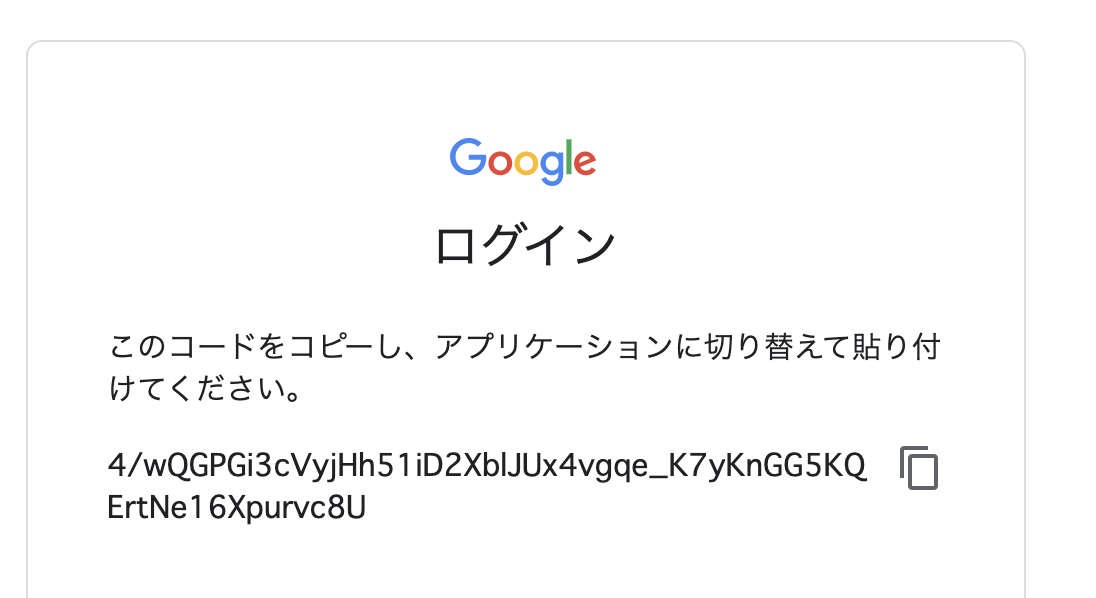
クリックするとブラウザ上で以下のようなコードが表示されるのでコピーします。

Enter the code from that page here: <ここにコードをペースト>の箇所にペーストします。

成功するとtoken.jsonというファイルが保存されて、以下のように元になってるスライドの情報が表示されます。

Token stored to token.json
The presentation contains 5 slides:
- Slide #1 contains 4 elements.
- Slide #2 contains 11 elements.
- Slide #3 contains 9 elements.
- Slide #4 contains 5 elements.
- Slide #5 contains 12 elements.

ソースコードの挙動など

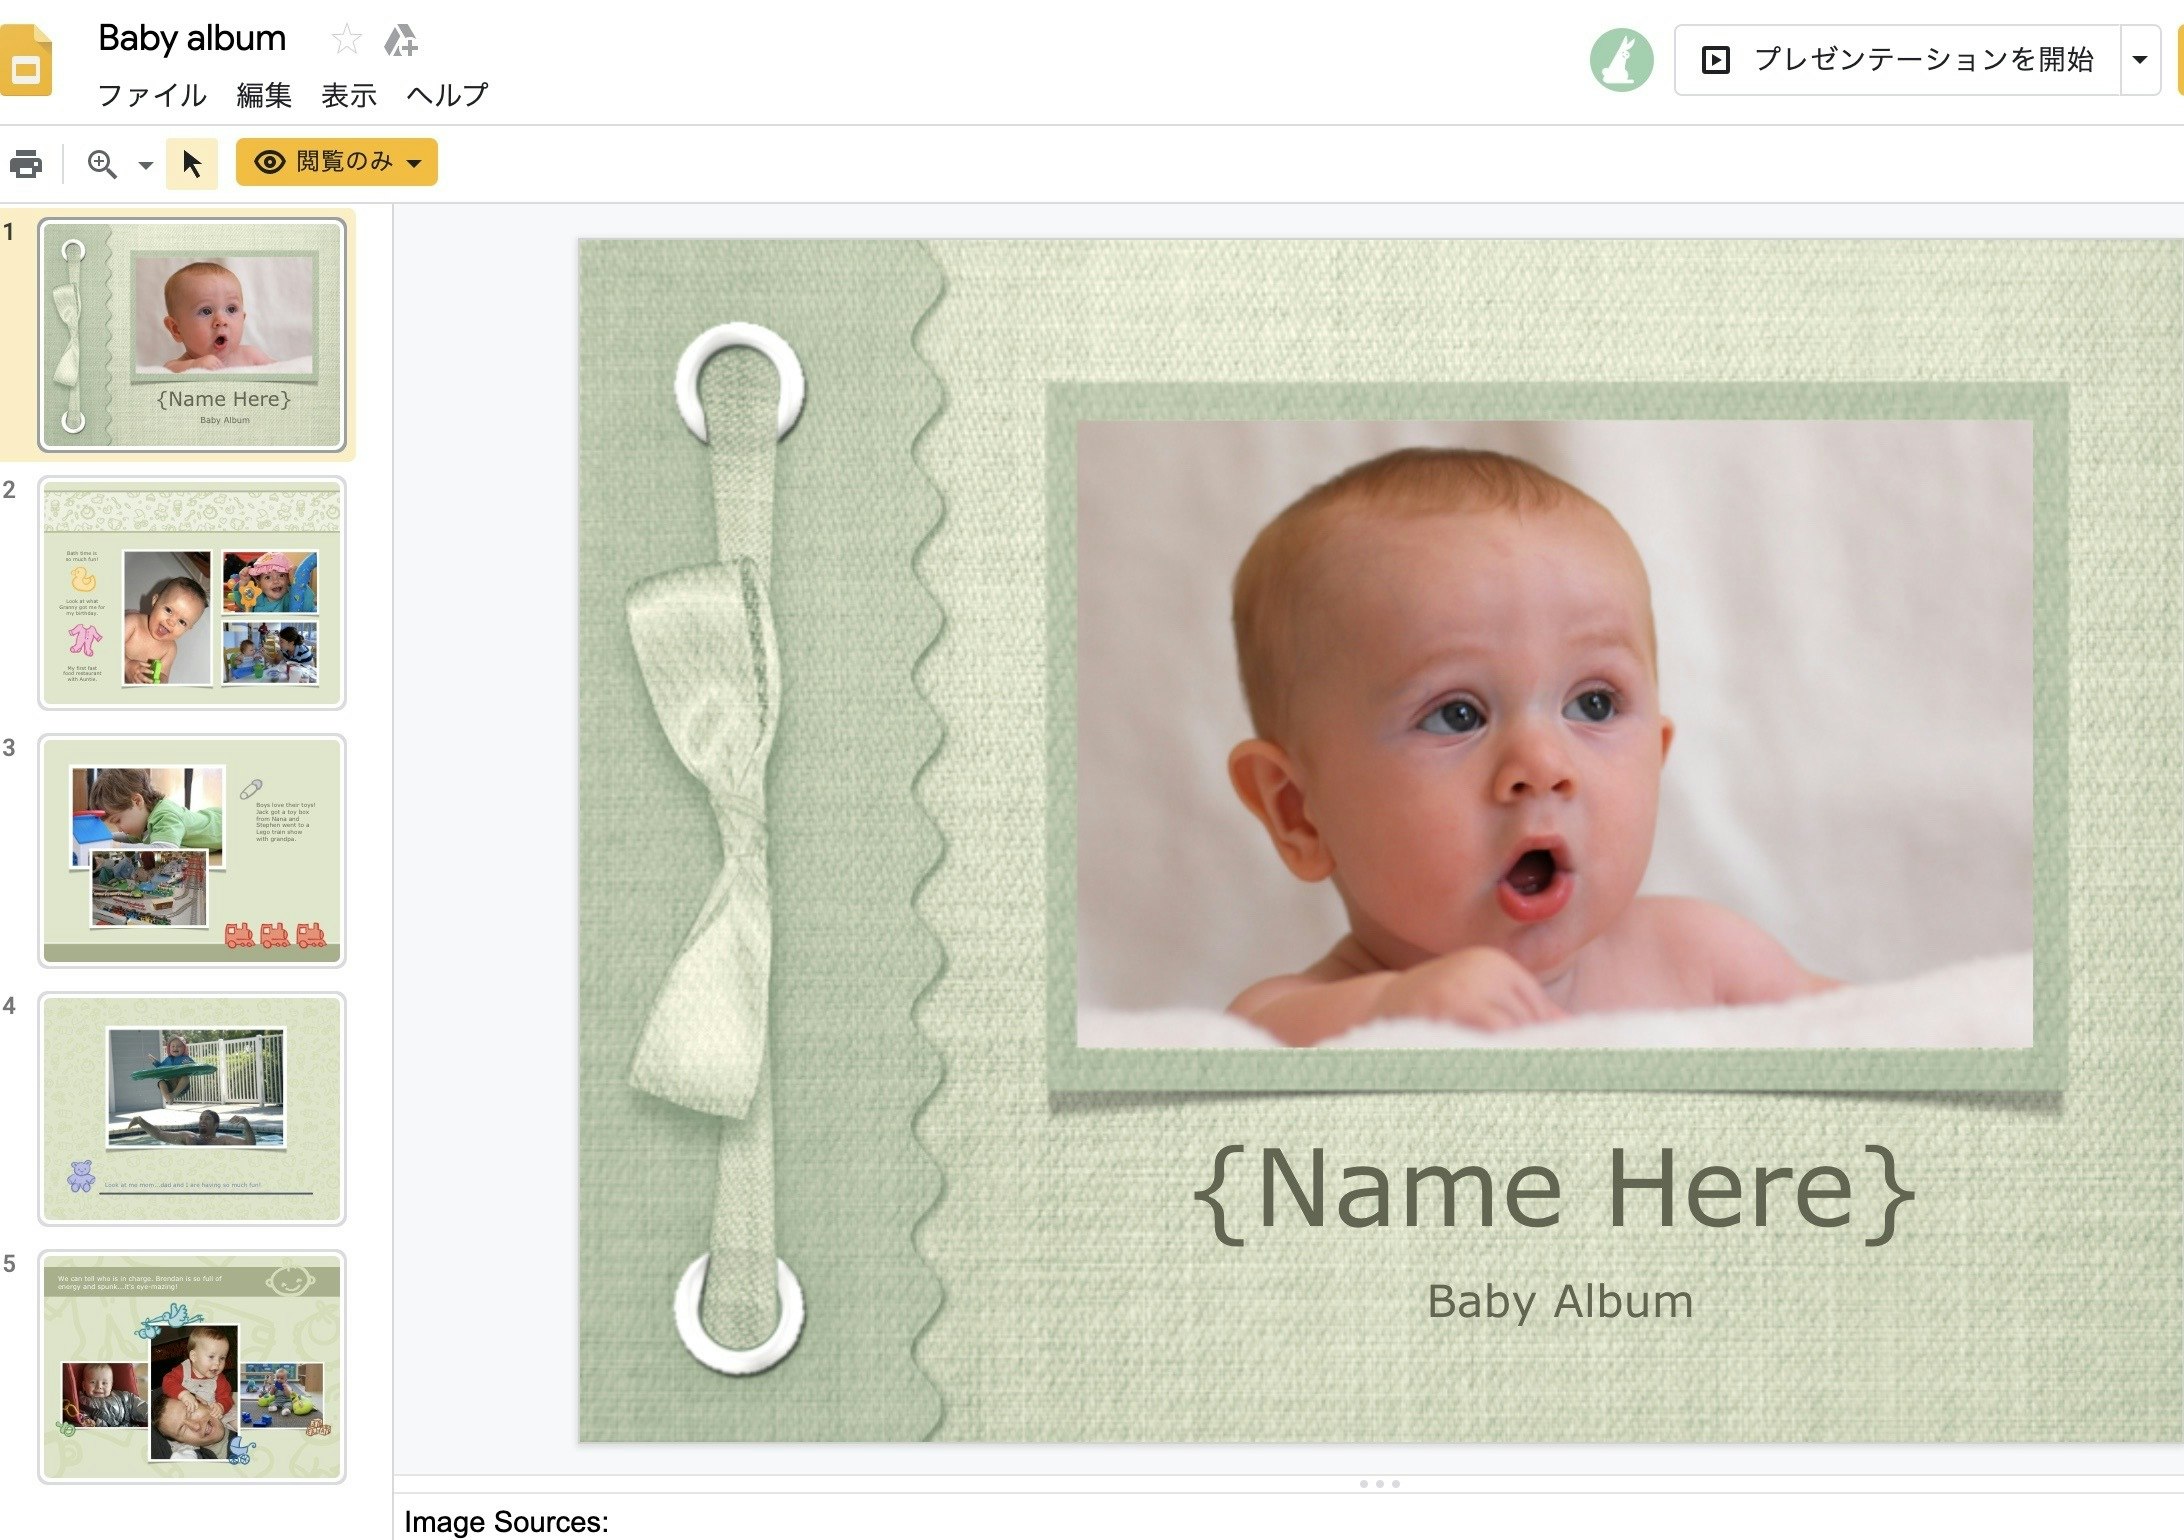
ソースコード上で以下のような箇所がありますが、このプレゼンテーションIDでGoogle Slidesのプレゼンを指定します。

app.js
//省略slides.presentations.get({presentationId:'1EAYk18WDjIG-zp_0vLm3CsfQh_i8eXc67Jo2O9C6Vuc',}//省略

https://docs.google.com/presentation/d/1EAYk18WDjIG-zp_0vLm3CsfQh_i8eXc67Jo2O9C6Vuc/edit#slide=id.ge63a4b4_1_0

先ほど、app.jsを実行した時の表示はスライドの枚数と要素数を表示しています。

The presentation contains 5 slides:
- Slide #1 contains 4 elements.
- Slide #2 contains 11 elements.
- Slide #3 contains 9 elements.
- Slide #4 contains 5 elements.
- Slide #5 contains 12 elements.

所感

取り急ぎ、触ることが出来ました。

思ったより簡単です。

JSONをもっと深ぼっていくとテキスト情報も取れそうですね。

次回やってみます。

Node.jsでGoogle Slides内のテキストを取得してみる

$
0
0

Node.jsでGoogle Slides APIを触ってみるの続きです。

準備

前回の記事を参照して、スライド情報にNode.jsからアクセス出来るようにしましょう。

適当なスライドを用意する

こちらを用意してみました。

https://docs.google.com/presentation/d/1ziVnaFocZ_YF_cuXyXF5PUKGoE62eX-XlnOEslPkKUc/edit#slide=id.p

https://docs.google.com/presentation/d/<ここがプレゼンテーションID>/edit#slide=id.pになるのでこのスライドのプレゼンテーションIDは1ziVnaFocZ_YF_cuXyXF5PUKGoE62eX-XlnOEslPkKUcになります。

Node.jsでGoogle Slidesのテキストを抽出

前回のコードからプレゼンテーションIDの箇所とfunction listSlides(auth)の中身を書き換えてます。

app.js
constfs=require('fs');constreadline=require('readline');const{google}=require('googleapis');//変更箇所: プレゼンテーションID - 試すときは自分のスライドでもやってみましょうconstpresentationId=`1ziVnaFocZ_YF_cuXyXF5PUKGoE62eX-XlnOEslPkKUc`;// If modifying these scopes, delete token.json.constSCOPES=['https://www.googleapis.com/auth/presentations.readonly'];// The file token.json stores the user's access and refresh tokens, and is// created automatically when the authorization flow completes for the first// time.constTOKEN_PATH='token.json';// Load client secrets from a local file.fs.readFile('credentials.json',(err,content)=>{if(err)returnconsole.log('Error loading client secret file:',err);// Authorize a client with credentials, then call the Google Slides API.authorize(JSON.parse(content),listSlides);});/**
 * Create an OAuth2 client with the given credentials, and then execute the
 * given callback function.
 * @param {Object} credentials The authorization client credentials.
 * @param {function} callback The callback to call with the authorized client.
 */functionauthorize(credentials,callback){const{client_secret,client_id,redirect_uris}=credentials.installed;constoAuth2Client=newgoogle.auth.OAuth2(client_id,client_secret,redirect_uris[0]);// Check if we have previously stored a token.fs.readFile(TOKEN_PATH,(err,token)=>{if(err)returngetNewToken(oAuth2Client,callback);oAuth2Client.setCredentials(JSON.parse(token));callback(oAuth2Client);});}/**
 * Get and store new token after prompting for user authorization, and then
 * execute the given callback with the authorized OAuth2 client.
 * @param {google.auth.OAuth2} oAuth2Client The OAuth2 client to get token for.
 * @param {getEventsCallback} callback The callback for the authorized client.
 */functiongetNewToken(oAuth2Client,callback){constauthUrl=oAuth2Client.generateAuthUrl({access_type:'offline',scope:SCOPES,});console.log('Authorize this app by visiting this url:',authUrl);constrl=readline.createInterface({input:process.stdin,output:process.stdout,});rl.question('Enter the code from that page here: ',(code)=>{rl.close();oAuth2Client.getToken(code,(err,token)=>{if(err)returnconsole.error('Error retrieving access token',err);oAuth2Client.setCredentials(token);// Store the token to disk for later program executionsfs.writeFile(TOKEN_PATH,JSON.stringify(token),(err)=>{if(err)returnconsole.error(err);console.log('Token stored to',TOKEN_PATH);});callback(oAuth2Client);});});}/**
 * Prints the number of slides and elements in a sample presentation:
 * https://docs.google.com/presentation/d/1EAYk18WDjIG-zp_0vLm3CsfQh_i8eXc67Jo2O9C6Vuc/edit
 * @param {google.auth.OAuth2} auth The authenticated Google OAuth client.
 * 
 */functionlistSlides(auth){constslides=google.slides({version:'v1',auth});slides.presentations.get({presentationId:presentationId,},(err,res)=>{if(err)returnconsole.log('The API returned an error: '+err);/* 変更箇所: スライド中のテキストを抽出するテスト */constfirstPage=res.data.slides[0];//1スライド目constfirstBox=firstPage.pageElements[0];//最初の要素console.log(firstBox.shape.text.textElements[1].textRun.content);//中身のテキスト確認});}

素でアクセすると

res.data.slides[0].pageElements[0].shape.text.textElements[1].textRun.content

みたいな感じで超深い階層になるみたいです。

  • res.data.slides: スライドXXページごとの配列 今回はタイトルスライドから抜き出すので0指定
  • firstPage.pageElements: 対象ページのオブジェクト(テキストボックスなど)の配列 今回はページの最初の部ジェクトなので0指定

実行

$ node app.js 
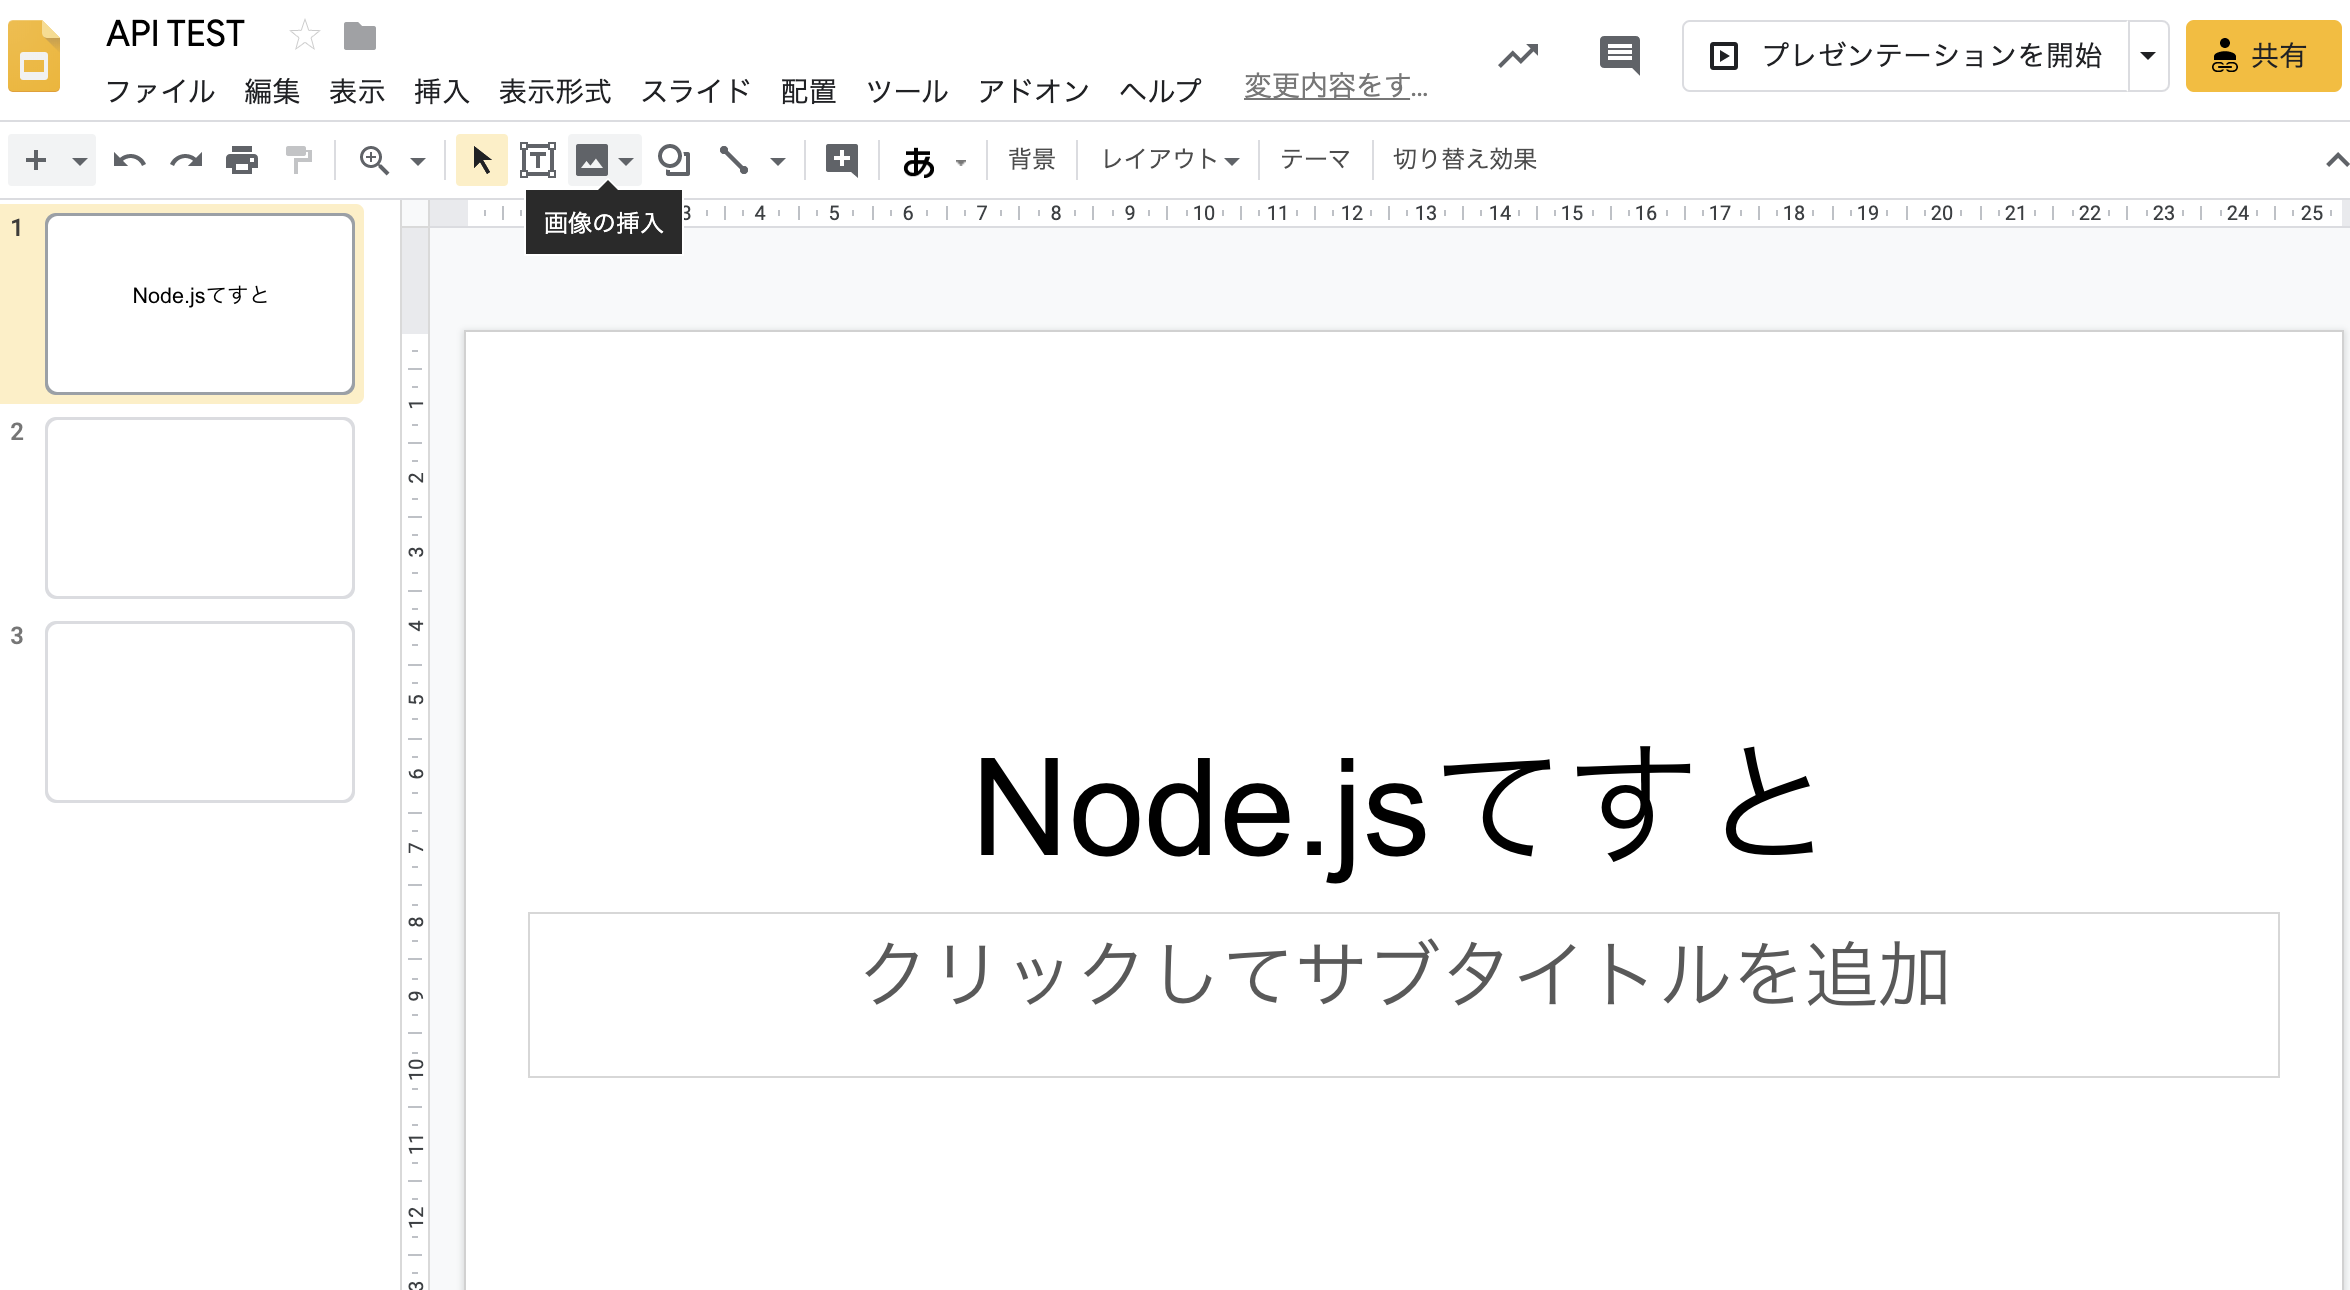
Node.jsてすと

ちゃんとテキストがとれましたね。

所感

返ってくるオブジェクトが結構複雑な印象です。

詳細はslides周りのSDKを覗くのが良さそうだけどどんなオブジェクトが返ってくるかはまだ見つけられてないのでconsole.logで探していったほうが早いかも

追記: 今回使ってるpresentations.getのAPIリファレンスはここっぽい

https://developers.google.com/slides/reference/rest/v1/presentations/get

Node.jsでGoogle Slidesの新規スライド作成

$
0
0

Google Slides APIをNode.jsから触ってみてます。

の記事の続きです。

Google Slideのcreateを試す

スライドの新規作成が出来そうな雰囲気です。

presentations.createのドキュメントを覗くとスライド作成できそうな雰囲気がありました。

準備

Node.jsでGoogle Slides APIを触ってみるでAPIへのアクセスなどを出来るようにしましょう。

ソースコード

前回記事のapp.jsの中身を書き換えます。

  • SCOPESを変更
app.js
constSCOPES=['https://www.googleapis.com/auth/presentations'];

元々は'https://www.googleapis.com/auth/presentations.readonly'と書いてあって読み込みのみ許可になってました。

  • listSlides(auth)の中身を以下に書き換え
app.js
省略functionlistSlides(auth){constslides=google.slides({version:'v1',auth});slides.presentations.create({presentationId:'',},(err,res)=>{if(err)returnconsole.log('The API returned an error: '+err);console.log(res.data);});}

tokenを再発行

token.jsonは読み込みのみ許可のトークンで作成されていたので、一度token.jsonのファイルを削除します。

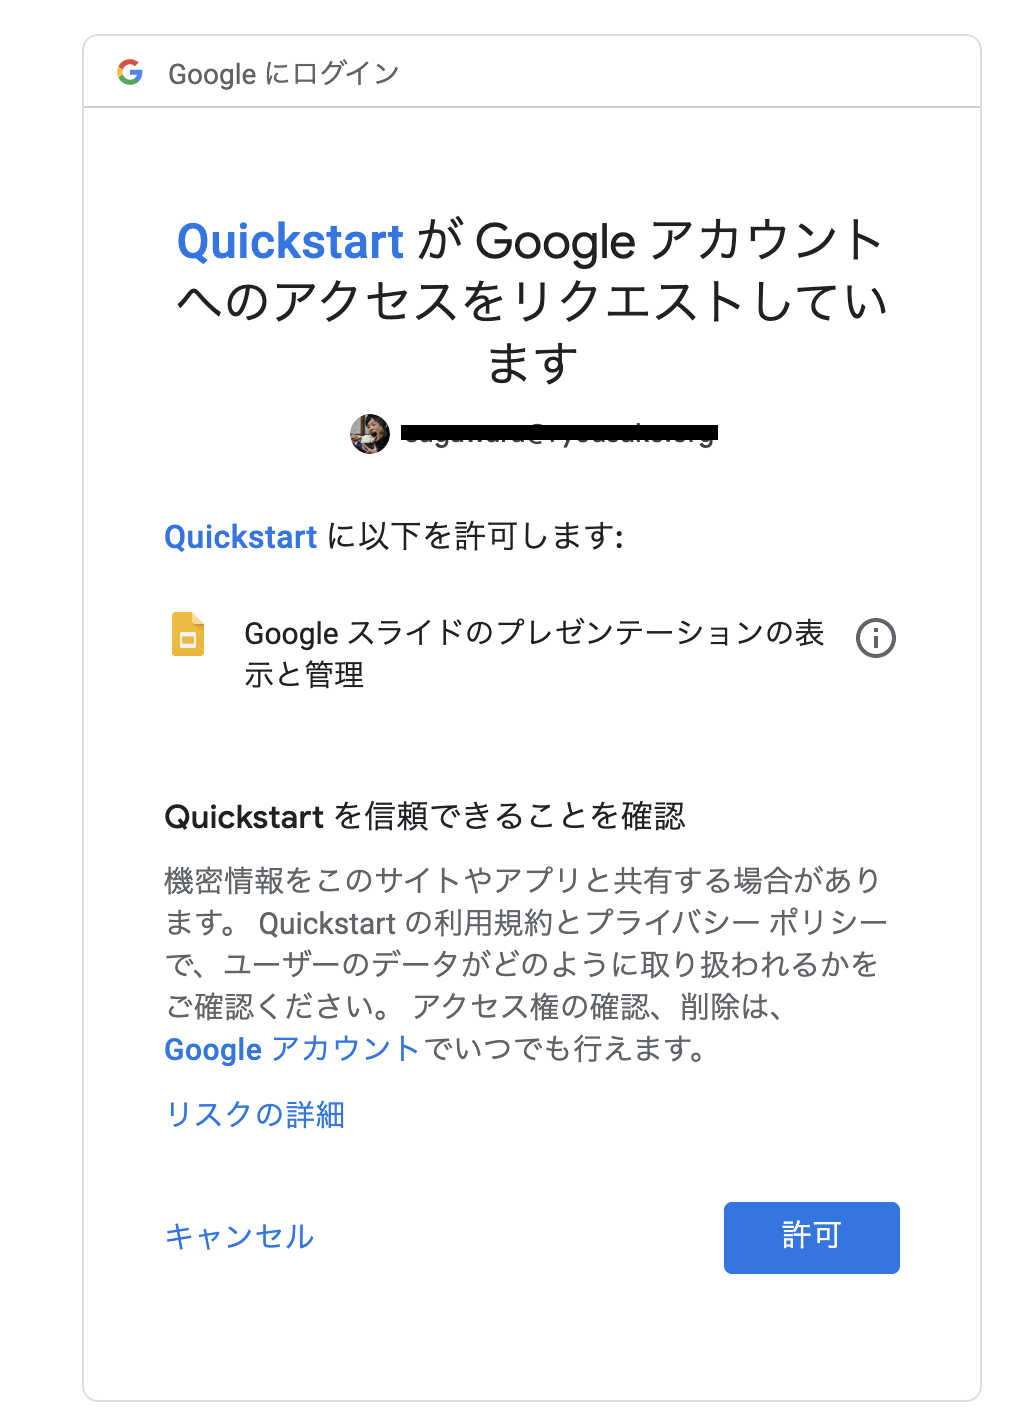
再度node app.jsで実行すると、URLが発行されて、ブラウザでアクセスするとこのようにアクセス許可を求められます。

スクリーンショット 2020-02-08 16.41.22.png

許可をして、発行されるコードをターミナル側に貼り付けて実行するとtoken.jsonが再発行されて実行できます。

新規スライドが出来た!

実行してみます。

$ node app.js
{
  presentationId: 'xxxxxxxxxxxxxxxxxxxxxxxxxxxxxxxxxx',
  pageSize: {
    width: { magnitude: 9144000, unit: 'EMU'},
    height: { magnitude: 5143500, unit: 'EMU'}},
  slides: [{
      objectId: 'p',
      pageElements: [Array],
      slideProperties: [Object],
      pageProperties: [Object]
    }],
  title: '無題のプレゼンテーション',
  masters: [{
      objectId: 'simple-light-2',
      pageType: 'MASTER',
      pageElements: [Array],
      pageProperties: [Object],
      masterProperties: [Object]
    }],

省略

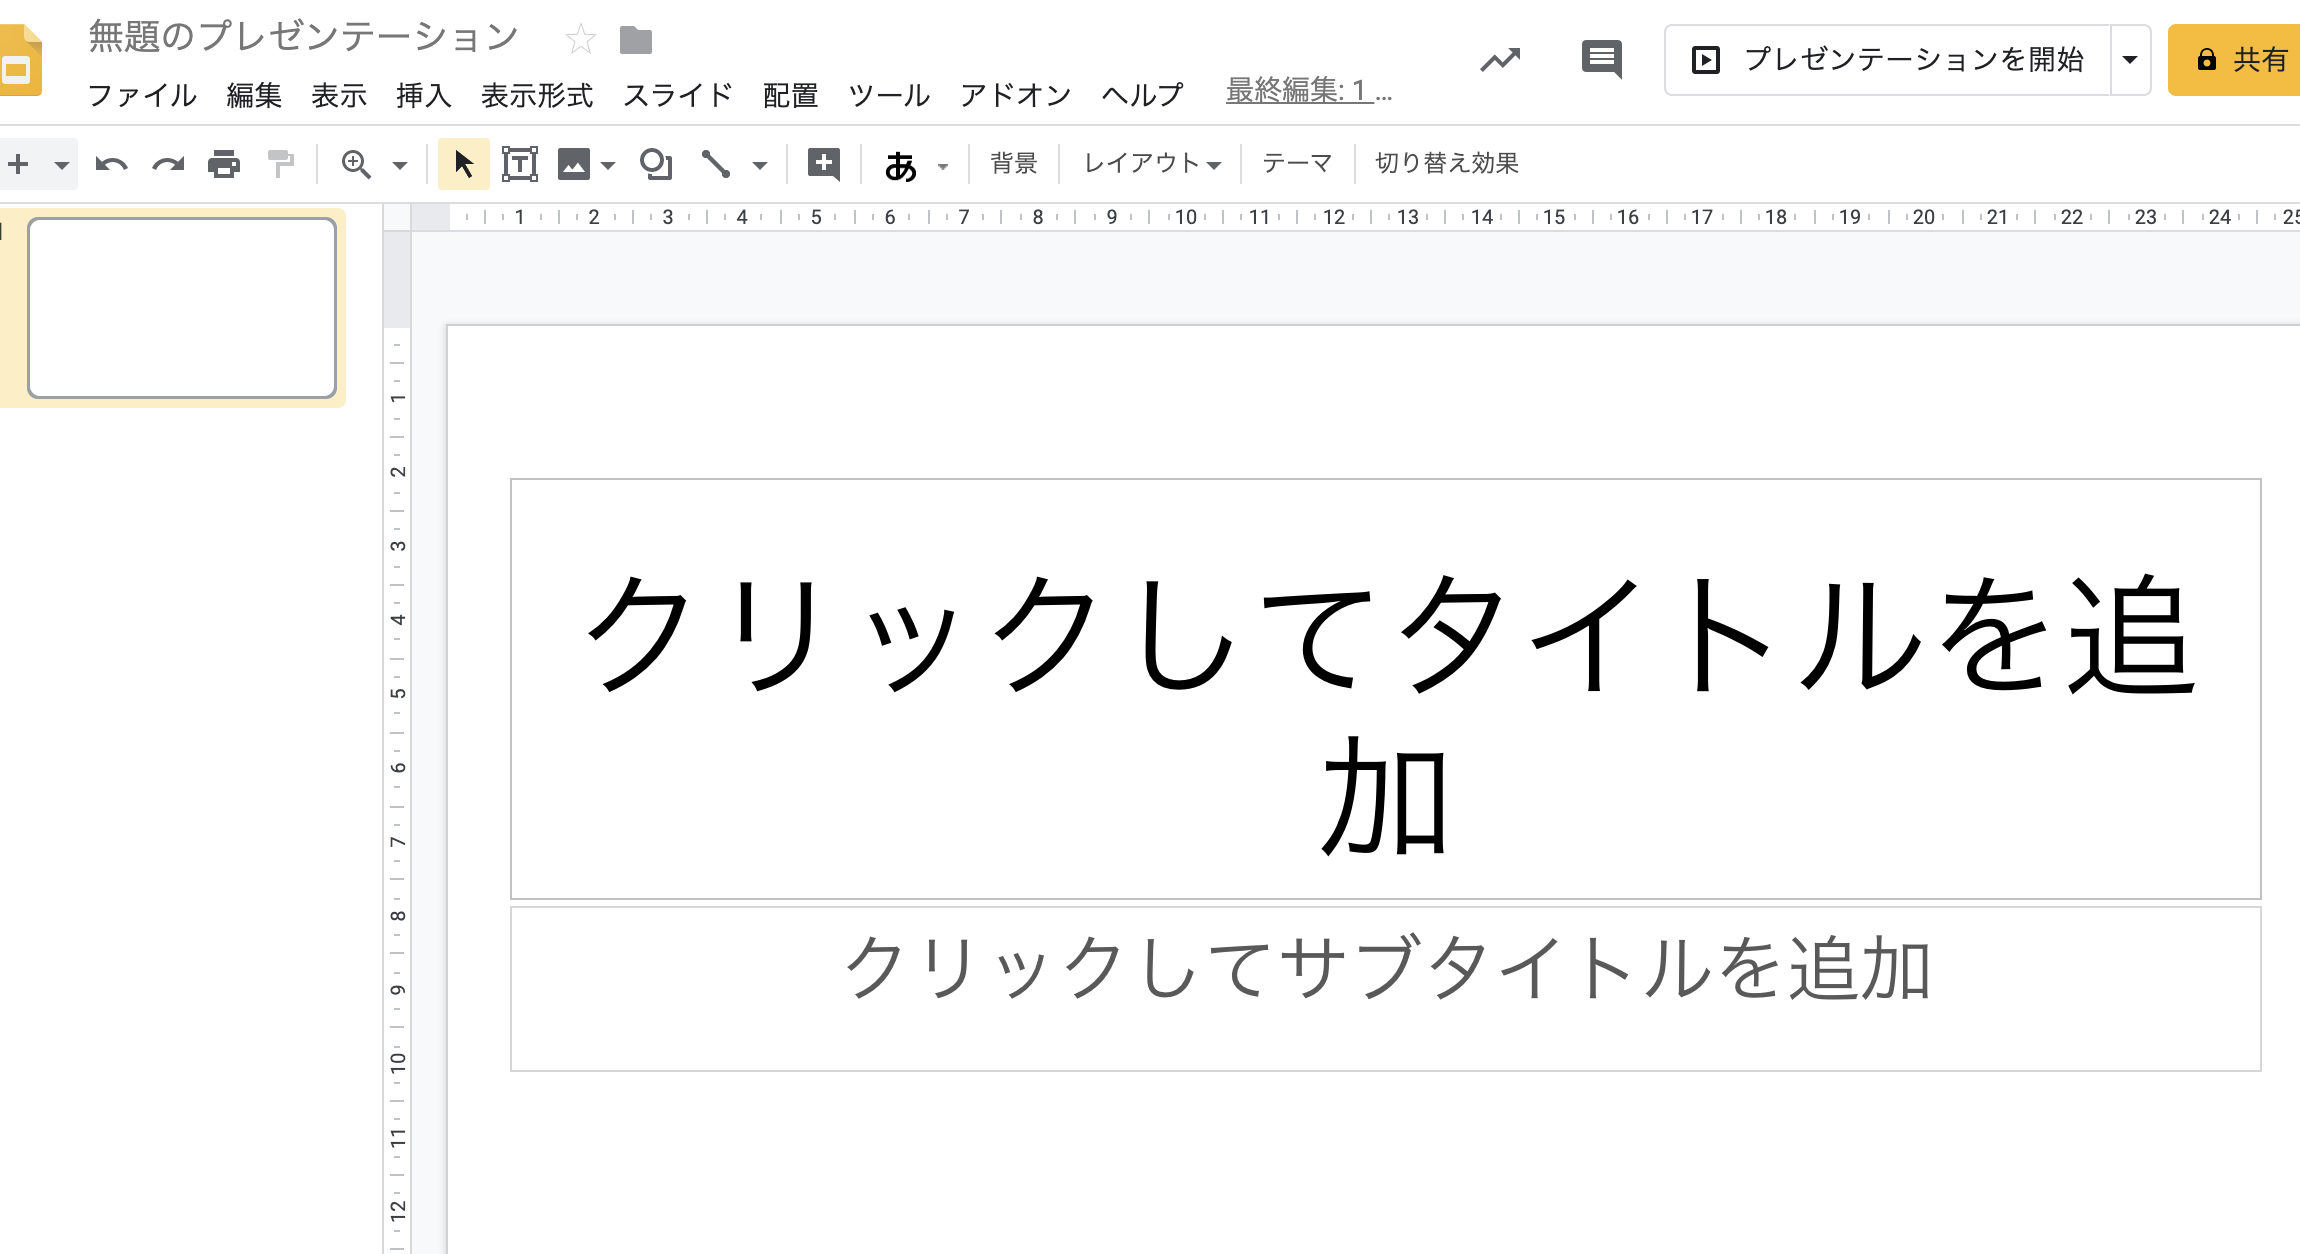
Google Drive上で確認してみると無題のプレゼンテーションが作成されてました。

スクリーンショット 2020-02-08 16.43.15.png

所感

とりあえず、Node.jsからスライドの新規作成ができました。

タイトル指定などをして作ることも出来そうなので引き続き探っていきます。

【AWS】IAM-APIGetway-Lambda-DynamoDB-S3でシンプルなアプリケーション制作

$
0
0

はじめに 

サーバーレス勉強する際に、いろいろ試したメモ、
つまずいた点や、解決法など、主に自分用のメモになります。
他の方の参考にもなれば嬉しいです。

やること

  • DynamoDBでテーブル作成
  • IAMでDynamoDB用のロール作成
  • Lambda上でDynamoDBに値を挿入
  • Lambda上でDynamoDBから値を取得
  • API Gatewayの設定
  • S3にウェブアプリケーションをアップし、公開する
  • 公開されたアプリケーションでDynamoDBを操作する

DynamoDBでテーブル作成

テーブルの作成をクリックしてください。
UNADJUSTEDNONRAW_thumb_42.jpg
テーブル名プライマリキーを入力します、プライマリキーのタイプは数値を選んでください。
2020-02-07 17.31のイメージ.jpg

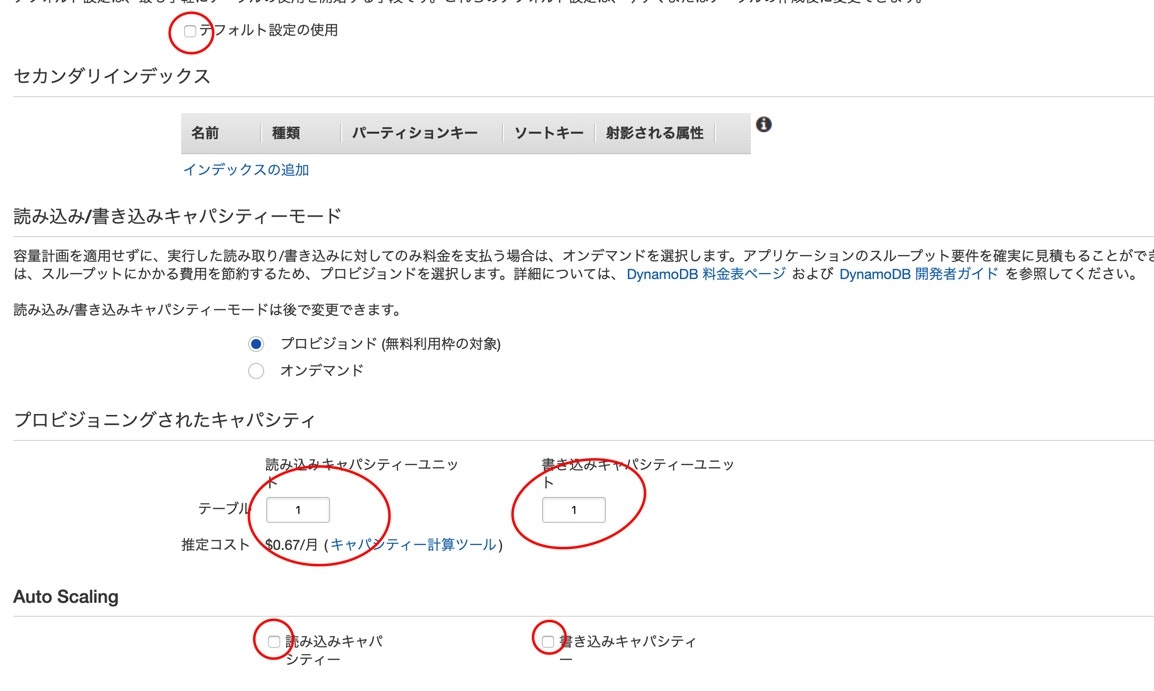
デフォルト設定の使用のチェックを外します、今回はテストのため、性能は最低限のもので良いです。
2020-02-07 17.56のイメージ.jpg

設定が終わったら作成をクリックします、しばらくしたらテーブルが作成されるはずです。
UNADJUSTEDNONRAW_thumb_45.jpg

IAMでDynamoDB用のロール作成

権限なしではLambdaがDynamoDB操作できません、Lambda作成する前にまずロールを作ります。
AWSサービスLambdaを選び、次のステップを押してください。

2020-02-07 19.05のイメージ.jpg
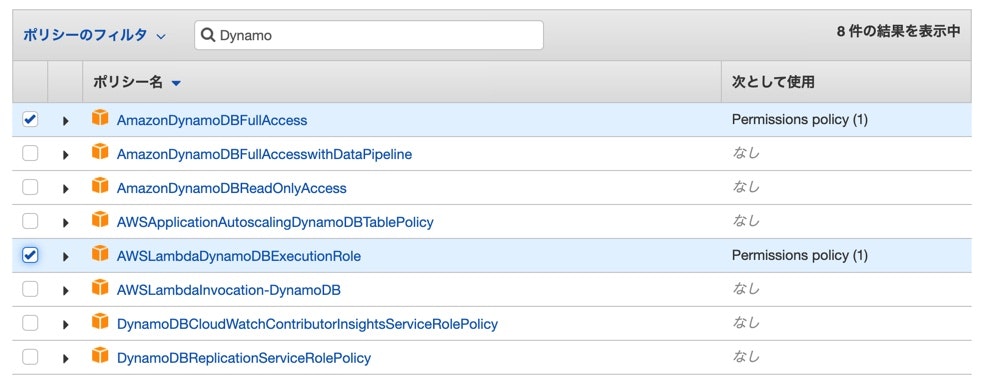
Dynamoを検索して、AmazonDynamoDBFullAccessAWSLambdaDynamoDBExecutionRoleにチェック入れてください。
2020-02-07 19.09のイメージ.jpg
タグの追加に関しては、わかりやすいkeyとvalueでいいと思います。
2020-02-07 19.16のイメージ.jpg
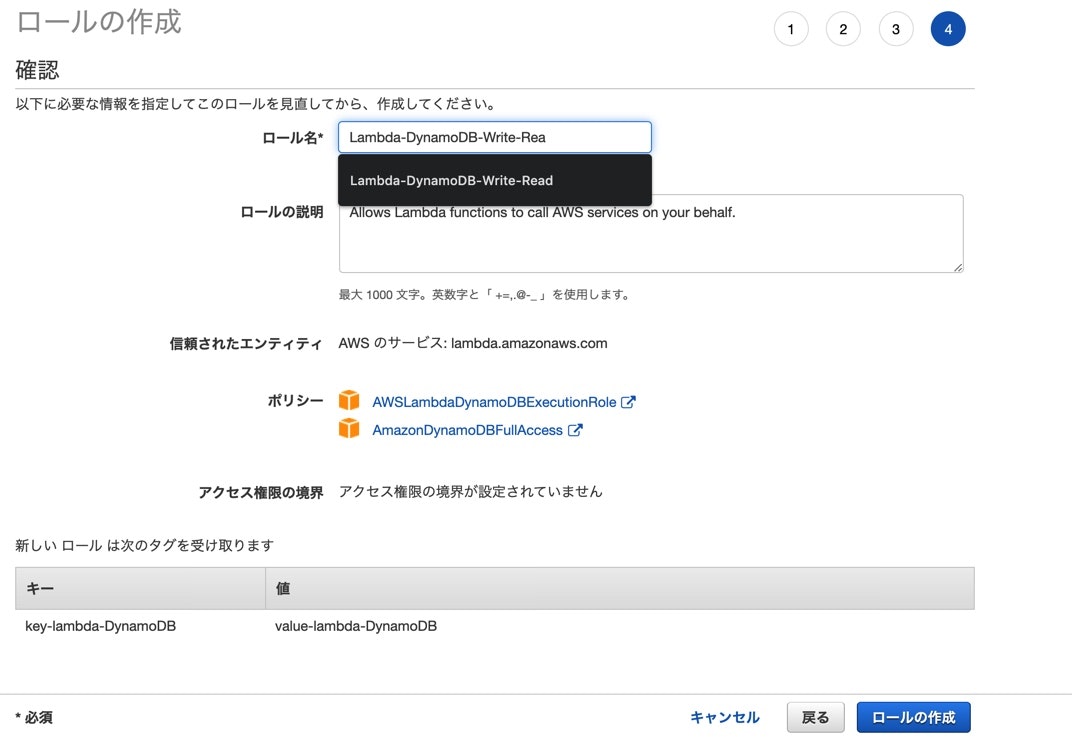
ロール名も用途が分かりやすいもので良いです、作成完了したら、Lambdaの方に入ります。
2020-02-07 19.19のイメージ.jpg

Lambda上でDynamoDBに値を挿入

関数を作ります。
関数の作成をクリック。
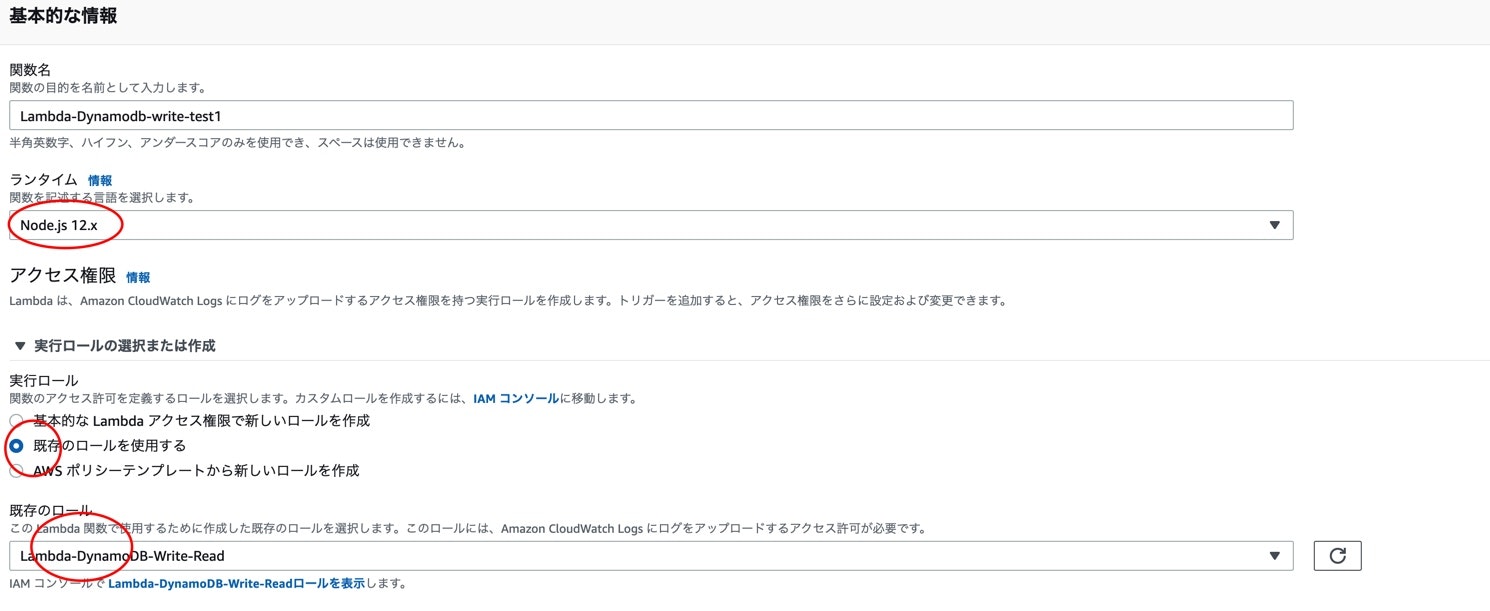
一から作成を選択、関数名は用途が分かりやすいものにします。
言語は今回Node.jsにします。
アクセス権限は先ほど作って置いたロールを使用します。
設定が終わったら、関数を作成します。
2020-02-07 20.07のイメージ.jpg

関数の内容はリクエストからmessageを受け取って、DynamonDBに保存するというシンプルな内容でした。

index.js
"use strict"console.log("loading function");varAWS=require("aws-sdk");AWS.config.region="ap-northeast-1";vardocClient=newAWS.DynamoDB.DocumentClient();exports.handler=function(event,context,callback){varparams={Item:{data:Date.now(),message:event.message},TableName:"Lambda-DynamoDB-Write-Read",};docClient.scan(params,function(err,data){if(err){console.log("Fail to write into DynamoDB");callback(err,null);}else{console.log("Successfully write into AWS DynamoDB");callback(null,data);}});};

Lambda上でDynamoDBから値を取得

設定は値挿入時と同じです。
今回はデータの読み取りなので、関数名はLambda-DynamoDB-read-testにします。

index.js
"use strict"console.log("loading function");constAWS=require("aws-sdk");AWS.config.region="ap-northeast-1"vardocClient=newAWS.DynamoDB.DocumentClient();exports.handler=function(event,context,callback){varparams={TableName:"Lambda-DynamoDB-Write-Read",Limit:100};docClient.scan(params,function(err,data){if(err){console.log("Fail to read from AWS DynamoDB");callback(err,null);}else{console.log("Successfully Read from AWS DynamoDB table");Reflect.set(data,"headers",{"Access-Control-Allow-Origin":"*","Access-Control-Allow-Credentials":"true"});Reflect.set(data,"responseCode",200);context.succeed(data);}});}

API Gatewayの設定

APIを作成します。
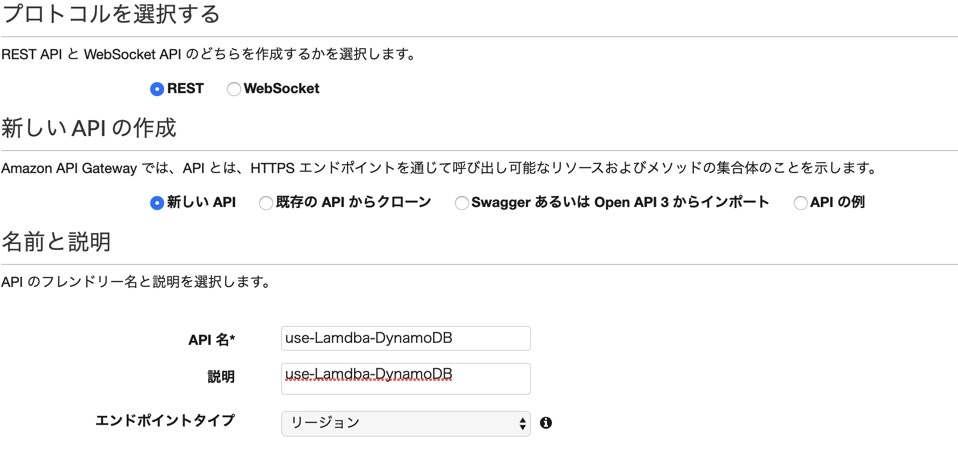
REST APIを選択します。
2020-02-07 21.45のイメージ.jpg
API名と説明を入力して、作成します。2020-02-07 22.21のイメージ.jpg
作成完了後、メニューのアクションから、メソッドの作成を選択して、GETPOSTを作ります。
2020-02-07 22.29のイメージ.jpg

GET

Lambda関数にチェックを入れて、
Lambda関数の所に先程作った、DynamoDBから値を取得用のLambda関数名を入れます。
2020-02-07 22.31のイメージ.jpg
Lambda 関数に権限を追加するのダイアログが出てきますが、okを選択します。
CORSを有効化します、アクションからCORS の有効化にしてください。
2020-02-08 11.45のイメージ.jpg
アクションから、APIのデプロイを行ないます。
2020-02-08 11.47のイメージ.jpg
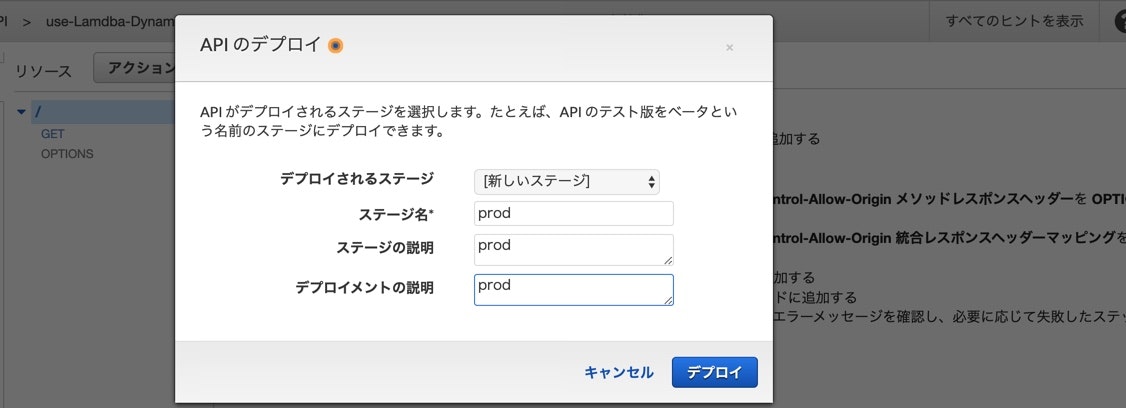
新しいステージを選択して、
ステージ名*ステージの説明デプロイメントの説明を入力します。
2020-02-08 16.28のイメージ.jpg
デプロイ完成したら、スタージでメソッド確認できます。
2020-02-08 16.45のイメージ.jpg

POST

手順はGET時と基本同じです。
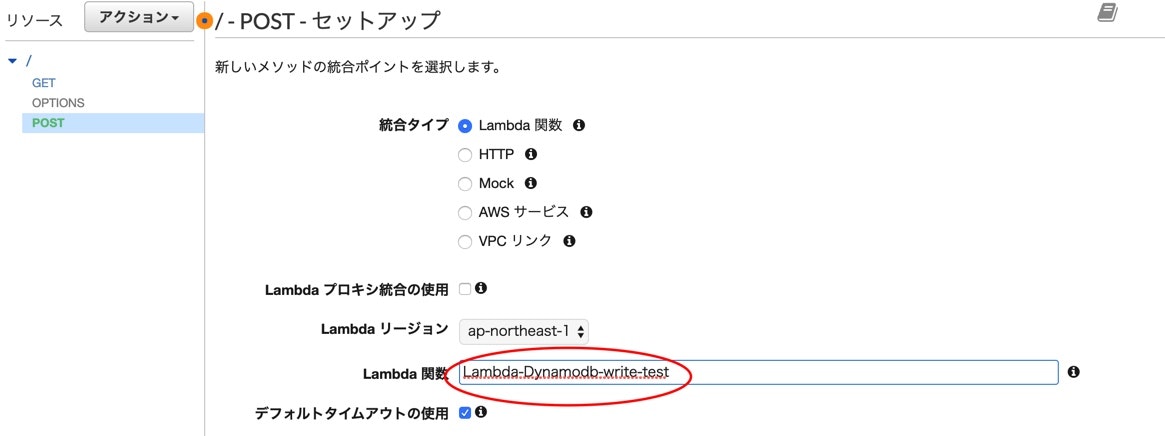
先程作った値を挿入用のLambda関数を使用します。
2020-02-08 17.08のイメージ.jpg
作った後、統合リクエストを選択します。
123.jpg

マッピングテンプレートapplication/jsonContent-Typeに追加します。
2020-02-08 17.21のイメージ.jpg
デプロイする際に、先程作ったステージを選択します。
2020-02-08 17.36のイメージ.jpg
完了後のステージはこんな感じになります。
2020-02-08 17.45のイメージ.jpg

S3にウェブアプリケーションをアップし、公開する

使用するウェブアプリのソースは以下になります。
Jqueryのmin.jsを同じディレクトリに置いてあります。
機能はajax使用して、ApiGatewayにGETとPOSTのリクエストを送り、
DynamoDBにデータ挿入、また取得します。

LamdbaAPIGetwanyDynamoDB.html
<htmllang="en"><head><metacharset="UTF-8"><title>Title1</title><script type="text/javascript"src="./jquery-2.1.4.min.js"></script></head><body><divid="entries"></div><h1>Write new comment</h1><form><labelfor="message">Message</label><textareaid="message"></textarea><buttonid="submitbutton">submit</button></form><script type="text/javascript">varAPI_Gateway_URL="APIのURL";$(document).ready(()=>{$.ajax({type:"GET",url:API_Gateway_URL,success:(data)=>{$("#entries").html("");data.Items.forEach((getcomments)=>{$("#entries").append("<p>"+getcomments.message+"</p>");})}});});$(function(){$("#submitbutton").click(()=>{console.log($("#message").val());$.ajax({url:API_Gateway_URL,type:"POST",data:JSON.stringify({"message":$("#message").val()}),contentType:'application/json',success:function(data){location.reload();}});returnfalse;})})</script></body></html>

S3のパケット作ります

パケット名を入力し、リージョンは東京を使用します。
作成でパケットを作ります。
2020-02-08 18.24のイメージ.jpg
フォルダを作ります。
2020-02-08 18.36のイメージ.jpg
ウェブアプリのファイルとjqueryのmin.jsを同じフォルダーにアップロードします。
2020-02-08 18.39のイメージ.jpg
アップロードされたファイル(HtmlをJqueryのmin.js)にチェック入れて、
アクションから公開します。
2020-02-08 18.58のイメージ.jpg

公開されたアプリケーションでDynamoDBを操作する

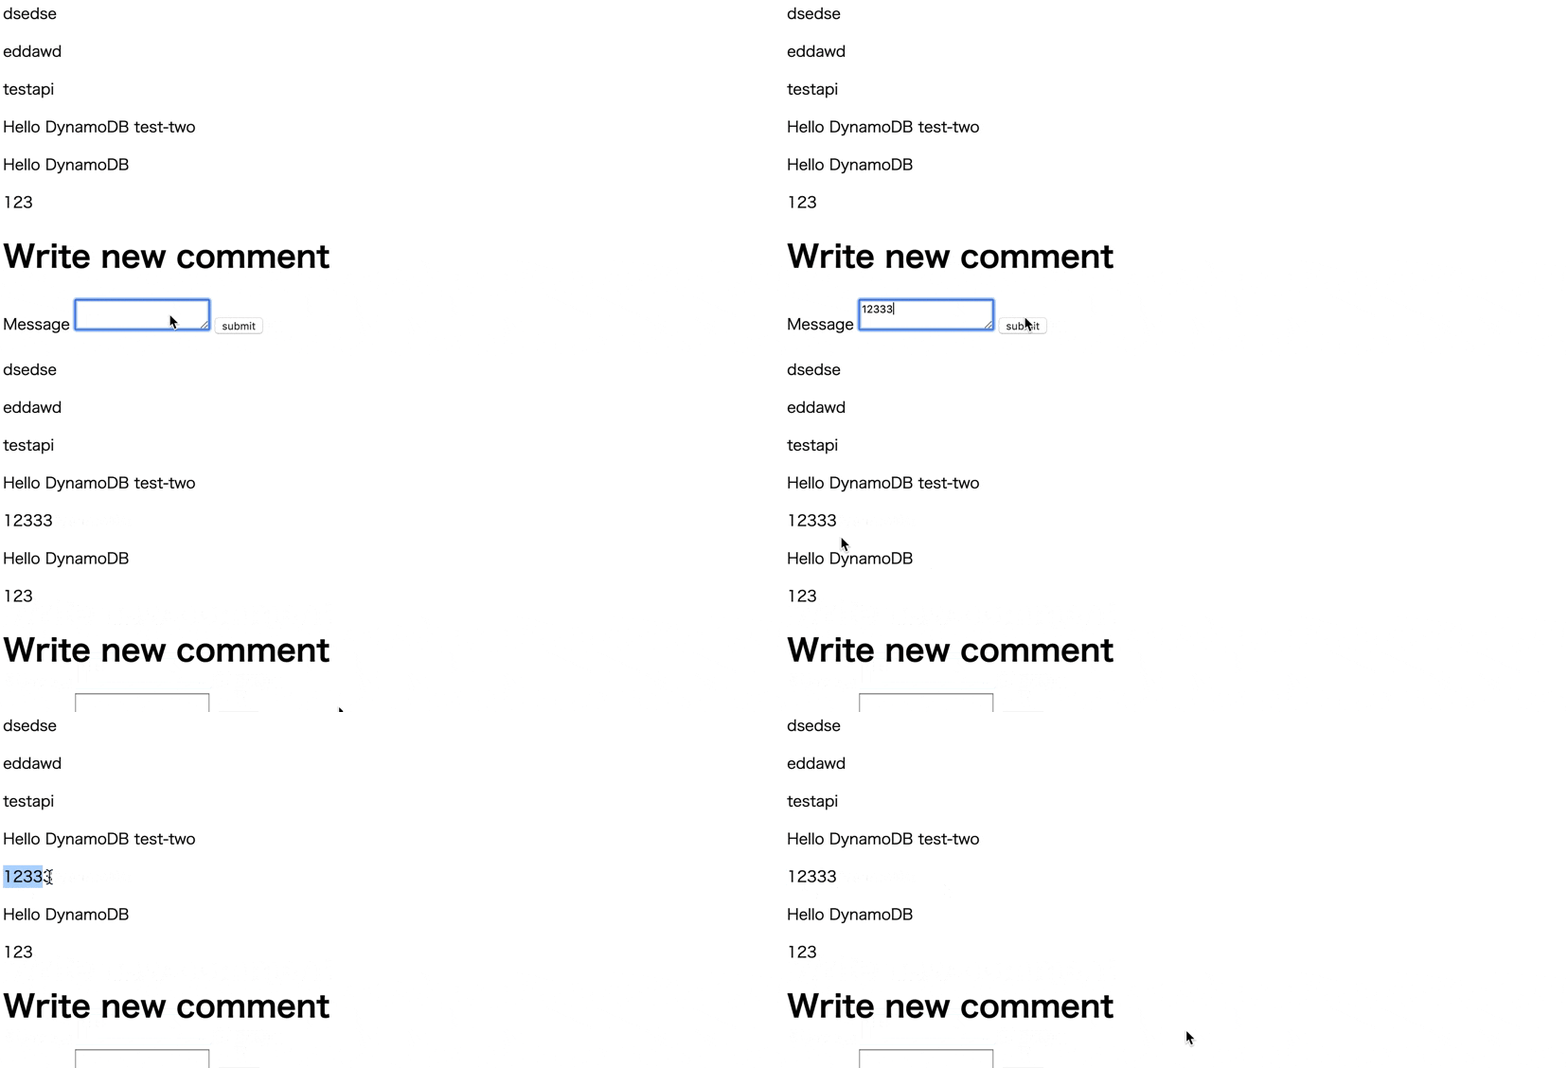
公開されたHtmlファイルのurlを開いて、実際操作します。
35cca2645658fe236fc58df751594306.gif
以上で終わりです。:relaxed:

【解決】nuxtでyarnをすると「gyp: No Xcode or CLT version detected!」エラーが発生

$
0
0

環境

  • macOS Catalina 10.15.3 (zsh)
  • node.js v10.15.2
  • yarn 1.21.1
  • vue/cli 4.1.1

事象

nuxt + typescript + vuetify環境を作成するために、以下のテンプレートを使用しました。
https://github.com/nuxt-community/typescript-template

そこでyarnコマンドを実行すると以下のエラーが発生し正常に起動できませんでした。

gyp: No Xcode or CLT version detected!
gyp ERR! configure error 
gyp ERR! stack Error: `gyp` failed with exit code: 1
gyp ERR! stack     at ChildProcess.onCpExit (/Users/dmorita/.nodebrew/node/v10.15.2/lib/node_modules/npm/node_modules/node-gyp/lib/configure.js:345:16)
gyp ERR! stack     at ChildProcess.emit (events.js:189:13)
gyp ERR! stack     at Process.ChildProcess._handle.onexit (internal/child_process.js:248:12)
gyp ERR! System Darwin 19.3.0
gyp ERR! command \"/Users/dmorita/.nodebrew/node/v10.15.2/bin/node\" \"/Users/dmorita/.nodebrew/node/v10.15.2/lib/node_modules/npm/node_modules/node-gyp/bin/node-gyp.js\" \"rebuild\"
gyp ERR! cwd /Users/projects/XXXX/client/node_modules/watchpack/node_modules/fsevents
gyp ERR! node -v v10.15.2
success Saved lockfile.
✨  Done in 156.15s.

yarnとしては、Xcodeが見つからないだけなのでsuccessとなってしまうのですが、yarnやnpm辺りに色々と不具合が起こるので解消したいと思います。
私の場合は以下の2stepで解消しました。

Step1

まずは、エラー内容「No Xcode or CLT version detected!」の通りにXcodeとCLTを確認

% xcode-select --install
xcode-select: error: command line tools are already installed, use "Software Update" to install updates

もちろんインストール済みですと。
私の場合、Catalinaにアップデートしてから多々不具合がありました。
こちらを参考に再インストールしました。
https://github.com/nodejs/node-gyp/blob/master/macOS_Catalina.md#i-did-all-that-and-the-acid-test-still-does-not-pass--

Step2

それから再度上記のテンプレートで yarnコマンドを叩くと以下のエラーが発生しました。

xcrun: error: active developer path (\"/Applications/Xcode.app/Contents/Developer\") does not exist
Use `sudo xcode-select --switch path/to/Xcode.app` to specify the Xcode that you wish to use for command line developer tools, or use `xcode-select --install` to install the standalone command line developer tools.
See `man xcode-select` for more details.
gyp ERR! build error 
gyp ERR! stack Error: `make` failed with exit code: 1
gyp ERR! stack     at ChildProcess.onExit (/Users/dmorita/.nodebrew/node/v10.15.2/lib/node_modules/npm/node_modules/node-gyp/lib/build.js:262:23)
gyp ERR! stack     at ChildProcess.emit (events.js:189:13)
gyp ERR! stack     at Process.ChildProcess._handle.onexit (internal/child_process.js:248:12)
gyp ERR! System Darwin 19.3.0
gyp ERR! command \"/Users/dmorita/.nodebrew/node/v10.15.2/bin/node\" \"/Users/dmorita/.nodebrew/node/v10.15.2/lib/node_modules/npm/node_modules/node-gyp/bin/node-gyp.js\" \"rebuild\"
gyp ERR! cwd /Users/projects/XXXX/client/node_modules/watchpack/node_modules/fsevents
gyp ERR! node -v v10.15.2
success Saved lockfile.
✨  Done in 150.93s.

え?パスが存在しないだと?
え?CLTのパスじゃなくてXcodeのパスだと?
となり、確認したところ

% xcode-select -print-path                    
/Applications/Xcode.app/Contents/Developer

CLTが参照しているのがXcode.appのDeveloperでした。
この原因の推測としては、過去に Xcode.app→CLT の順にインストールを行ったためXcode.appが先に決定されていたのだと思います。

こちらを参考に参照先のパスをCLTに変更しました。
https://stackoverflow.com/questions/17980759/xcode-select-active-developer-directory-error

% sudo xcode-select -switch /Library/Developer/CommandLineTools

以上

この状態で再度 yarnコマンドを叩くと

% yarn
yarn install v1.21.1
info No lockfile found.
[1/4] 🔍  Resolving packages...
warning nuxt > @nuxt/webpack > @nuxt/babel-preset-app > core-js@2.6.11: core-js@<3 is no longer maintained and not recommended for usage due to the number of issues. Please, upgrade your dependencies to the actual version of core-js@3.
[2/4] 🚚  Fetching packages...
[3/4] 🔗  Linking dependencies...
warning " > vuex-class@0.3.2" has unmet peer dependency "vue@^2.5.0".
warning " > vuex-class@0.3.2" has unmet peer dependency "vuex@^3.0.0".
warning " > vuex-class@0.3.2" has unmet peer dependency "vue-class-component@^6.0.0 || ^7.0.0".
[4/4] 🔨  Building fresh packages...
success Saved lockfile.
✨  Done in 150.13s.

と正常に完了しました。
CatalinaになりNode.js周りで苦しんでる方の悩みが解消できたら幸いです👏

Viewing all 8835 articles
Browse latest View live